How To Make An Electric Violin: DIY Guide
You can make an electric violin by fitting a pickup, adding simple wiring, and building or modifying a suitable body.
Learning how to make an electric violin is part woodworking, part instrument setup, and part basic electronics. The best results come from controlling vibration, reducing unwanted noise, and protecting the violin’s natural playability. This guide explains the full process, from choosing a design to testing the finished instrument, with practical tips that help avoid common beginner mistakes.
What an Electric Violin Does
An electric violin turns string vibration into an electrical signal. A pickup senses the movement, and a cable sends that signal to an amplifier, audio interface, effects pedal, or recording system.
Unlike an acoustic violin, an electric violin does not need a hollow body to project sound across a room. This gives you more freedom with shape and materials. However, the neck, bridge, fingerboard, tailpiece, and string length still need careful attention.
A well-made electric violin should provide:
• Clear string response
• Comfortable left-hand spacing
• Stable tuning
• Low feedback on stage
• A strong signal with little unwanted noise
• Easy access to controls and output connections
An electric violin can use a solid body, a hollow body, or even a modified acoustic violin. Each design has different strengths. A solid body is often easier to control at high volume, while a hollow body may feel closer to a traditional instrument.

Choose the Best Electric Violin Design
Before learning how to make an electric violin, decide what type of instrument you want. Your choice affects the tools, cost, sound, and amount of work involved.
Option 1: Modify an acoustic violin
This is the fastest approach. You can add a bridge pickup, sound-post pickup, or removable contact pickup to an existing violin.
This method is useful if you want to experiment without cutting wood. It also lets you keep playing the violin acoustically. The main limitation is that a temporary pickup may not look as clean or sound as balanced as a built-in system.
Option 2: Build a solid-body electric violin
A solid-body design is often the best choice for a first full build. It needs less internal carving than an acoustic violin, and it usually produces less feedback.
You can make the body from maple, ash, alder, walnut, poplar, or another stable hardwood. Many builders use a thin body because the instrument does not need a large sound chamber.
Option 3: Build a hollow or chambered body
A hollow or chambered body can add acoustic character. It may also feel more familiar to players who enjoy the response of a traditional violin.
The tradeoff is greater complexity. Thin wood can crack, internal parts need support, and loud amplification may cause feedback. If this is your first project, a solid body is usually easier to manage.
Option 4: Make a minimalist frame violin
Some electric violins use a narrow frame instead of a full body. This reduces weight and creates a modern look.
A frame design must still support the neck, bridge, tailpiece, and electronics. Since there is less material around the bridge, the structure must be strong enough to resist string tension.

Plan the Scale, Neck, and String geometry
the most important part of learning how to make an electric violin is understanding string geometry. A beautiful body cannot fix a neck that is too short, too long, twisted, or set at the wrong angle.
A standard full-size violin has a vibrating string length of about 328 millimeters, though exact measurements vary by instrument. Smaller violins use shorter lengths. Choose one scale and copy it accurately.
Plan these measurements before cutting wood:
• Nut to bridge distance
• Neck length
• Fingerboard length and taper
• Bridge height
• String spacing
• Tailpiece position
• Neck angle
• Body thickness
Use a full-size drawing or reliable violin plan. Mark the center line on every part. This center line helps you place the neck, bridge, tailpiece, and pickup correctly.
The bridge must sit at the correct scale position. A small error can affect intonation across every note. I have seen many first builds look excellent but play poorly because the bridge was placed by eye. Measure from the nut instead of guessing from the body shape.
Fingerboard considerations
A violin fingerboard is curved across its width. This curve allows the player to bow one string without striking the others.
You can buy a finished ebony fingerboard, which saves time and improves accuracy. Making one from raw wood is possible, but it requires careful planing, scraping, and shaping.
The fingerboard should have a smooth longitudinal curve called relief. It should not be perfectly flat. Too much relief makes the instrument hard to play, while too little can cause buzzing.
Neck angle and projection
The neck must meet the body at a stable angle. The fingerboard projection near the bridge is commonly set around 27 millimeters on a full-size violin, although the exact value depends on the design and bridge.
This measurement affects bridge height and playing comfort. Make a temporary neck jig before final assembly so you can check the angle without committing to glue.
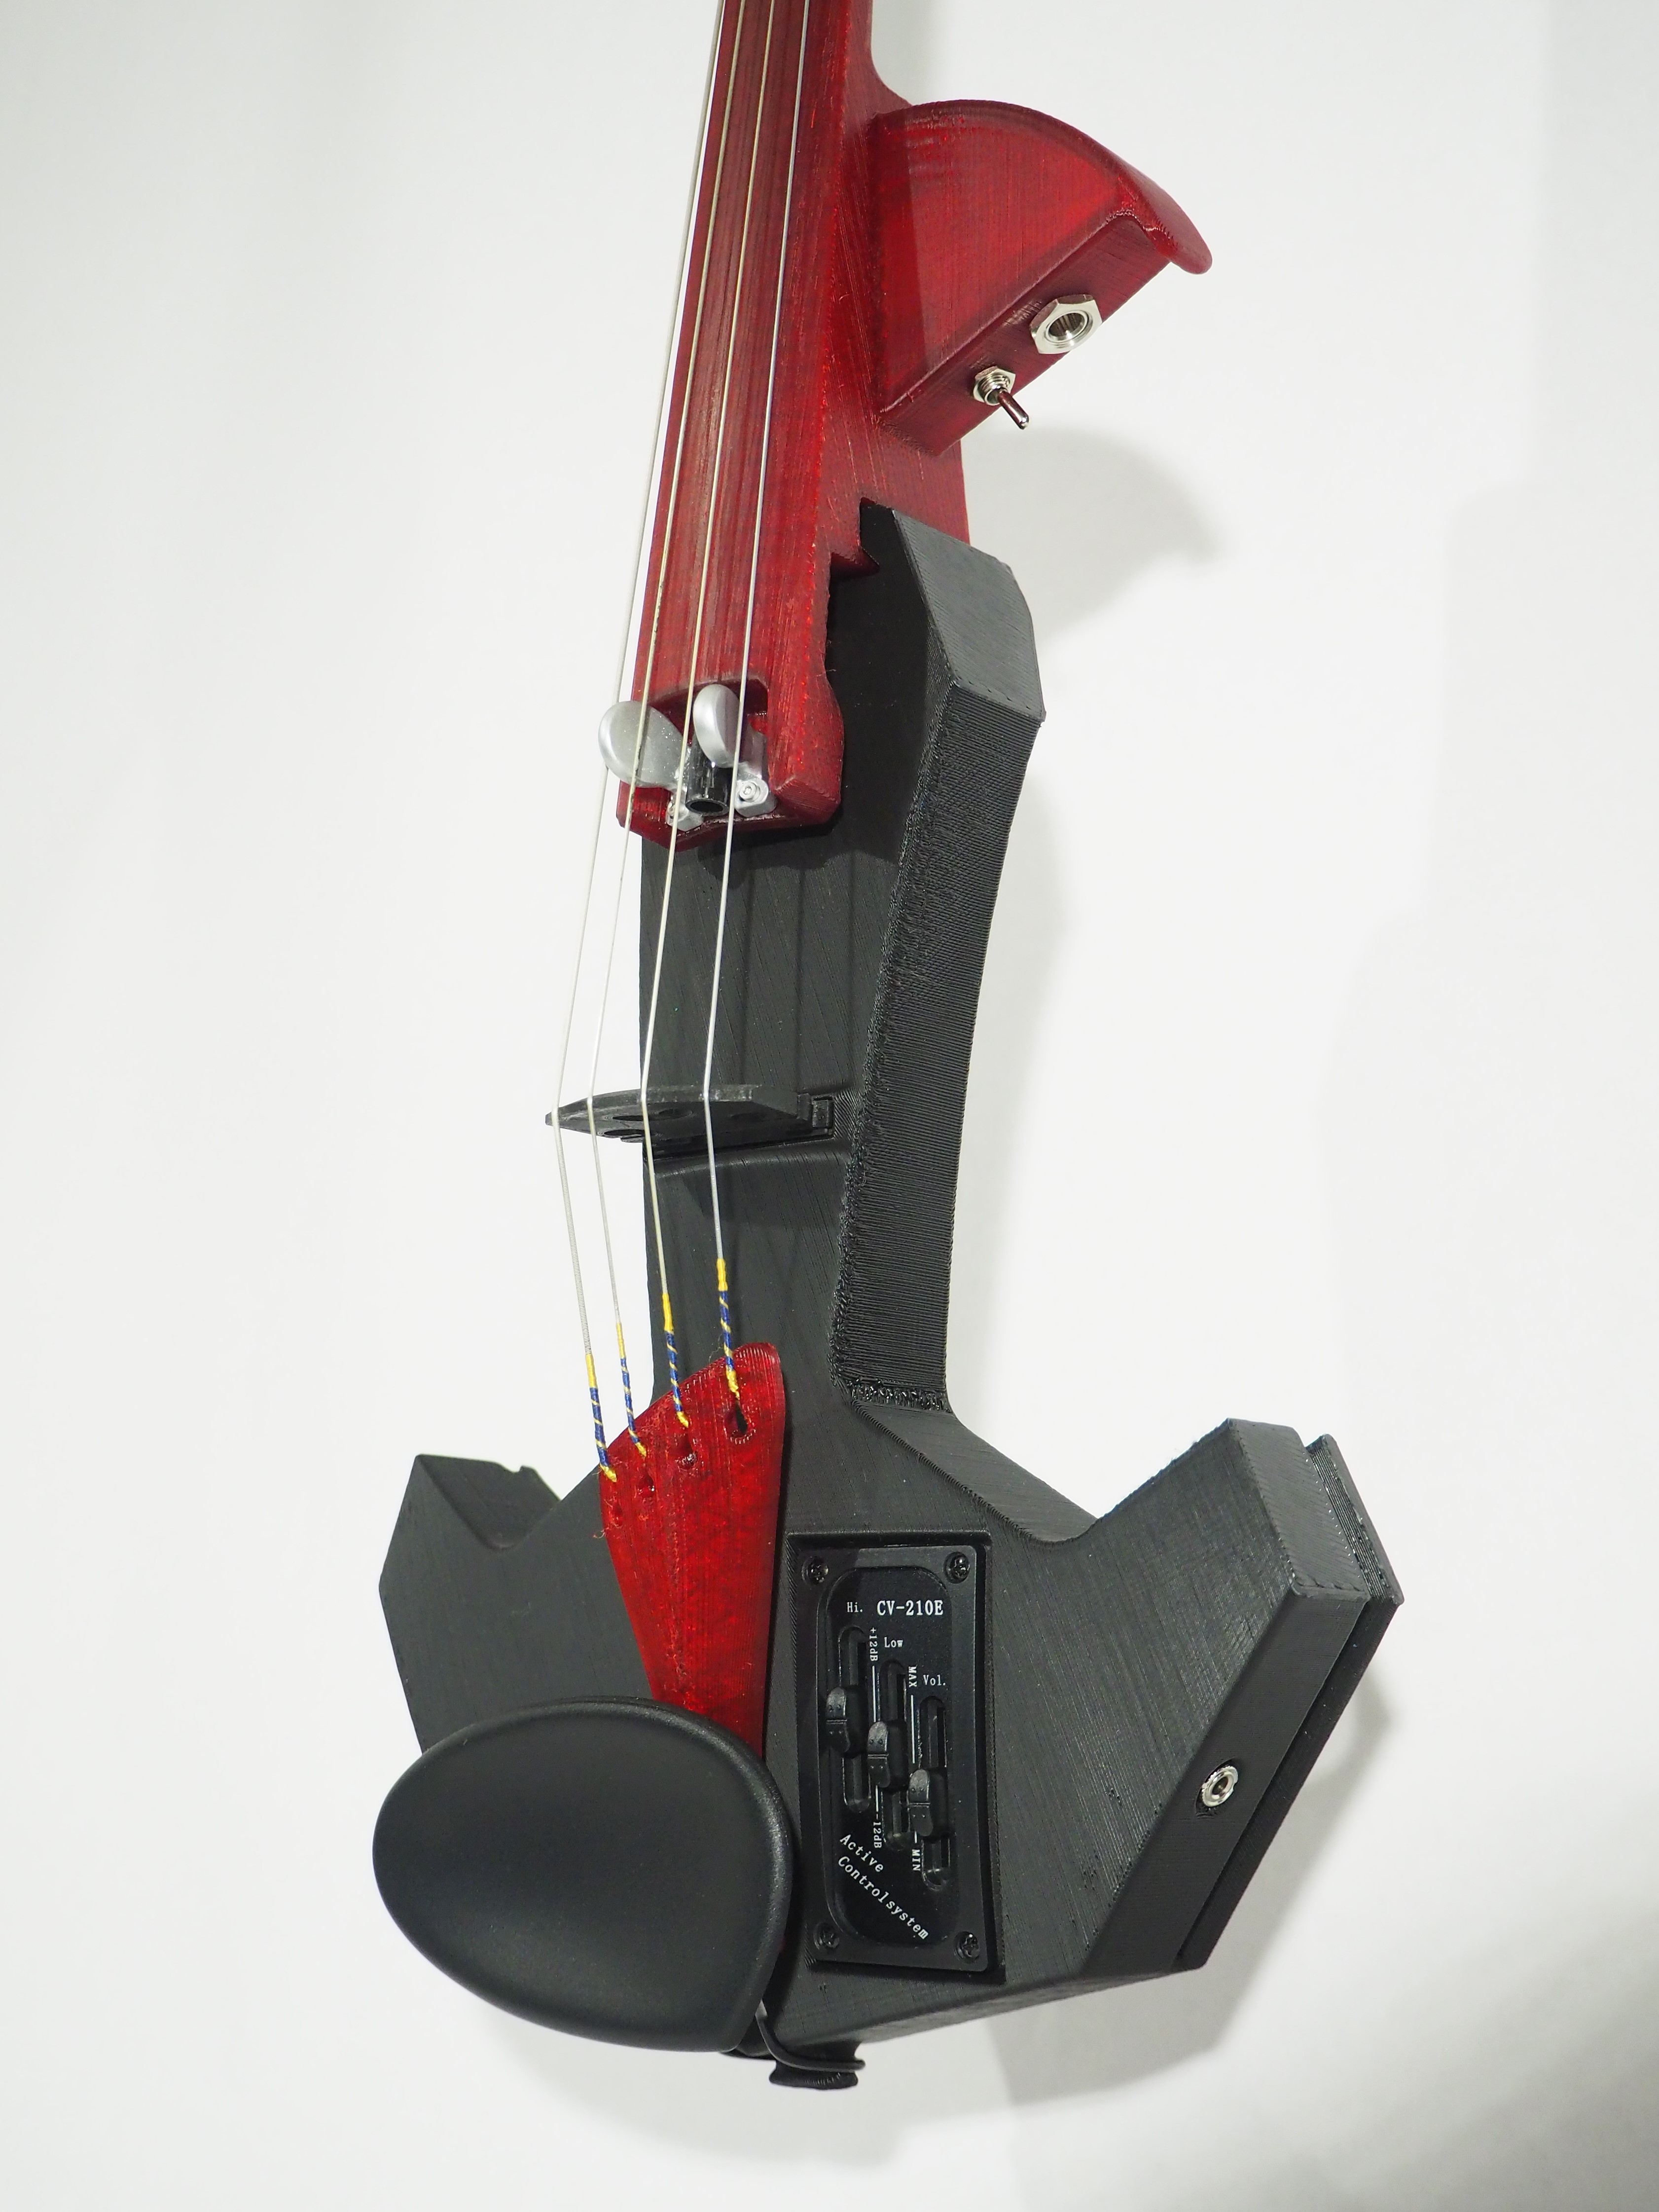 geometry”
style=”max-width: 100%; height: auto; border: 2px solid black; border-radius: 10px; display: block; margin: 0 auto;”
loading=”lazy”
/>
Gather the Materials and Tools
A careful materials list makes the project smoother. You do not need every specialist tool at once, but accurate measuring tools are essential.
Main materials
• Stable hardwood for the body
• Maple or another strong wood for the neck
• Ebony fingerboard
• Violin bridge
• Tailpiece
• Fine tuners
• Pegs or geared tuning machines
• Violin strings
• End button or tailpiece anchor
• Pickup
• Shielded instrument wire
• Potentiometers, if you want volume or tone controls
• Output jack
• Solder
• Shielding foil or conductive shielding paint
• Wood glue suitable for instrument work
• Finish, such as oil, shellac, or a durable lacquer
For a first build, buying the bridge, fingerboard, pegs, and tailpiece is sensible. These parts require specialized shaping and have a direct effect on playability.
Useful tools
• Ruler and calipers
• Straightedge
• Marking knife
• Coping saw or band saw
• Router or rotary tool
• Chisels
• Rasps and files
• Hand planes
• Drill and drill bits
• Clamps
• Soldering iron
• Multimeter
• Sandpaper
• Protective glasses and hearing protection
A multimeter is especially useful. It can help you test continuity, find short circuits, and confirm that the output jack and controls are wired correctly.
Wood safety
Wear eye protection when cutting, drilling, or sanding. Use dust collection or a suitable respirator when working with fine wood dust. Never rush a cut because instrument parts are small and easy to damage.

Select and Install the Pickup
The pickup is the heart of an electric violin. It determines how string vibration becomes an electrical signal.
Piezoelectric pickups
Piezo pickups are the most common choice for electric violins. They respond to pressure and vibration. A piezo element may sit under the bridge, inside a bridge wing, beneath the bridge feet, or against another vibrating part.
Advantages include:
• Good resistance to feedback
• Simple installation
• Low weight
• Strong response to bowing
• Compatibility with passive or active circuits
Piezo pickups can sound bright or harsh if they are pressed unevenly. Bridge pressure must be balanced across the strings. A preamp or buffer can also improve the sound because piezo elements often work best with a high input impedance.
Magnetic pickups
Magnetic pickups sense changes in a magnetic field. They require suitable strings, usually with ferrous metal content.
They can offer a smoother and more familiar electric-instrument sound. However, they may respond differently to various violin strings, and their design can be harder to hide beneath the bridge.
Contact microphones
A contact microphone attaches to the instrument and senses body vibration. It is easy to test and can work well for experimental builds.
Its sound depends strongly on where you place it. Moving the contact point only a few centimeters can change the balance between low, mid, and high frequencies.
Pickup placement tips
Place the pickup where it receives useful vibration without blocking the bridge or weakening the body.
• Keep the pickup firmly seated
• Avoid crushing piezo elements
• Use flexible, shielded wire
• Leave enough wire for repairs
• Secure loose wires so they cannot buzz
A practical lesson from pickup experiments is that more contact does not always mean better sound. A pickup that is too tightly clamped can sound thin or uneven. Test the pickup before permanently routing the body.

Build the Body and Neck
Once your plan is ready, transfer the body outline to your selected wood. Mark the center line, bridge position, neck pocket, pickup route, control cavity, and output jack location.
Cut outside the line first. You can remove small amounts of wood later, but you cannot easily replace a section that was cut too far.
Shape the body
A solid electric violin body can be between roughly 20 and 35 millimeters thick, depending on the wood and design. Leave extra material around the neck joint, bridge area, and tailpiece anchor.
Round the edges only after the main shape is correct. A larger roundover feels comfortable, but sharp decorative curves may weaken the body.
Make the neck joint strong
The neck receives constant stress from the strings. Use a stable joint, such as a deep tenon, bolt-on joint, or carefully fitted glued joint.
A bolt-on neck is easier to remove and repair. A glued neck can look more traditional but requires greater accuracy.
For a first project, a reinforced bolt-on neck can be practical. Use strong bolts and a solid mounting block. Avoid relying only on small wood screws.
Shape the neck
The neck should feel smooth but not overly thin. Shape it gradually and check it often in your hand.
The back of the neck should have no sharp ridges. Sand through several grits, but do not remove so much wood that the neck becomes weak.
Install or fit the fingerboard only after confirming that the neck is straight. Check it with a straightedge from several angles.

Wire the Electric Violin
Wiring an electric violin is simple when the circuit is planned first. A basic passive circuit may use only a pickup, volume control, and output jack.
Basic signal path
The signal normally follows this path:
-
Pickup hot wire to the volume control input
-
Volume control output to the output jack tip
-
Pickup ground to the volume control ground
-
Volume control ground to the output jack sleeve
-
Bridge or shielding ground connected where appropriate
A passive circuit does not need a battery. An active circuit uses a battery-powered preamp or equalizer and can provide a stronger, more shaped signal.
Potentiometer values
Piezo pickups often work better with high-value input resistance. A low-value volume pot can reduce brightness and output. Follow the pickup maker’s recommended circuit when available.
If you add a tone control, test it carefully. A tone circuit that works well for a guitar may not suit a piezo violin pickup.
Soldering tips
Heat the wire and terminal together, then apply solder. A good joint should look smooth and secure.
Avoid these common errors:
• Melting insulation with too much heat
• Leaving bare wire exposed
• Creating a cold solder joint
• Reversing the jack tip and sleeve
• Routing signal wires beside noisy power wires
Use a multimeter to check continuity before closing the control cavity. Gently move each wire while testing. A reading that changes may reveal a weak connection.
Shielding and grounding
Shielding can reduce hum from electrical interference. Line the control cavity with conductive foil or shielding paint, then make sure the shielding forms a continuous electrical path.
Do not connect the instrument to household mains electricity. The violin should connect only to low-voltage audio equipment through a proper instrument cable.

Install the Hardware and Set Up the Instrument
After the electronics work, install the bridge, tailpiece, tuners, strings, and end button. Do not fully tighten the strings until you have checked alignment.
The bridge should stand upright, with its feet fitted closely to the instrument surface. The bridge top should have the correct string curve. If the bridge rocks or has gaps beneath its feet, the sound and response may suffer.
Check string alignment
Look from the tailpiece toward the nut. The strings should run in a straight path. They should not drift toward one side of the fingerboard.
Check the following:
• String spacing at the nut
• String spacing at the bridge
• Bridge position
• Tailpiece alignment
• Peg or tuner movement
• Clearance above the fingerboard
Tune slowly. New strings stretch, and the neck may settle during the first few hours.
Avoid excessive string tension
Do not install strings that exceed the design’s strength. A violin neck and body can fail if the hardware is weak or the neck joint is poorly made.
If the instrument shows cracks, movement, or unusual bending, loosen the strings and inspect it. When in doubt, ask a violin repair professional to check the structure.
Action and playability
Action is the height of the strings above the fingerboard. Excessive action makes the violin tiring to play. Very low action can cause buzzing.
Make small adjustments. Remove material slowly from the nut, bridge, or fingerboard. These parts are easier to lower than to rebuild.
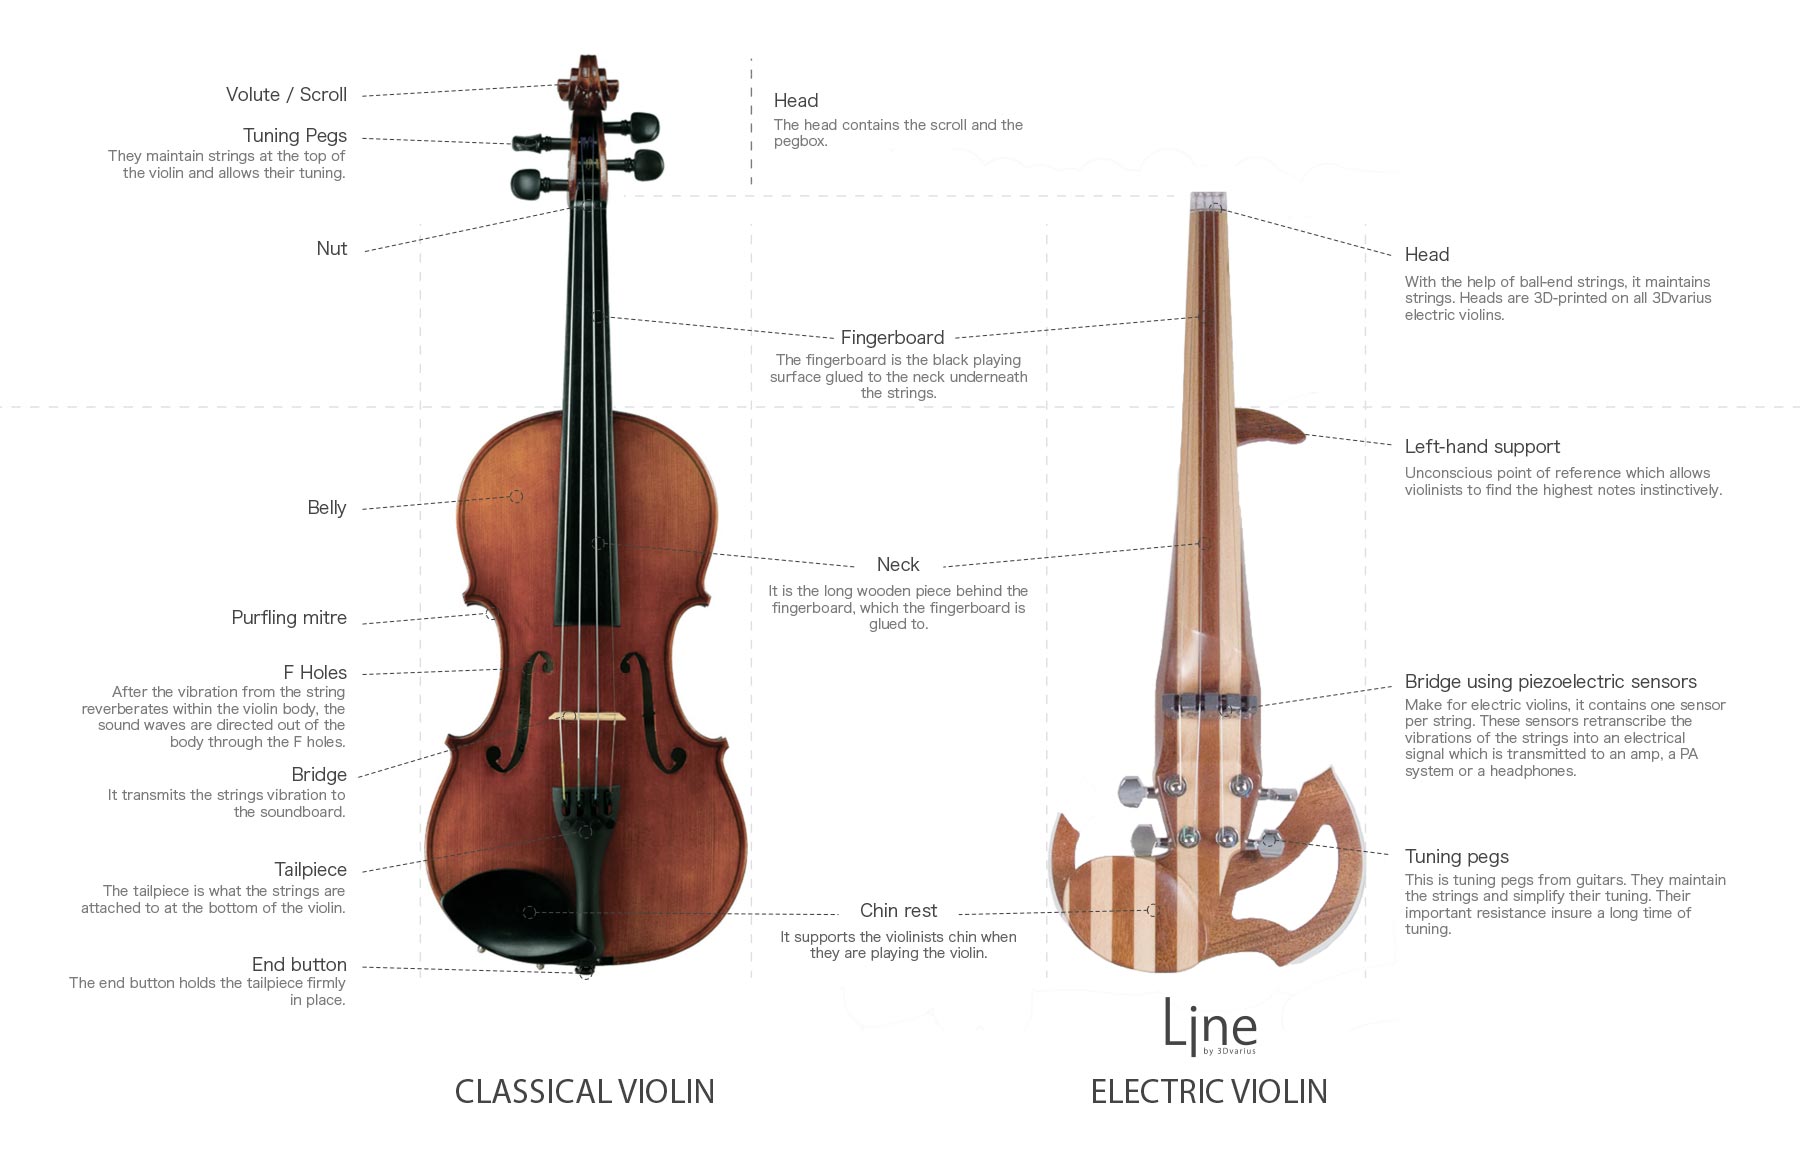
Finish and Protect the Instrument
Finish protects the wood and gives the electric violin its final appearance. It also affects how the instrument feels in your hands.
Oil finishes are simple and can look natural. Shellac gives a traditional appearance but needs careful application. Spray lacquer can create a durable surface, but it requires good ventilation and proper protective equipment.
Before finishing:
• Sand the body evenly
• Remove all dust
• Mask the fingerboard and hardware areas
• Test the finish on scrap wood
• Let every coat dry fully
Do not flood the pickup cavity or electronic parts with finish. Keep conductive shielding and wiring clean.
A thick finish may add weight and make repairs harder. For a solid-body electric violin, durability matters, but there is no need to create an excessively heavy coating.

Test, Troubleshoot, and Improve the Sound
Testing should happen in stages. First, plug the instrument into a small amplifier at low volume. Tap near the pickup and bow each string gently.
Listen for:
• Uneven volume between strings
• Buzzing from loose wires
• Hum when you touch the strings
• Crackling while turning controls
• Weak output
• Excessive feedback
If one string is much louder than the others, check bridge pressure and pickup placement. If the sound is thin, the pickup may need a better preamp or a different load resistance.
If the instrument hums, inspect the ground path. A ground connection should be secure, but never use unsafe household wiring or improvised electrical connections.
Feedback control
Feedback happens when amplified sound causes the instrument to vibrate and sends that signal back into the amplifier.
To reduce feedback:
• Lower the amplifier volume
• Move away from the speaker
• Use a piezo pickup
• Add an onboard preamp or equalizer
• Reduce problematic low frequencies
• Use a solid or well-damped body
A stage-ready electric violin often needs different settings from a studio instrument. In a studio, natural tone may matter most. On stage, stable output and feedback control may be more important.
Record a simple test
Record each string with the same bow pressure and amplifier setting. This helps you compare changes after moving the pickup or adjusting the bridge.
One useful workshop habit is to change only one thing at a time. If you move the pickup, alter the bridge, and change the preamp together, you will not know which change helped.
Common Mistakes to Avoid
Knowing how to make an electric violin also means knowing what not to do. Many problems begin before the first piece of wood is cut.
• Using an unverified scale length: Even a small measurement error can create poor intonation.
• Making the neck too flexible: String tension can pull the neck forward.
• Gluing before testing: Dry-fit the neck, bridge, pickup, and hardware first.
• Choosing a pickup without checking compatibility: Magnetic pickups may not work well with every string type.
• Ignoring shielding: Unshielded cavities can pick up electrical noise.
• Making the body too heavy: A heavy instrument quickly becomes tiring.
• Routing too close to the edge: Thin wood can crack around cavities and jacks.
• Sanding by eye alone: Use a straightedge and calipers for critical surfaces.
• Skipping the multimeter test: A five-minute continuity check can prevent hours of troubleshooting.
• Copying a guitar circuit without checking the pickup: Piezo and magnetic systems do not behave the same way.
The goal is not to finish quickly. The goal is to create an instrument that stays stable, plays comfortably, and can be repaired later.
Estimated Cost and Build Time
The cost depends on whether you modify an existing violin or build every part yourself.
A basic modified instrument may cost about $100 to $300 beyond the violin, depending on the pickup and electronics. A custom solid-body build can range from $250 to more than $1,000 when you include quality wood, hardware, tools, and finishing supplies.
A first project may take several weekends. The woodworking can be completed quickly, but fitting the neck, shaping the bridge, testing the pickup, and correcting small problems take time.
Your budget should include replacement parts. Strings, bridges, jacks, and soldering supplies are inexpensive compared with the cost of redoing a damaged neck or body.
If you lack woodworking tools, buying a finished neck and fingerboard can be cheaper than purchasing every specialized tool.
Is Building an Electric Violin Worth It?
Building an electric violin is worthwhile if you enjoy making, testing, and improving instruments. It gives you control over the body shape, pickup type, controls, scale, weight, and visual style.
The project may not save money compared with buying a reliable factory-made electric violin. Commercial instruments often include tested electronics, stable hardware, and professional setup.
DIY construction still offers unique benefits:
• A custom fit for your hands
• A personal body design
• Better understanding of instrument electronics
• Easier future repairs
• A rewarding connection with the instrument
For a first attempt, consider making a removable pickup system or modifying a low-cost violin. This lets you learn how the signal behaves before committing to a full custom body.
Frequently Asked Questions About How to Make an Electric Violin
Can I turn a normal violin into an electric violin?
Yes. You can attach a bridge pickup, contact pickup, or sound-post pickup to an acoustic violin and connect it to an amplifier. A removable system is the safest option if you want to protect the original instrument.
What is the best pickup for a homemade electric violin?
A piezo pickup is usually the easiest choice for a homemade electric violin. It is compact, resists feedback, and works well with bridge-based designs, although it may need a high-impedance preamp for a balanced tone.
Does an electric violin need a sound box?
No. An electric violin can use a solid body or a narrow frame because the amplifier creates the audible volume. The body still needs to support the neck, bridge, tailpiece, and electronics.
Can I use regular violin strings on an electric violin?
Usually, yes, when the pickup and instrument design support them. Magnetic pickups may require strings with suitable ferrous material, while piezo pickups generally work with a wider range of violin strings.
How much does it cost to make an electric violin?
A simple modified violin may cost around $100 to $300 in parts. A fully custom electric violin can cost several hundred dollars or more, especially when you include quality hardware, wood, tools, and professional setup.
Why does my homemade electric violin sound harsh?
A harsh sound can come from uneven bridge pressure, poor pickup placement, excessive treble, or an unsuitable input impedance. Test the pickup position, use a suitable preamp, and adjust the amplifier’s high-frequency controls.
Conclusion
Learning how to make an electric violin becomes much easier when you treat the project as three connected systems: mechanical structure, acoustic response, and electronics. Start with accurate scale measurements, use a strong neck joint, choose a suitable pickup, and test every circuit before final assembly.
A simple solid-body design is often the best first project. Build slowly, measure twice, and make small adjustments to the bridge, pickup, and setup. With careful planning, your homemade electric violin can become more than a working instrument; it can become a reliable tool for practice, recording, and live performance. Share your design ideas, document your progress, and keep learning from each test.

Senior Music Reviewer
Alex Carter is a seasoned music reviewer with over a decade of experience in the world of sound and instruments. Passionate about helping musicians and enthusiasts make informed choices, he brings sharp insights and in-depth knowledge to every review. From classical instruments to modern gear, Alex combines technical expertise with a love for music to deliver content that resonates with readers.
As a Senior Music Reviewer and expert author on Tuneluma.com, Alex is dedicated to sharing honest evaluations, practical advice, and thoughtful commentary to guide readers in their musical journey.