How To Fix Violin String: Quick Repair Guide
To fix a violin string, replace damaged strings, reseat loose parts, and tune slowly to protect the instrument.
Learning how to fix violin string problems is a useful skill for every player. A string may snap, slip from the peg, pop out of the fine tuner, or sound wrong because the bridge moved. Each issue needs a slightly different solution. This guide explains how to fix violin string problems safely, with clear steps, simple tools, and practical tips that help prevent damage.

How to identify the violin string problem
Before you try to fix violin string issues, find the real cause. A broken string is easy to spot, but other problems may look similar. A weak sound, buzzing tone, or string that will not stay in tune can come from the peg, bridge, tailpiece, nut, or even poor tuning habits.
Check these common signs:
• A snapped string needs a full replacement.
• A string that slips at the peg may have too few or too many neat wraps.
• A string that comes loose at the tailpiece may not be seated in the fine tuner or tailpiece hole.
• A bridge that leans toward the fingerboard can make tuning unsafe.
• A buzzing sound may come from a loose winding, a damaged string, or a bridge that moved.
• A string that feels rough, rusty, or discolored should usually be replaced.
The violin has many small parts that work together. Think of the string as part of a balanced system, not as an isolated wire. A small bridge movement can change the string angle and place extra stress on the instrument.
If the bridge falls, a soundpost moves, or the top of the violin cracks, stop and contact a qualified violin repairer. These problems are not good beginner repairs.
Tools you need to fix violin string problems
You do not need a large tool kit to fix violin string issues. Use clean, simple tools and work over a safe surface. A table with a soft towel can help protect the violin from scratches.
Prepare the following items:
• A replacement violin string with the correct size and type
• A digital tuner or a reliable tuning app
• A peg compound made for violin pegs
• A soft microfiber cloth
• A pencil with a clean graphite tip
• Small wire cutters for trimming the old string
• A violin case or padded work area
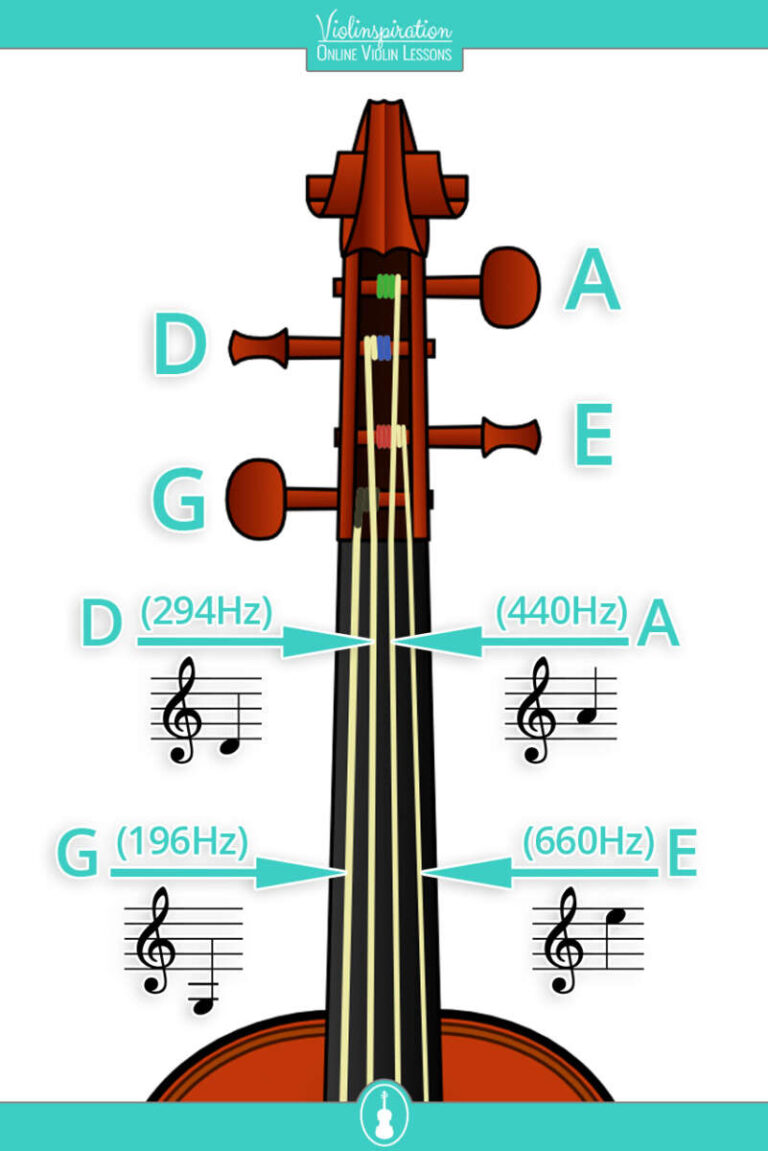
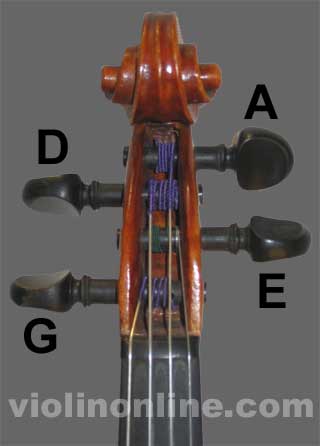
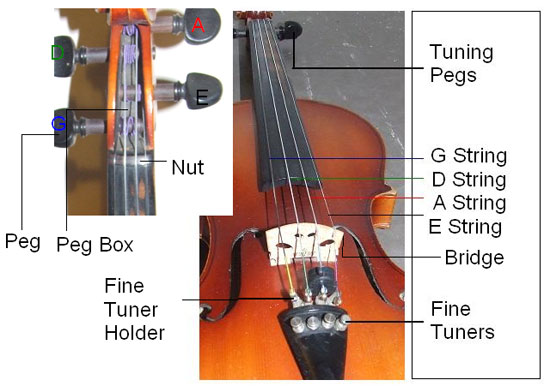
Match the new string to the old one. Violin strings are sold by pitch and position: G, D, A, and E. The E string is the highest and thinnest string, while the G string is the lowest and thickest.
Use the same string type when possible. Steel core, synthetic core, and gut strings have different tension and sound. Mixing types is possible, but a major change can affect tone, response, and tuning stability.
Never use household oil, glue, or harsh cleaners on a violin. These products can stain the varnish or damage the strings. If a peg feels stuck, do not force it. A professional may need to adjust the peg shape or the pegbox.
How to fix violin string by replacing a broken string
The safest way to fix violin string damage is to replace the entire string. Do not tie a broken string back together. A knot will create uneven tension and can snap without warning.
Follow these steps:
- Loosen and remove the broken string
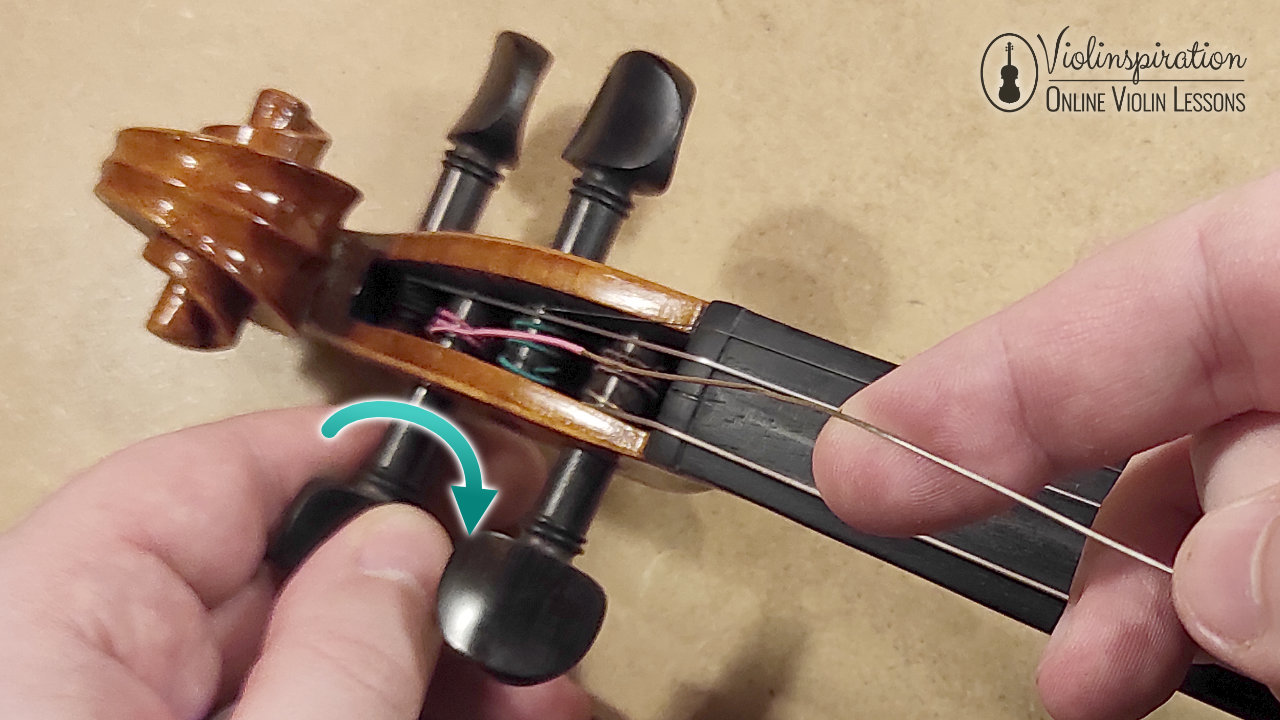
Turn the peg slowly toward you to release tension. If the string is already broken, remove both loose ends from the peg and tailpiece. Use a cloth to wipe away dust near the bridge and fingerboard.
Do not pull hard on a string that is still tight. Sudden tension changes can move the bridge or cause the string to whip back.
- Check the new string
Make sure the replacement string has the correct pitch. Many strings have a small colored winding at one end. The ball or loop end belongs at the tailpiece, depending on the design of your violin and string.
If the string has a ball end, place the ball into the matching slot or fine tuner. If it has a loop end, hook the loop onto the fine tuner. Do not force the end into a space that is too small.
- Attach the string to the tailpiece
Place the end of the string into the tailpiece or fine tuner. Check that it sits fully in the slot. The string should point toward the bridge without rubbing against the edge of the tailpiece.
This is an important step when you fix violin string problems. A poorly seated end can slip later or create a sharp bend that weakens the string.
- Insert the string into the peg
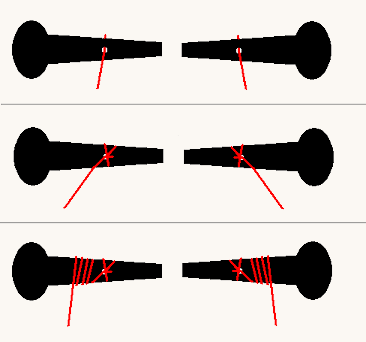
Guide the free end through the hole in the correct peg. Leave about 1 to 2 inches of string beyond the peg hole. This extra length gives you enough material for clean winding.
Turn the peg so the string wraps toward the center of the pegbox. The coils should sit side by side. They should not pile up against the pegbox wall.
- Wind the string slowly
Keep light pressure on the string near the pegbox while turning the peg. This helps the string stay in the hole and prevents loose coils.
Aim for neat wraps. The string should leave the peg in a straight line and pass through the pegbox without rubbing on another peg or string.
- Bring the string to pitch
Tune the string slowly with the peg. Stop when it is close to the correct note, then use the fine tuner for small changes.
New strings stretch for a while. Tune them several times over the next day. Avoid pulling the string hard, since this can damage the winding or place too much stress on the bridge.
- Inspect the bridge
Look at the bridge from the side. Its feet should sit flat on the violin top. The bridge should stand mostly upright, with its back side facing the tailpiece nearly straight.
If the bridge begins to lean, loosen the string slightly and ask a violin teacher or repairer for help. Moving a bridge without experience can damage the violin top.
How to fix violin string that slipped from the peg
A string may slip even when it is not broken. This often happens because the string was not wound neatly or the peg was not pushed gently into the pegbox while tuning.
To fix violin string slippage, first lower the tension. Then unwind the string until you can inspect the peg hole and the coils. Look for crushed winding, sharp bends, or coils that overlap.
Reinsert the string and leave a short tail beyond the peg hole. Wind the coils toward the pegbox center. As you turn the peg, press it inward with gentle pressure. Do not push so hard that the peg becomes stuck.
If the peg keeps slipping, the problem may be the peg fit. Pegs work through friction, and dry weather or worn peg surfaces can reduce that friction. Peg compound may help with minor issues, but a badly fitted peg needs professional care.
A useful lesson from repeated restringing is that slow tuning saves time. Fast turns may seem convenient, but they often create loose coils and unstable tuning. A few careful turns now can prevent several frustrating adjustments later.
 replacing a broken string”
style=”max-width: 100%; height: auto; border: 2px solid black; border-radius: 10px; display: block; margin: 0 auto;”
loading=”lazy”
/>
How to fix violin string at the tailpiece or fine tuner
Sometimes the string comes loose at the bottom of the violin. This can happen when the ball slips out of the fine tuner or when the loop is not fully hooked.
To fix violin string attachment problems, loosen the string before reconnecting it. Never try to force a tight string back into the tailpiece. Sudden release can scratch the violin or injure your fingers.
Check the fine tuner for sharp edges. A rough tuner can cut into the string, especially on the thin E string. If you see a sharp metal edge, have it repaired or replaced.
After reconnecting the string:
• Confirm that the ball or loop is fully seated.
• Make sure the string leaves the tailpiece in a straight line.
• Tune with small turns.
• Watch the bridge as tension returns.
• Stop if the tailpiece twists or lifts.
Some violins use only one fine tuner for the E string. Others use four integrated fine tuners. Either design can work well when properly fitted. A fine tuner that is screwed too far in may have little room for adjustment, so reset it near the middle before installing the string.
How to fix violin string when the bridge moves
The bridge transfers string vibration to the violin body. It is not glued in place. This allows it to be removed and adjusted, but it also means it can move during tuning.
A bridge that leans forward toward the fingerboard is a common problem. If ignored, the bridge may warp or suddenly fall.
To check the bridge:
-
Place the violin on a stable, padded surface.
-
Look at the bridge from the side.
-
Check that both feet touch the violin top evenly.
-
Confirm that the bridge is centered between the fingerboard and tailpiece.
-
Tune each string in small steps.
If the bridge is only slightly out of position and you have been taught how to adjust it, loosen the strings a little before making a very small correction. Hold the bridge securely by both sides and move it with care.
Beginners should not force a bridge into place. Bridge feet must match the shape of the violin top. If the feet no longer sit flat, the bridge may need professional fitting.
When you fix violin string problems, bridge safety should always come first. A string replacement is minor compared with damage to the violin top.
How to fix violin string that sounds bad
A new string may sound bright, thin, or unstable at first. This is normal. Most strings need time to stretch and settle. Tune often, but make only small changes.
A rough or buzzing sound can have several causes:
• The string winding may be damaged.
• The string may not sit correctly in the nut.
• The bridge may be leaning.
• The fine tuner may touch the string.
• The tailpiece may be loose.
• The string may be old or dirty.
Wipe the string after playing with a dry cloth. Rosin dust can build up and make the sound harsh. Do not use alcohol or liquid cleaner unless a trained repairer applies it safely. Alcohol can damage violin varnish.
If the string sounds false even after careful tuning, replace it. Strings wear out through playing, sweat, rosin, and repeated tuning. How often you replace strings depends on use, string type, climate, and sound quality.
Students who play a few times each week may replace strings every several months. Active performers may need replacements more often. The best guide is the string’s condition and response, not a fixed calendar.
How to fix violin string problems without damaging the instrument
A violin can tolerate normal restringing, but it does not tolerate careless force. Keep the instrument supported and make every tension change gradually.
Use these safety habits:
• Work one string at a time when possible.
• Keep the bridge in view while tuning.
• Avoid touching the varnish with oily hands.
• Do not over-tighten a string above its correct pitch.
• Keep your face and eyes away from the string path.
• Stop if you hear a crack, pop, or sudden buzz.
• Ask a teacher or repairer for help with structural problems.
Temperature and humidity also affect violin strings. Dry air can cause pegs to behave differently and may affect the wood. Very damp conditions can make tuning feel slow and unstable. Store the violin in its case and avoid leaving it near a heater, air conditioner, or sunny window.
A reliable tuner helps reduce mistakes. Tune the string close to its target note with the peg, then use the fine tuner for small corrections. This method is more stable than turning the fine tuner through its full range.

Common mistakes when you fix violin string issues
Many string problems come from simple mistakes. The good news is that most are easy to avoid once you know what to watch for.
• Using the wrong string: Check the string name and size before opening the package.
• Winding too many coils: Excess coils can rub against the pegbox or block the peg.
• Winding too few coils: The string may slip through the peg hole.
• Tuning too quickly: Fast tension changes can move the bridge.
• Ignoring a leaning bridge: A warped bridge is harder and more expensive to replace.
• Cutting the string too short: Leave enough length to create stable coils.
• Pulling a new string hard: This can damage the winding and does not properly break in the string.
• Using glue on a peg: Glue can make future repairs difficult and may damage the pegbox.
• Cleaning with household products: Strong liquids can harm varnish and finish.
One mistake I often see in beginner setups is focusing only on the broken string. The player replaces it, tunes quickly, and closes the case. A better habit is to inspect the bridge, tailpiece, peg, and string path before playing.
That short inspection works like checking a bicycle brake before riding. It takes less than a minute and can prevent a larger problem.
When to ask a professional to fix violin string problems
Many players can replace a broken string. Some issues, however, need an experienced violin maker or repair technician.
Ask for professional help when:
• The bridge is warped, cracked, or badly displaced.
• The soundpost falls or moves.
• The violin top or back has a crack.
• A peg will not turn or will not hold.
• The tailpiece is cracked.
• The string repeatedly breaks at the same spot.
• The nut or bridge has a deep groove.
• The fine tuner has a sharp edge.
• The instrument makes a new, serious buzzing sound.
Repeated string breaks can reveal a hidden sharp edge at the bridge, nut, fine tuner, or peg. Replacing strings again and again without finding that edge wastes money and may damage the instrument.
A qualified repairer can inspect string contact points, peg fit, bridge shape, and soundpost position. These adjustments require specialized tools and judgment. The cost of a basic inspection is usually far lower than repairing a cracked violin.
How to prevent future violin string problems
Good care makes it easier to fix violin string issues before they become serious. Wipe the strings after each playing session and keep the violin in a proper case.
Build a simple routine:
-
Check the string winding for rough spots.
-
Look at the bridge before and after tuning.
-
Turn pegs slowly.
-
Keep fine tuners near the middle of their adjustment range.
-
Replace strings when they sound dull or show damage.
-
Keep spare strings in your case.
-
Avoid extreme heat, cold, and dry air.
-
Have the violin inspected if a problem repeats.
Keep one spare set if you perform or travel. A spare string is small, inexpensive insurance. Learn the basic replacement process at home, not for the first time five minutes before a concert.
String choice also matters. A beginner may benefit from a stable synthetic-core set, while another player may prefer steel or gut for a different sound. No string is best for every violin or player. Your teacher or repairer can help match string tension to your instrument.

Frequently Asked Questions About How to Fix Violin String
Can you repair a broken violin string?
No. A snapped violin string should be replaced, not tied or spliced. A repaired knot creates uneven tension and may break suddenly while you play.
How long does it take to fix violin string problems?
Replacing one string often takes 5 to 15 minutes for an experienced player. A beginner may need longer because the string must be wound carefully and brought up to pitch in stages.
Why does my new violin string keep going out of tune?
New strings stretch as they settle. Tune slowly several times during the first day or two, and check that the peg coils are neat and the string is seated correctly at both ends.
Can I replace one violin string at a time?
Yes, replacing one string at a time is often safest for beginners because it helps the bridge keep its position. Replace the full set when several strings are old or when you want a balanced change in tone.
Why does my violin string keep breaking?
A string may break because it is old, damaged, or rubbing against a sharp edge at the bridge, nut, fine tuner, or peg. If the same string breaks repeatedly, have the contact points checked by a qualified repairer.
Should I loosen all the strings when replacing one string?
Usually, no. Keep the other strings at normal tension when replacing one string, unless the bridge has moved or a professional has told you to loosen them. Stable tension helps keep the bridge and soundpost in position.
Can I use any brand of violin string?
You can use different brands, but string sets have different tension, materials, and sound. Choose a string made for your violin size and consult a teacher or repairer before making a major change.
Conclusion
To fix violin string problems safely, first identify whether the issue involves a broken string, loose peg, tailpiece, fine tuner, bridge, or worn string. Replace snapped strings instead of tying them, wind new strings neatly, tune in small steps, and watch the bridge as tension returns.
Simple care prevents many problems. Keep a spare string, use a dry cloth, protect the violin from harsh conditions, and ask a professional to handle cracks, soundpost movement, warped bridges, and repeated string breaks. Practice these steps calmly, and you will feel far more confident the next time a violin string lets go. Share your experience, ask a teacher for feedback, or explore more violin care guides to build your repair skills.

Senior Music Reviewer
Alex Carter is a seasoned music reviewer with over a decade of experience in the world of sound and instruments. Passionate about helping musicians and enthusiasts make informed choices, he brings sharp insights and in-depth knowledge to every review. From classical instruments to modern gear, Alex combines technical expertise with a love for music to deliver content that resonates with readers.
As a Senior Music Reviewer and expert author on Tuneluma.com, Alex is dedicated to sharing honest evaluations, practical advice, and thoughtful commentary to guide readers in their musical journey.