
How To Put On Violin Strings: Easy Step-By-Step Guide
To put on violin strings, remove one string at a time, secure each end, and tune slowly.
Learning how to put on violin strings is easier when you understand the path each string takes from the fine tuner to the peg. This guide explains the full process, including string order, bridge safety, tuning, common mistakes, and tips that help new strings settle without damaging your violin.
What You Need Before You Start
Gather your tools before removing a string. A calm setup makes the job safer and faster.
You will need:
• A correctly sized set of violin strings
• An electronic tuner or reliable tuning app
• A peg compound or peg lubricant, if needed
• A soft cloth
• A string winder, optional but helpful
• A pencil with graphite
• Small wire cutters, only if the string has excess winding
• A stable, clean work surface
Choose strings made for a full-size or fractional violin that matches your instrument. A 4/4 violin needs full-size strings, while a 3/4 violin needs strings made for that smaller scale.
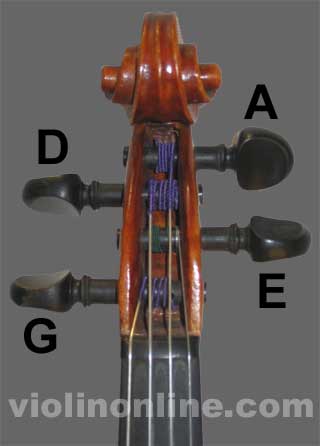
Most violin sets follow this order from lowest pitch to highest pitch:
• G string: thickest string
• D string
• A string
• E string: thinnest string
The string packaging usually labels each string. Never rely only on color because color codes differ between brands.
A soft towel can protect the violin from scratches. However, do not place a thick towel under the bridge. It can change the violin’s position or put pressure on the top.

Before You Remove the Old String
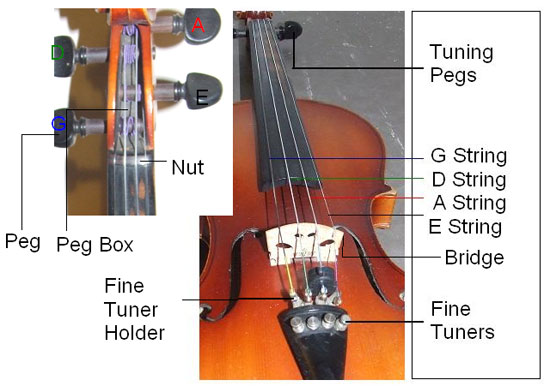
Inspect the violin first. Look at the bridge, tailpiece, fine tuners, and tuning pegs.
The bridge should stand upright, with its feet flat on the violin’s top. The side facing the tailpiece is usually slightly lower than the side facing the fingerboard. If the bridge already leans, take a photo before changing the string.
Replacing one string at a time is the safest method for most players. It keeps the bridge and soundpost under normal tension.
Removing all four strings at once can allow the bridge to fall. It may also let the soundpost move. A soundpost that falls or shifts usually needs help from a violin repair professional.
Before loosening the old string, check its route:
• From the tailpiece or fine tuner
• Over the bridge
• Along the fingerboard
• Through the correct peg hole
• Around the tuning peg
This simple check helps you copy the original setup.
I once saw a player remove all four strings to “make the job easier.” The bridge slipped, the soundpost fell, and a basic string change became a repair visit. Replacing one string at a time may feel slower, but it prevents many avoidable problems.

How to Put on Violin Strings Step by Step
The basic process is similar for the G, D, A, and E strings. Start with the string you need to replace, and keep the other three strings at normal tension.
1. Loosen the old string
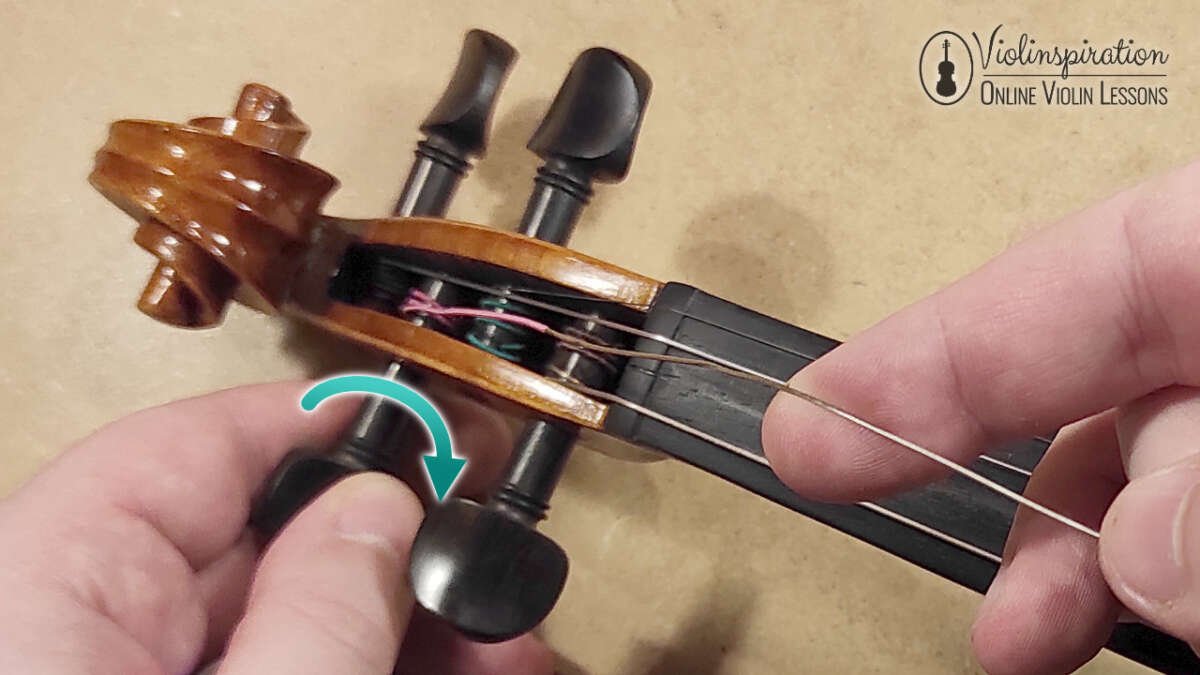
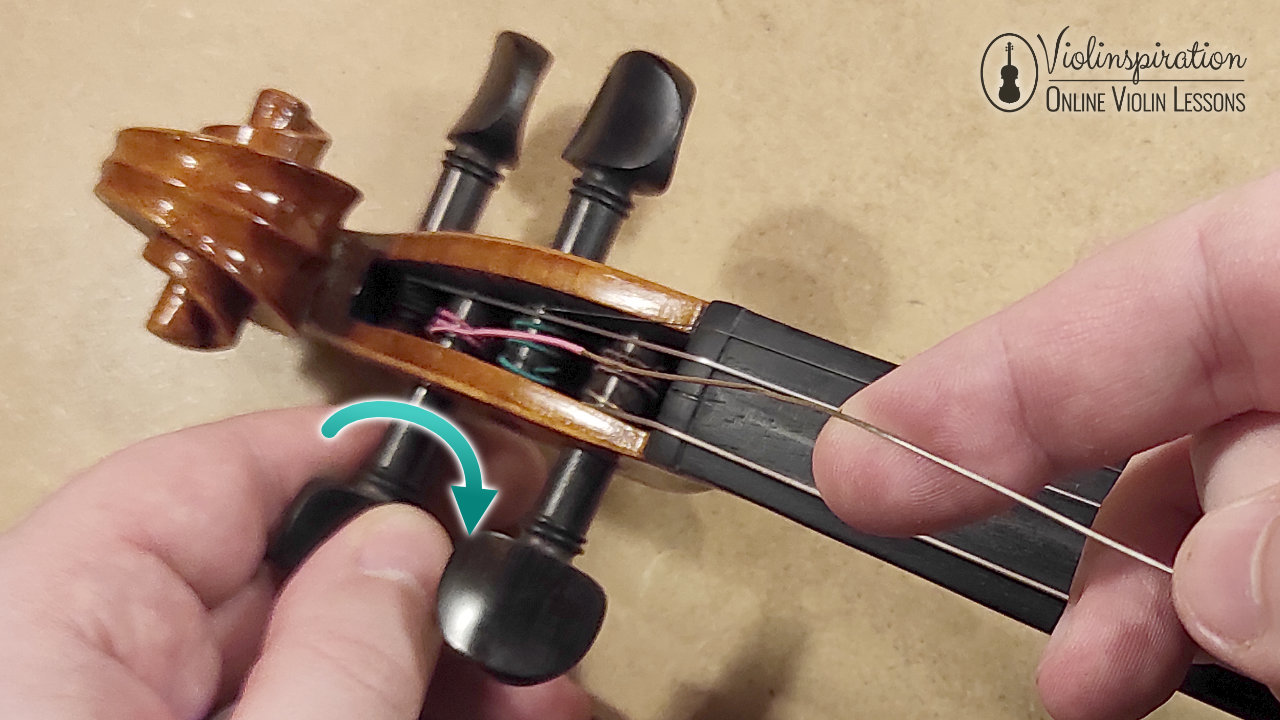
turn the tuning peg slowly so the string becomes loose. Turn the peg in the direction that unwinds the string from its post.
Do not pull a tight string out of the peg hole. A sudden release can make the string whip around or scratch the violin.
Once the string is loose, remove it from the peg. Then lift its ball end from the tailpiece or fine tuner.
Some strings have a small ball at the end. Others use a loop, especially certain E strings. Use the end style that matches your tailpiece and fine tuner.
2. Prepare the new string
Open only the string you plan to install. Check its label and compare its thickness with the old string.
Straighten the string gently with your fingers. Do not bend sharp kinks into it. A tight bend near the winding can weaken the string and cause early breakage.
If the string has a colored silk winding, keep that section in the peg area and tailpiece area as designed by the manufacturer. The colors help identify the string and can show whether the string is positioned correctly.
3. Attach the string to the tailpiece
Place the ball end into the correct hole or fine tuner. Make sure the ball sits fully in its slot.
If your violin has built-in fine tuners, the string should pass through the tuner’s hook or channel. The string must sit straight and should not rub against a sharp metal edge.
For a loop-end E string, place the loop over the fine tuner hook. Check that it is fully seated before adding tension.
4. Guide the string over the bridge
Lay the string in the correct bridge groove. The string should run in a straight line from the tailpiece to the fingerboard.
The groove should hold the string without trapping it. If the string sits beside the groove, it may pull the bridge sideways or create a poor playing response.
A small amount of graphite from a sharpened pencil can reduce friction in the bridge groove and the nut groove. Do not cut the groove deeper yourself. Nut and bridge work requires careful fitting.
5. Thread the string through the peg
Turn the peg so its hole faces along the path of the string. Feed the string through the hole, leaving about 1/8 to 1/4 inch of string beyond the hole.
The exact amount depends on the peg and string. You need enough material for the first wrap, but too much excess can create messy coils.
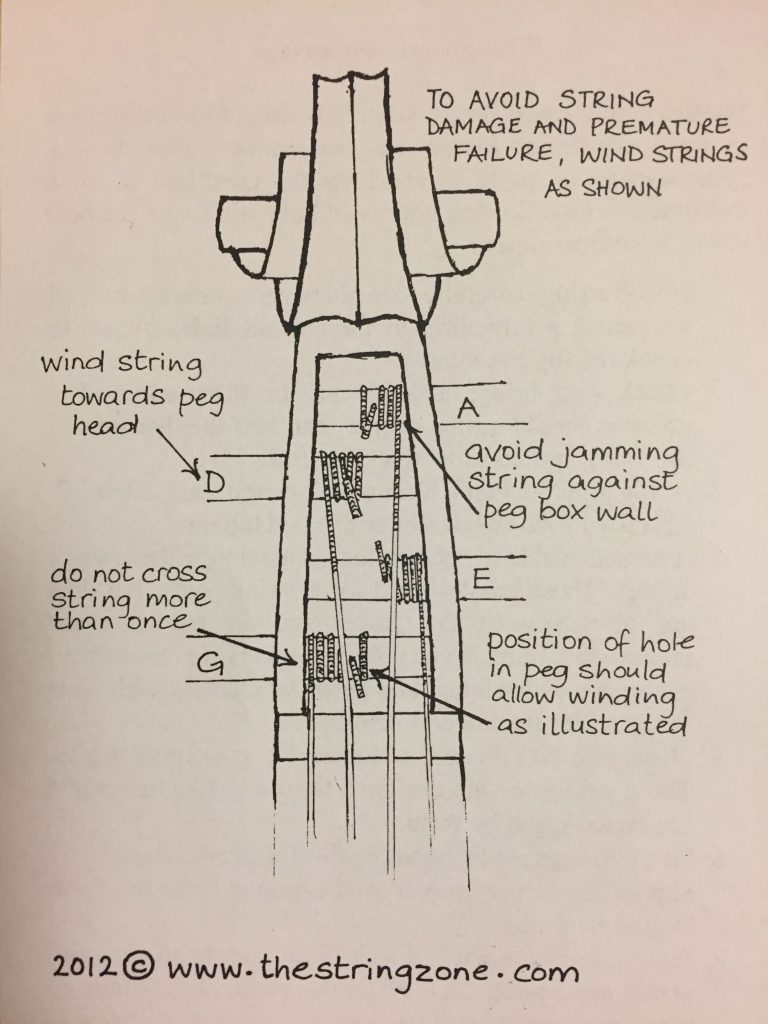
For the G and D strings, the string usually winds toward the inner side of the pegbox. For the A and E strings, the direction is mirrored. The goal is the same: the coils should build neatly toward the pegbox wall without touching it.
6. Wind the string neatly
Begin turning the peg slowly while keeping light tension on the string with your other hand. This prevents loose coils and helps the string seat correctly.
Each coil should sit beside the previous coil. Do not stack coils over one another.
Keep the winding close to the pegbox wall, but leave enough space so the string does not rub against the wood. The string should leave the peg in a clean line toward the nut.
Stop when the string has enough tension to remain in the bridge groove. Do not tune to pitch yet.
7. Check the bridge position
Look at the bridge from the side. It should remain upright and centered between the f-holes.
As you tighten the string, the bridge can lean toward the fingerboard. If this happens, loosen the string slightly and use clean, gentle pressure to bring the bridge back upright.
Do not force the bridge while the string is fully tight. If it feels stuck, stop and ask a teacher or luthier for help.
8. Bring the string close to pitch
Use a tuner and raise the pitch slowly. Tune the string to the correct note:
• G3 for the G string
• D4 for the D string
• A4 for the A string
• E5 for the E string
Tune upward whenever possible. If you pass the note, loosen the string below the target and tune upward again.
New strings often stretch during the first few minutes. This is normal. Tune in small steps and check the bridge after each adjustment.

How to Tune and Stretch New Violin Strings
New strings need time to settle. Their materials stretch slightly, and the windings adjust around the peg and bridge.
You can help the process with gentle stretching. After tuning the string close to pitch, lightly press it down with one finger at several points along the fingerboard. Then tune again.
Use only mild pressure. Pulling hard on a new string can damage the winding or cause it to break. A new string should settle through normal playing, not force.
Repeat this process:
- Tune the string close to its target note.
- Press it gently along the fingerboard.
- Tune it again.
- Check the bridge and tailpiece.
- Play a few slow notes.
- Retune as needed.
New strings may need several tuning checks during the first day. This is especially common with synthetic-core strings. Steel strings may settle faster, but every brand behaves differently.
The string should produce a clear tone without buzzing, rattling, or slipping. If it will not hold pitch, inspect the peg, tailpiece, bridge groove, and nut groove.
Common Mistakes When Replacing Violin Strings
Knowing what not to do is an important part of learning how to put on violin strings.
Removing every string at once
This can cause the bridge to fall and may allow the soundpost to move. Replace one string at a time unless you are experienced with violin setup.
Winding too much string onto the peg
Too many coils can crowd the pegbox. They may touch the pegbox wall or interfere with nearby strings.
Cut excess string only after the string holds pitch. Leave enough length for future peg adjustments.
Letting the bridge lean
A leaning bridge changes the string angle and can damage the bridge feet over time. Check its position during and after the string change.
Tuning too quickly
Turning the peg too fast can overshoot the note. It also increases the chance of breaking the string.
Using the wrong string
A violin string must match the instrument’s scale and setup. A fractional violin needs fractional strings. Mixing unrelated strings can create an uneven sound or uncomfortable tension.
Pulling the string sideways
Sideways force can move the bridge or damage the string’s winding. Keep the string aligned from the tailpiece through the bridge and toward the peg.
Ignoring sharp edges
A sharp tuner hook, bridge groove, or nut groove can cut into the string. If a new string breaks in the same place more than once, have the violin inspected.

Tips for Different Violin Strings
Each string has slightly different handling needs.
G string
The G string is thick and often needs more peg rotation before it reaches pitch. Wind it neatly and make sure it does not rub against the pegbox.
D string
The D string usually settles well, but its lower tension can make loose coils more noticeable. Keep the winding firm as you turn the peg.
A string
The A string is often the most frequently replaced string because players use it heavily. Tune it carefully and check that it sits securely in the bridge groove.
E string
The E string is thin and can break suddenly if it has a sharp bend or catches on a rough groove. Work slowly, especially when the pitch approaches E5.
Some E strings use a protective sleeve where they cross the bridge. Keep the sleeve centered over the bridge groove if the manufacturer supplied one.

When Should You Replace Violin Strings?
There is no single replacement schedule for every player. Playing time, sweat, string type, storage, and sound preferences all matter.
Many active players replace a full set every few months. Casual players may use strings longer, but old strings can lose brightness, stability, and response before they break.
Replace a string when you notice:
• A dull or weak tone
• Poor tuning stability
• Fraying windings
• Rust or discoloration
• A rough feeling under the fingers
• A string that no longer responds well
• A sudden change in volume or balance
You do not always need to replace the full set. Replacing one broken or worn string is fine. However, if the other strings are old, a new string may sound much brighter than the rest.
For auditions, concerts, or recording sessions, install strings early enough to allow them to settle. Changing them minutes before performing can lead to repeated tuning adjustments.
Care After Installing New Strings
Wipe the strings and violin with a clean, dry cloth after playing. Rosin dust can collect on the strings and varnish.
Do not use household cleaners, alcohol, or furniture polish on the violin. These products may harm the varnish or string surface.
Store the violin in a case away from extreme heat, cold, and rapid humidity changes. Wood responds to its environment, and severe changes can affect tuning and structure.
Check the bridge each time you tune. A quick side view can reveal whether it is beginning to lean.
Keep the pegs moving smoothly. If a peg slips or becomes difficult to turn, do not force it. Peg compound may help with minor problems, but a poorly fitted peg needs professional adjustment.
A luthier should inspect the violin if:
• The bridge will not stay upright
• The soundpost has fallen
• The pegbox has a crack
• Strings break repeatedly at the same spot
• A peg slips despite correct winding
• The violin develops a new buzz or rattle
How to Put on Violin Strings Without Breaking Them
The best protection is slow, even tension. Make sure the string is seated in the tailpiece, bridge, nut, and peg before tuning.
Avoid sharp bends near the peg hole. Keep the string aligned as it crosses the bridge. Tune in small turns, especially when you are close to the target note.
If a string breaks, move your face and hands away from the instrument. Although violin strings are small, a broken string can snap with surprising force.
Do not assume every break is caused by bad luck. A rough bridge groove, worn fine tuner, sharp nut edge, or incorrect winding may be the real cause.
If the same string breaks more than once in the same location, stop replacing it and have the violin checked.
Frequently Asked Questions About How to Put on Violin Strings
Can I replace all four violin strings at once?
You can, but it is safer for most players to replace one string at a time. Keeping three strings under tension helps hold the bridge and soundpost in place.
Which violin string should I replace first?
You may replace any string that needs changing. If you are installing a full set, many players begin with the G string and move toward the E string, replacing one string at a time.
How many times should I wrap a violin string around the peg?
Most strings need several neat coils, often around three to five, depending on the peg and the amount of extra string. The coils should sit beside one another and should not touch the pegbox wall.
Why does my new violin string keep going flat?
New strings stretch and settle, so some pitch drop is normal during the first hours or days. If the string keeps slipping badly, check the peg winding, nut, bridge, and tailpiece.
How do I know if my violin bridge is in the correct position?
The bridge should stand upright, with both feet flat on the violin top and its center aligned between the f-holes. If it leans or shifts, loosen the string slightly and correct it gently.
Can I use pencil graphite on a violin bridge?
A small amount of graphite in the bridge and nut grooves can reduce friction during tuning. Use only a light coating, and do not enlarge the grooves.
Why did my violin string break while I was tuning it?
A string may break because of excessive tension, a sharp bend, a rough groove, poor winding, or an old string. If the break happens repeatedly in one place, have that area inspected by a luthier.
Conclusion
Learning how to put on violin strings takes patience, but the process is simple when you work one string at a time. Use the correct string, follow its path from tailpiece to peg, wind it neatly, protect the bridge, and tune in small steps.
New strings need time to settle, so expect to retune them during the first several hours. With careful handling, you can change strings safely and keep your violin sounding clear and balanced.
Practice the process on a quiet day before your next performance. If you found these steps helpful, explore more violin care guides or share your own restringing tips in the comments.

Senior Music Reviewer
Alex Carter is a seasoned music reviewer with over a decade of experience in the world of sound and instruments. Passionate about helping musicians and enthusiasts make informed choices, he brings sharp insights and in-depth knowledge to every review. From classical instruments to modern gear, Alex combines technical expertise with a love for music to deliver content that resonates with readers.
As a Senior Music Reviewer and expert author on Tuneluma.com, Alex is dedicated to sharing honest evaluations, practical advice, and thoughtful commentary to guide readers in their musical journey.