How To Put New Strings On A Violin: Easy Step-By-Step Guide
To put new strings on a violin, remove each old string, fit its replacement, tune slowly, and check the bridge.
Learning how to put new strings on a violin is a useful skill for every player. The job looks simple, but small details matter. A loose bridge, poor peg winding, or sudden string tension can cause trouble. This guide explains the full process in a safe, clear way, with practical tips that help new strings settle faster and sound their best.

What You Need Before Changing Violin Strings
Before you learn how to put new strings on a violin, gather your tools and choose a calm place to work. A table with good light is ideal. Keep the violin on a soft cloth to protect its varnish.
You will need:
• A full set or single replacement violin strings
• An electronic tuner or tuning app
• A clean, soft cloth
• Peg compound, if a peg slips or sticks
• A pencil with soft graphite
• String cutters or small wire cutters
• A violin shoulder rest, if you normally use one
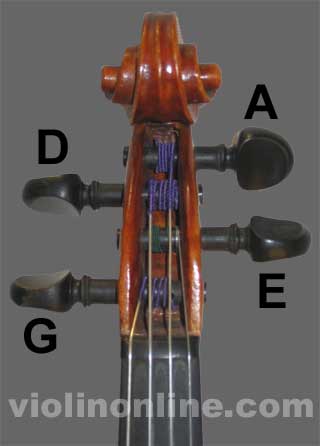
Check the string package before you begin. Violin strings are named from highest to lowest: E, A, D, and G. The E string is the thinnest. The G string is the thickest.
Many players replace one string at a time. This keeps the bridge and soundpost under more stable tension. It also prevents confusion about which string belongs in each peg hole.
Do not change every string at once unless you know how to monitor the bridge and understand your instrument. The bridge can lean, fall, or move when all string pressure disappears. A soundpost may also shift, although this is less common.
When Should You Replace Violin Strings?
Most violinists replace strings when the tone becomes dull, weak, or hard to control. The correct schedule depends on how often you play, how much you sweat, and the type of strings you use.
Common signs include:
• A rough or fuzzy winding
• Rust, discoloration, or broken outer wire
• A string that will not stay in tune
• A flat tone with little projection
• Poor response when you use the bow
• Frequent false notes or unusual buzzing
A student who practices for 30 minutes a day may replace strings every four to six months. A professional who plays for several hours each day may need new strings much sooner. These are general ranges, not strict rules.
Strings also lose their best sound over time. They may still produce a note, but that does not mean they are working well. Fresh strings often improve response, color, and tuning stability.

How to Put New Strings on a Violin
The safest method is to replace one string at a time. Work slowly, and never force a peg or pull a string tight in one quick motion.
1. Identify the correct replacement string
Place the new string beside the violin and confirm its name. The string should match the correct position.
The order from left to right, when the violin faces you, is usually:
- G string
- D string
- A string
- E string
Your violin may have a different fine-tuner setup, but the string order remains the same.
Some strings have colored silk at each end. The colors help identify the string brand and type. Do not rely only on color. Read the label when possible.
2. Loosen and remove the old string
Turn the tuning peg slowly toward you or away from you, depending on the peg position. Watch the string as it loses tension.
Once the string is loose, remove it from the peg. Then lift the ball or loop end from the fine tuner or tailpiece.
Do not yank the string from the peg hole. Unwind it gently. A sharp, loose string can scratch the violin or poke your hand.
Fold or wrap the old string before throwing it away. Loose metal ends can cut skin or damage a case.
3. Check the fine tuner and tailpiece
Look at the fine tuner before installing the new string. The small hook or slot should be open and free of sharp edges.
If the string uses a ball end, place the ball into the fine tuner slot. If it uses a loop end, place the loop over the hook. Some E strings use a special loop or ball design, so check the package.
Make sure the fine tuner screw is not fully tightened. Leave room for later tuning. A good starting point is to turn the screw out until several threads remain visible.
4. Insert the string into the peg
Guide the free end of the string toward the correct peg. Push about 1/4 inch to 1/2 inch through the hole.
Do not push too much string through the hole. Excess string makes clean winding harder. Too little string may slip out while you turn the peg.
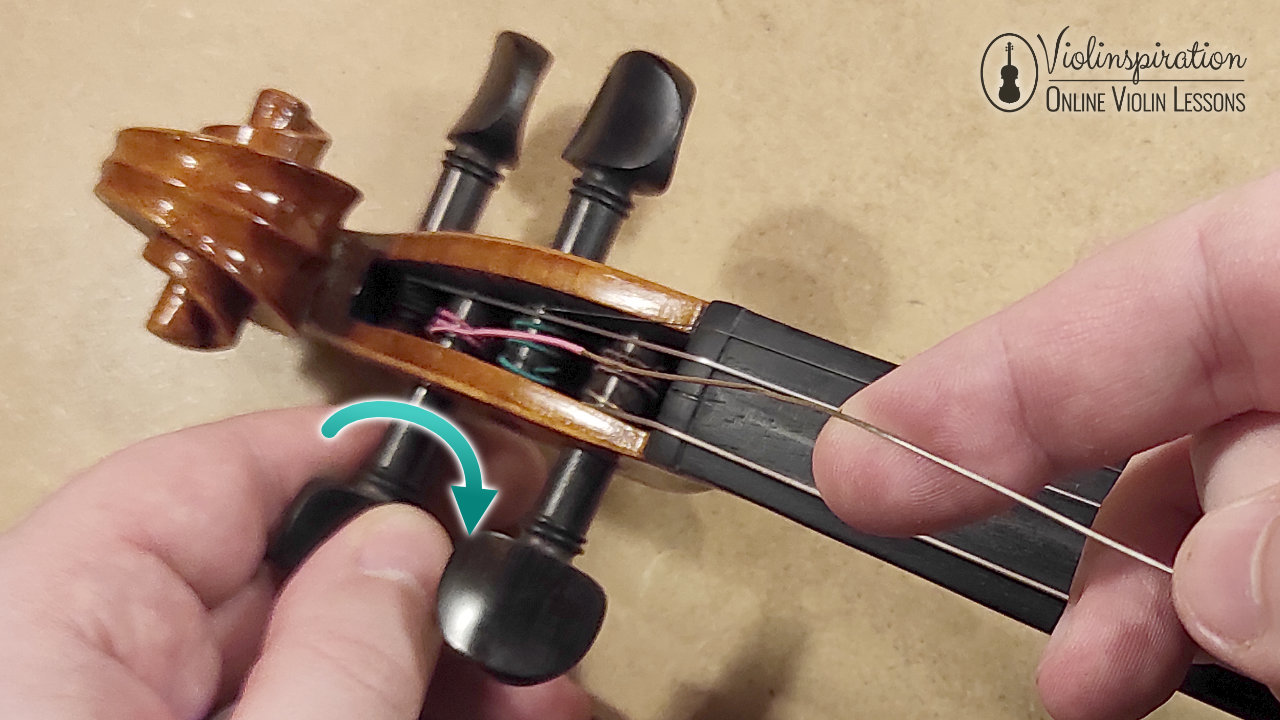
Keep light tension on the string with one hand. With the other hand, turn the peg slowly so the string begins to wrap.
5. Wind the string neatly
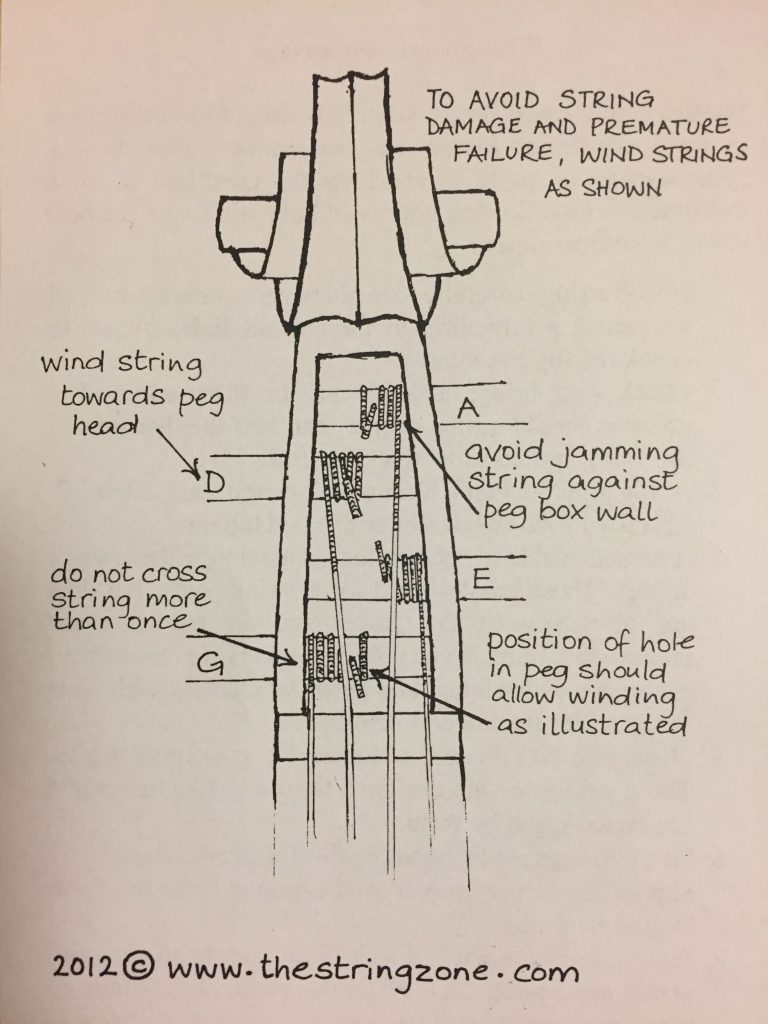
This step is central to learning how to put new strings on a violin. Wind the string in neat, even coils beside the peg wall. Do not stack the coils in a messy pile.
For most violin pegs, the string should wind toward the pegbox wall. The goal is to let the string pull the peg inward as it gains tension. This helps the peg stay secure.
Leave a small amount of space between the coils. Do not let the string rub against the neighboring peg or the wooden pegbox.
On the E peg, space can be tight. Take extra care to keep the winding clean. A tangled E string can break quickly.
6. Guide the string across the bridge
As you raise the tension, watch the bridge. The string should sit in the correct groove. The bridge should remain upright and centered between the f-holes.
The bridge is not glued to the violin. String pressure holds it in place. This is why it can move during a string change.
Use your thumb and fingers to keep the bridge aligned. Do not push hard. If the bridge leans toward the fingerboard, loosen the string slightly and correct it with gentle pressure.
7. Tune the string slowly
Bring the string close to its target note with the peg. Then use the fine tuner for small changes, if your violin has one.
Tune in small steps. New strings stretch, so the pitch may drop several times during the first day. This is normal.
Do not tune far above the correct note. Excess tension can break the string and may stress the instrument. If the string feels unusually tight before reaching the right pitch, stop and check that it is in the correct peg and bridge groove.
How to Keep the Bridge Safe During a String Change
A bridge check is one of the most important parts of how to put new strings on a violin. The bridge should stand nearly straight. Its feet should sit flat on the violin top, and its center should line up between the inner f-hole notches.
The bridge may lean toward the fingerboard as you tune. This happens because the strings pull against the bridge. A small lean can become serious if you ignore it.
To correct the bridge:
- Loosen the strings slightly if the bridge is under strong tension.
- Hold the violin securely over a soft surface.
- Place both thumbs against the lower bridge area.
- Move the bridge gently until its back face is nearly straight.
- Tune again while checking its position.
If the bridge feet lift, the bridge is badly warped, or you feel unsure, stop and contact a violin shop. A trained repairer can fix the problem without damaging the top or varnish.
Never use glue on a violin bridge. The bridge must remain removable for repair and adjustment.
Common Mistakes When Installing Violin Strings
Many string problems come from small mistakes rather than bad equipment. Knowing these errors makes how to put new strings on a violin much easier.
Changing all four strings without checking the bridge
Removing all tension can allow the bridge to fall. The soundpost may also move. Replace one string at a time unless a qualified repairer tells you otherwise.
Winding too much string on the peg
Large coils can touch the pegbox or another peg. This creates friction and makes tuning difficult. Use neat, close windings with only a small amount of extra string.
Placing the string in the wrong groove
The bridge grooves match specific string sizes. A thick G string should not sit in the E groove. The wrong groove can damage the bridge or cause poor spacing.
Tuning too quickly
New strings need time to stretch. Turning the peg sharply can overshoot the note or break the string. Tune in short movements.
Forgetting the nut groove
The string must also sit properly in the small groove at the top of the fingerboard. If it floats above the groove, tuning may feel uneven.
Using too much peg compound
Peg compound can help a slipping peg, but too much can make the peg turn unpredictably. Apply only a small amount, and use a professional if the peg still slips or sticks.
In my experience helping players with string changes, messy peg winding causes more trouble than the string itself. Take an extra minute to guide each coil. That small habit saves many tuning problems later.

How to Stretch and Settle New Violin Strings
New strings rarely stay in tune right away. Their materials stretch as they adjust to tension. This is especially common with synthetic-core strings.
After installing a string, tune it to the correct note. Then gently pull the string upward by a small amount over the fingerboard. Use light pressure only. Retune it afterward.
Repeat this process once or twice. Do not pull hard. Strong pulling can damage the string, bridge, or tailpiece.