How To Press Violin Strings: Easy Safe Guide
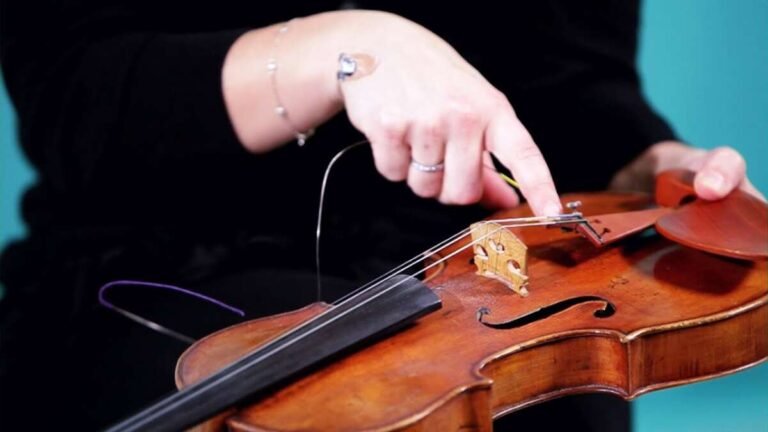
To press violin strings well, use gentle fingertip pressure near the fingerboard while keeping your hand relaxed and curved.
learning how to press violin strings is one of the first skills that shapes your tone, pitch, speed, and comfort. The best players do not use force; they use accurate finger placement, steady hand shape, and only enough pressure to stop the string cleanly. This guide explains the method step by step, along with common mistakes, practice drills, and tips drawn from standard violin technique.
What It Means to Press Violin Strings
When violinists talk about pressing a string, they mean using a left-hand finger to stop the string against the fingerboard. This changes the string’s vibrating length and creates a higher note.
A violin has no frets. Your finger must create the stopping point that frets provide on a guitar. That is why small changes in finger position can affect pitch so much.
The goal is not to push the string hard into the fingerboard. You need only enough pressure to produce a clear note without a scratchy buzz.
A good pressed note has three qualities:
• It sounds clear and steady.
• It matches the correct pitch.
• Your finger, hand, wrist, and thumb remain relaxed.
Think of your fingertip as a soft doorstop. It stops the string in the right place, but it does not crush it.
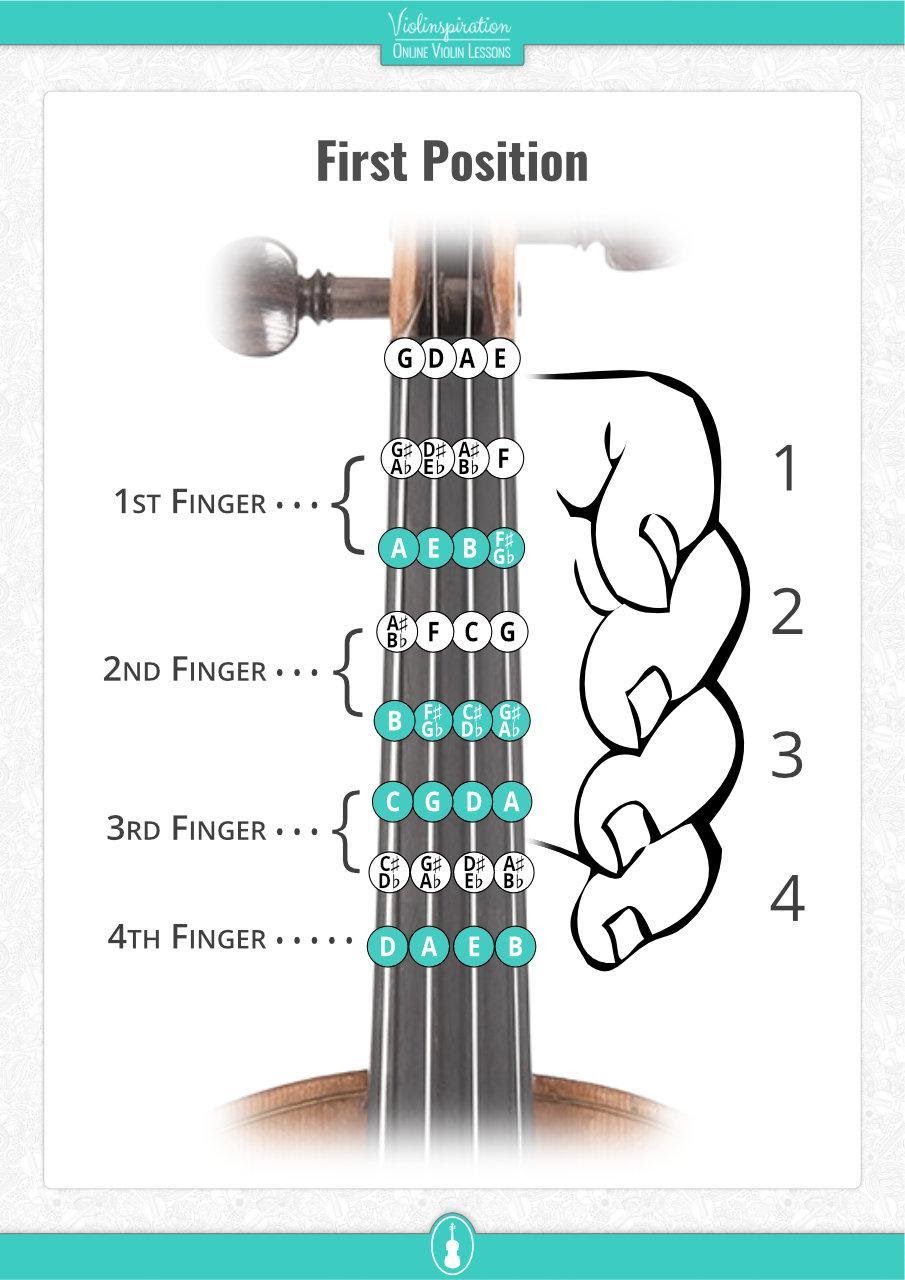
How to Press Violin Strings Correctly
Follow these steps when learning how to press violin strings.
1. Set your left-hand position
Hold the violin securely between your chin and shoulder. Your left hand should support the neck without gripping it tightly.
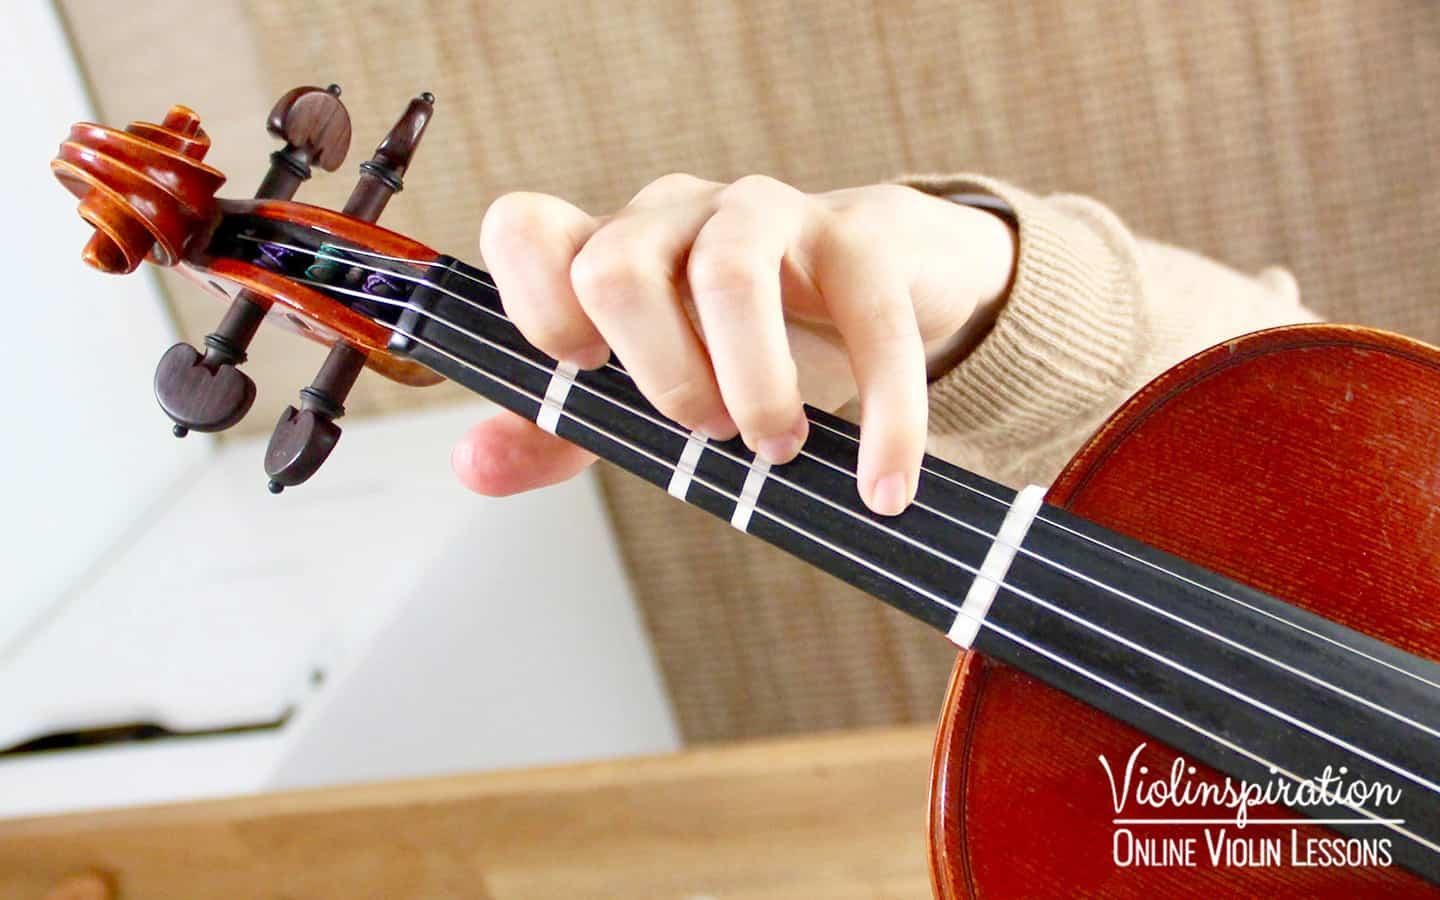
Keep your wrist fairly straight. Avoid bending it sharply inward or outward. Your fingers should arch over the strings, much like small bridges.
Your thumb should rest lightly under the neck. It should not squeeze against your fingers. A relaxed thumb gives your fingers more freedom to move.
2. Use the fingertip
Place the string near the soft pad of your fingertip, just behind the nail. Avoid using the flat part of the finger.
A curved fingertip gives you better control. It also helps the neighboring strings stay open if you need to play them.
For most players, the first finger is easiest to control. Start with a simple note on the A or D string. Place the finger down slowly and listen for a clean sound.
3. Press close to the correct note position
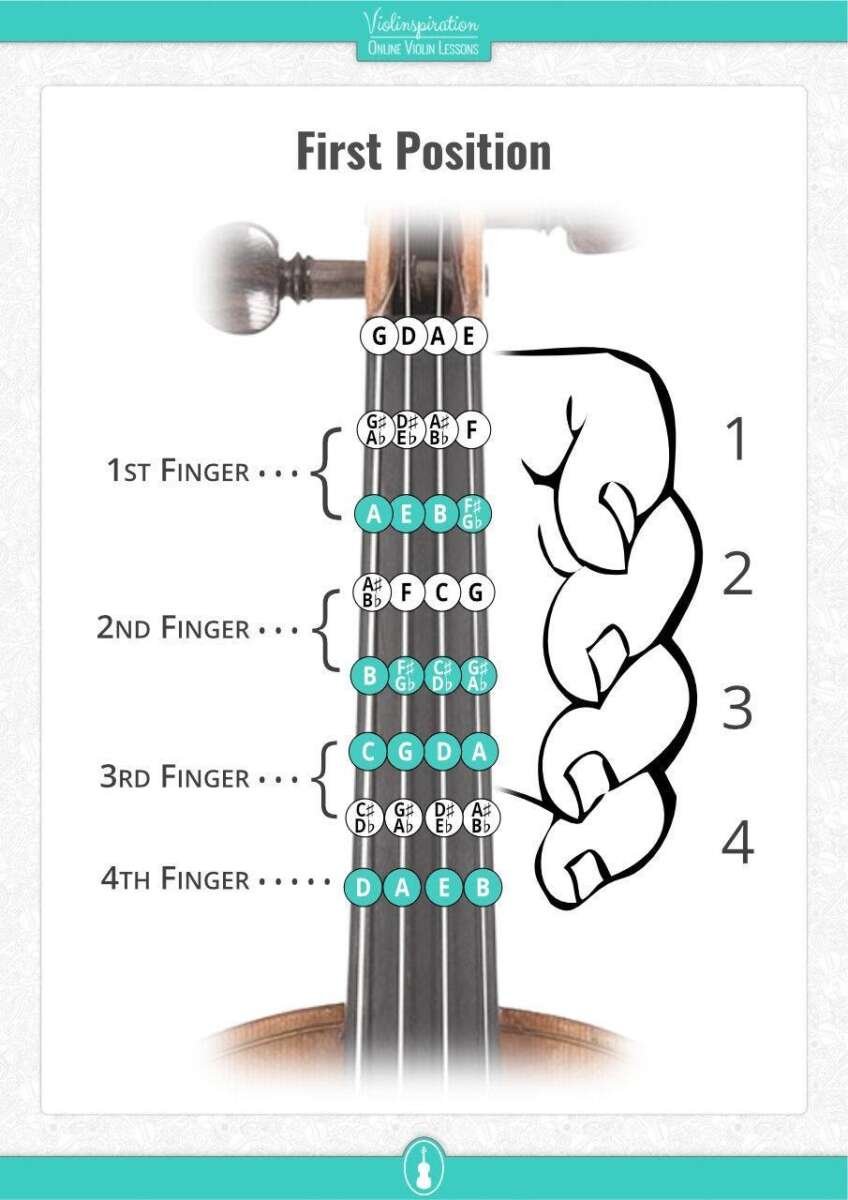
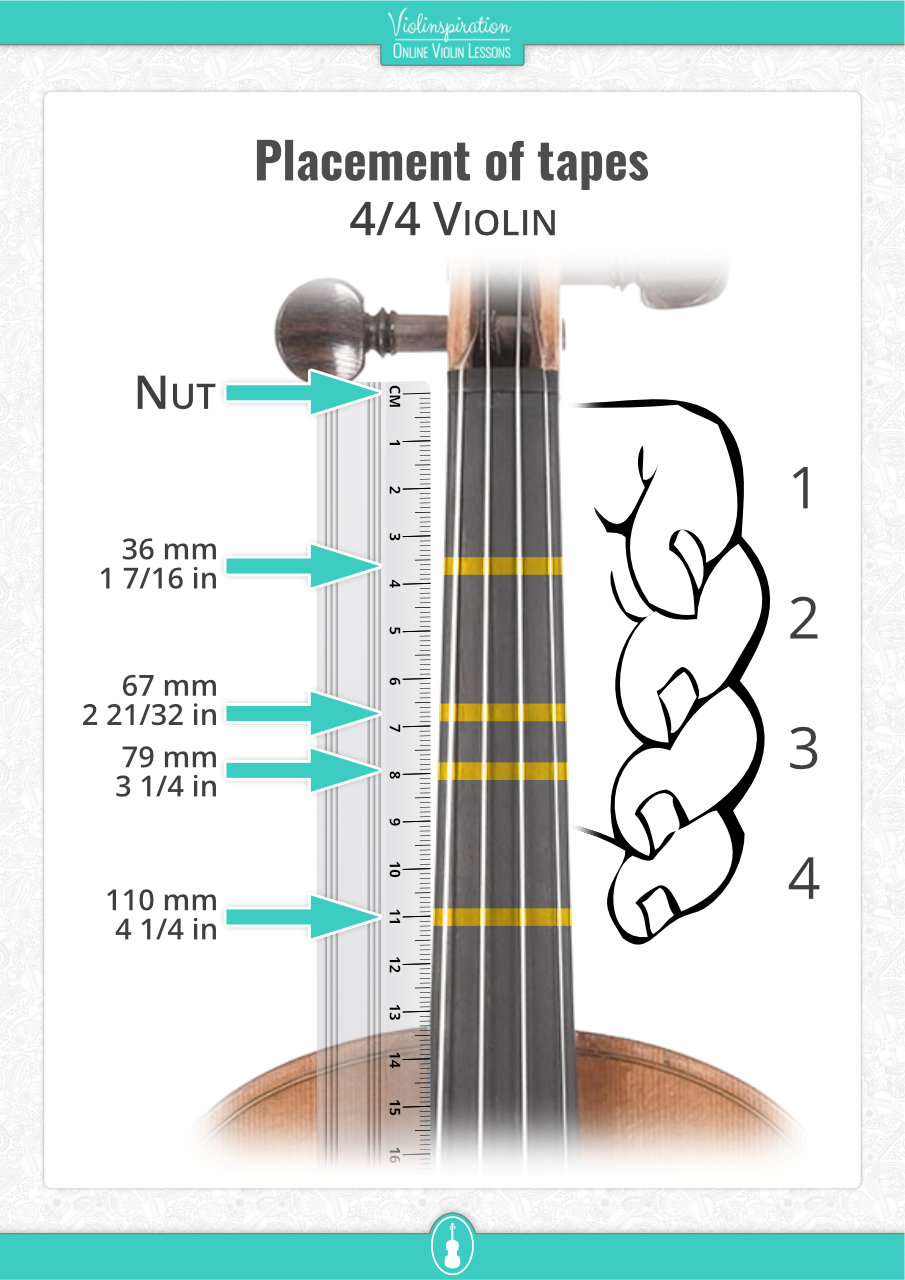
Because the violin has no frets, finger placement controls pitch. Place your finger in the correct spot for the note, rather than pressing anywhere along the fingerboard.
In general, place the finger slightly closer to the scroll than the bridge when finding a note. The exact position depends on the note, the instrument, and your tuning.
A tuner can help you check pitch. However, your ear remains essential. Train yourself to hear whether the note is high, low, or centered.
4. Use only enough pressure
Press the string until the open sound stops and the note becomes clear. Then reduce the pressure slightly to find the minimum amount that still works.
This is the most important part of learning how to press violin strings. Too little pressure causes a weak or buzzing sound. Too much pressure creates tension and slows your playing.
Try this test:
-
Place your finger on the string.
-
Play the note with the bow.
-
Slowly reduce finger pressure.
-
Stop reducing pressure when the sound begins to buzz.
-
Add a small amount of pressure back.
That small increase is often close to the ideal pressure.
5. Keep the finger ready to lift
Do not bury the finger into the string after the note sounds. Keep it light and ready to move.
A relaxed finger can lift faster for scales, trills, and changing notes. This also reduces fatigue during long practice sessions.

How Much Pressure Should You Use?
Most beginners use more pressure than they need. They may believe a strong finger creates a strong sound, but the bow creates most of the violin’s volume.
The left hand controls pitch and clarity. The right arm, bow speed, bow pressure, and contact point control much of the sound’s power.
Use this simple rule:
• If the note buzzes, add a little pressure or adjust finger placement.
• If the note sounds clear, do not press harder.
• If your hand feels tight, check whether you are using unnecessary force.
A useful practice exercise is to press the string with different pressure levels. Begin with almost no pressure, then increase it slowly. Listen for the moment when the note becomes clear.
This teaches your hand instead of forcing it to guess. Over time, your fingers will learn the correct pressure through muscle memory.
When I explain how to press violin strings to new players, I compare it to holding a ripe berry. You need enough pressure to hold it, but too much pressure will damage it. The same idea applies to the string and your fingertip.

Finger Placement for Clear Violin Notes
Pressure alone cannot fix poor placement. Your fingertip must land in the right location.
Place the finger near the bridge side of the target area
For a clean stopped note, the finger usually works best when placed close to the bridge side of the target position. This shortens the vibrating length at the intended point.
Do not place the finger directly on top of the target spot without listening. Each violin has small differences in scale length, bridge position, and setup.
Keep the fingers curved
Curved fingers improve accuracy and reduce contact with nearby strings. They also make it easier to lift one finger while keeping others prepared.
A collapsed finger often causes flat notes and weak control. If your finger bends backward, move your hand slightly and relax the thumb.
Keep the knuckles flexible
Your left-hand knuckles should not lock. Flexible knuckles allow the fingers to fall naturally from above.
Avoid stretching the fingers from a stiff hand shape. Instead, move the whole hand when a note pattern feels too wide.
Check your thumb
A tight thumb often causes tight fingers. Let the thumb move slightly as your hand changes position.
The thumb does not need to press hard against the neck. It acts more like a guide than a clamp.
Common Mistakes When Pressing Violin Strings
Many early problems come from tension rather than a lack of strength. Here are the mistakes I see most often in beginner practice.
Pressing too hard
Hard pressure can cause sore fingertips, stiff knuckles, and slow finger movement. It may also pull the pitch slightly sharp if the finger pushes the string sideways.
Fix this by practicing soft pressure with slow bow strokes. Let the bow reveal whether the note is truly clear.
Using the flat part of the finger
A flat finger can touch two strings at once. It may also make the note sound dull or unclear.
Raise the knuckle slightly and let the fingertip contact the string. Do not force a dramatic curve if your hand is small. Comfort and control matter more than appearance.
Placing the finger too far from the target
A finger that lands too high or too low creates an out-of-tune note, even if the pressure is perfect.
Use a tuner during early practice, but also sing or hum the target pitch. This helps build reliable ear training.
Squeezing with the thumb
A squeezing thumb limits movement and can cause hand pain. It also makes shifting between notes more difficult.
Try lifting the thumb away from the neck for a moment while keeping the violin stable. This shows how little gripping force your hand may actually need.
Lifting fingers too far
Large finger movements waste time and often create tension. Keep unused fingers close to the string without pressing them down.
Small, calm movements improve speed and intonation.
Blaming the finger when the setup is the problem
Sometimes a buzzing note is caused by an uneven fingerboard, poor bridge shape, loose fitting, or worn string. A violin technician should inspect persistent problems.
Do not press harder to fix a mechanical issue. That can hide the real cause and create bad technique.
Exercises to Improve Finger Pressure
These exercises make learning how to press violin strings easier and more consistent.
The silent placement exercise
Place your bow on the string without playing. Set one finger down slowly and release it.
Repeat the motion several times. Focus on a curved fingertip, a relaxed thumb, and a quiet hand.
Then play the note with a slow bow. This separates finger placement from bow movement.
The pressure release exercise
Play a stopped note with normal pressure. While the bow continues, release pressure little by little.
Listen for the first hint of buzzing. Then restore only a small amount of pressure.
This teaches the minimum pressure needed for a clean tone.
The finger tap exercise
Place your first finger on the string. Lift it slightly and tap it back down without squeezing.
Repeat with the second, third, and fourth fingers. Keep the motion small and springy.
This builds finger independence and helps prevent heavy pressing.
The slow scale exercise
Play a one-octave scale with a very slow bow. Hold each note for several seconds.
Check three things:
• Is the pitch accurate?
• Is the tone clear?
• Is the hand relaxed?
Slow work often reveals tension that fast playing hides.
The drone exercise
Play a sustained open string or use a steady drone from a tuner or practice app. Then play related notes and listen for the sound waves to settle.
When the note is in tune, the sound often feels more stable against the drone. This develops intonation without relying only on visual tuning tools.
How Bow Pressure Works With Finger Pressure
A clear violin note requires cooperation between the left and right hands. Pressing the string correctly cannot replace good bow control.
If the bow is too light, the note may sound weak even when your finger is accurate. If the bow is too heavy, the sound may become harsh or scratchy.
Start with a slow bow and moderate contact. Keep the bow moving straight between the bridge and fingerboard.
The finger stops the string. The bow makes the stopped string speak. If either hand becomes tense, the tone suffers.
A common beginner mistake is pressing the left-hand finger harder when the sound is poor. First check the bow path, bow speed, and contact point. The issue may not be the finger at all.
How to Press Violin Strings Without Pain
Some fingertip tenderness is normal when you begin playing. Sharp pain, numbness, or lasting soreness is not something to ignore.
Use short practice sessions at first. Five to ten focused minutes can teach more than thirty minutes of tense repetition.
Take regular breaks and gently move your fingers. Keep the wrist and thumb loose while you rest.
Helpful habits include:
• Warm up with open strings.
• Practice slowly before increasing speed.
• Stop when pain changes your hand shape.
• Keep your nails short on the left hand.
• Ask a teacher to check your posture.
Your fingertips may develop small calluses over time. However, calluses should not be the goal. Good technique uses efficiency, not force.
If pain continues, consult a qualified violin teacher, medical professional, or hand specialist. Technique advice cannot diagnose an injury.
Special Tips for Children and Small Hands
Children may struggle to press violin strings because their fingers are shorter and their hand muscles are still developing. They should not be expected to copy an adult hand shape exactly.
A smaller violin may improve comfort and reach. Instrument size should be checked by a teacher or qualified violin shop.
Keep practice playful and brief. Have the child place one finger, play one clear note, and relax the hand.
Avoid telling a child to “press harder” without checking finger position. A well-placed finger often works with less force than a poorly placed one.
For young players, the best sign of progress is a free hand that can repeat the motion without fear or strain.
When to Adjust or Replace Violin Strings
String condition affects how easy it feels to press violin strings. Old strings can become rough, dull, unstable, or difficult to tune.
Replace strings when they show signs such as:
• Fraying or visible damage.
• Deep grooves where the fingers contact them.
• A dull sound that does not improve with bow care.
• Poor tuning stability.
• A winding that begins to unwind.
String life depends on playing time, sweat, string type, and storage. Many active players replace strings every few months, while occasional players may use them longer.
Do not change all four strings at once if you are not comfortable with the process. The bridge can move or fall when string tension changes. A teacher or violin shop can replace them safely.
A fresh, properly fitted string should respond more evenly. It will not solve every technique issue, but it can make accurate finger placement easier to hear.
A Simple Daily Practice Plan
Use this 10-minute routine to build reliable finger pressure.
-
Play open A and D strings for one minute.
-
Place and release first-finger notes for two minutes.
-
Practice slow notes with pressure release for two minutes.
-
Play a simple scale with a tuner for three minutes.
-
Finish with one minute of relaxed, easy playing.
Record yourself once or twice a week. Listen for buzzing, uneven tone, and notes that begin late.
Do not judge only by speed. A slow, clear note shows better progress than a fast note made with tension.
The most useful lesson in how to press violin strings is simple: accuracy comes from repetition, not force. Make each repetition calm and correct.
Frequently Asked Questions About How to Press Violin Strings
How hard should I press a violin string?
Press only hard enough to stop the string and create a clear note. If the sound is clean, extra pressure is unnecessary and may cause tension.
Why does my violin string buzz when I press it?
Buzzing can come from too little finger pressure, poor finger placement, or a setup problem. Check your fingertip position first, then ask a violin teacher or technician to inspect the instrument if the buzz remains.
Should my violin fingers be curved?
Yes, gently curved fingers usually give better control and cleaner contact. Do not force an extreme curve, especially if your hand is small or uncomfortable.
Can pressing too hard make a violin note sharp?
Yes, pressing or pushing the string sideways can affect pitch. Excess pressure also creates tension, which may make accurate intonation and smooth movement harder.
How can I press violin strings without hurting my fingers?
Use short practice sessions, relaxed hand posture, and the minimum pressure needed for a clear sound. Stop if you feel sharp pain, numbness, or lasting soreness.
Do violin strings need to touch the fingerboard?
A stopped string should contact the fingerboard under the fingertip. However, you should not force the string down with excessive pressure because the finger must create the note efficiently.
Does the bow affect how a pressed note sounds?
Yes, very much. The finger controls the pitch, while bow speed, contact point, and pressure strongly affect volume and tone.
Conclusion
Good violin string pressure is light, accurate, and relaxed. Place the fingertip in the right spot, keep the hand curved, and use only enough force to stop the string clearly. Then let the bow create the sound.
Practice slowly, listen closely, and correct tension before it becomes a habit. With steady work, your fingers will learn how to press violin strings with control and confidence. Try the exercises today, and share your progress with a teacher or fellow violin player.

Senior Music Reviewer
Alex Carter is a seasoned music reviewer with over a decade of experience in the world of sound and instruments. Passionate about helping musicians and enthusiasts make informed choices, he brings sharp insights and in-depth knowledge to every review. From classical instruments to modern gear, Alex combines technical expertise with a love for music to deliver content that resonates with readers.
As a Senior Music Reviewer and expert author on Tuneluma.com, Alex is dedicated to sharing honest evaluations, practical advice, and thoughtful commentary to guide readers in their musical journey.