How To Restring A Violin With Fine Tuners: Easy Guide
Replace one string at a time, seat its ball end, wind the peg, and tune with fine tuners.
Learning how to restring a violin with fine tuners is easier when you understand what each part does. The pegs set the main pitch, while the fine tuners make small, accurate changes. This guide explains the full process, common mistakes, safe tuning methods, and practical setup tips used by violinists and repair technicians.

What You Need Before You Start
Gather your tools and work in a quiet, well-lit place. A stable table is best, but place a clean towel under the violin if you need extra protection.
You will need:
• A correctly sized violin string
• A violin peg winder, if available
• An electronic tuner or tuning app
• A soft microfiber cloth
• A pencil
• A small bridge straightening tool, or clean fingers
• A string cutter, if the new string has a long excess end
Check the string package before opening it. Violin strings are made for specific pitches: G, D, A, and E. Never put a string on the wrong position just because it appears to fit.
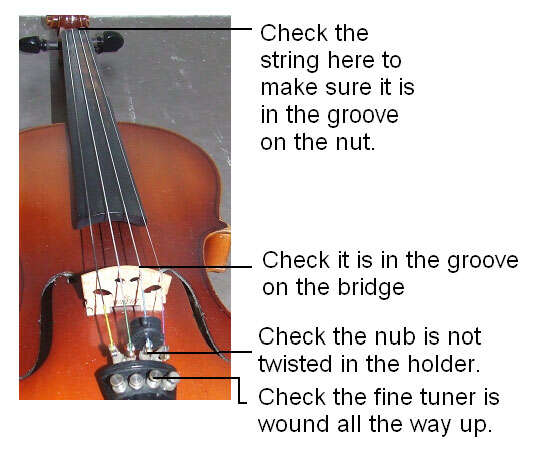
Inspect the fine tuner as well. Its screw should turn freely, and the small hook or slot should not have sharp edges. A damaged fine tuner can cut the string or make tuning unstable.

How Fine Tuners Work
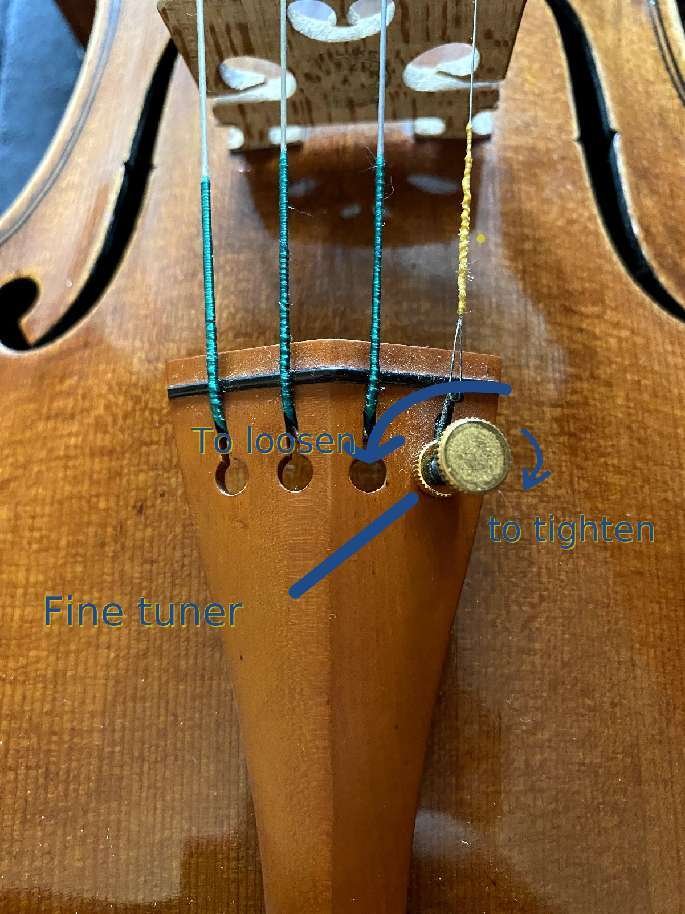
A fine tuner is a small metal device attached to the tailpiece. It changes string tension by moving a short lever. Turning the screw clockwise usually raises the pitch, while turning it counterclockwise usually lowers the pitch.
The tuning peg makes larger pitch changes. The fine tuner makes smaller changes. Think of the peg as the steering wheel and the fine tuner as the final adjustment knob.
Many violins have one fine tuner on the E string. Student violins often have four fine tuners. Some tailpieces have built-in tuners, while others use separate tuners attached to the tailpiece.
Fine tuners are useful because they make small corrections easy. However, they should not be turned all the way in or out during normal tuning. Leave enough room in both directions so you can raise or lower the pitch later.

How to Restring a Violin With Fine Tuners
The safest approach is to replace one string at a time. Removing all four strings at once can allow the bridge to fall and may reduce pressure on the soundpost. A violin’s bridge and soundpost depend on balanced string tension.
Follow these steps for how to restring a violin with fine tuners.
1. Place the violin safely
Rest the violin face up on a clean, padded surface. Keep the scroll supported and make sure the instrument cannot slide.
Before loosening the old string, look at the bridge. The bridge should stand nearly upright, with its feet flat on the violin top. Take a quick photo if you are unsure of its position.
2. Loosen and remove the old string
Turn the tuning peg toward you slowly. Reduce the tension until the string feels loose. Do not pull a tight string from the peg, because it may snap back or scratch the varnish.
Once the tension is gone, unwind the string from the peg. Then remove the ball end from the fine tuner. On some fine tuners, the ball sits in a small hook. On others, it passes through a slot.
Wrap the old string and discard it safely. A loose string can have sharp ends, so do not leave it on the floor.
3. Check the fine tuner position
before installing the new string, turn the fine tuner screw counterclockwise several turns. Stop before the screw comes out.
This creates room for later pitch adjustments. If the screw is already fully tightened, you may not be able to lower the pitch without using the peg.
Make sure the fine tuner lever is not pressed hard against the tailpiece. It should have a small amount of movement available.
4. Install the ball end
Place the ball end of the new string into the fine tuner. Check that the ball is fully seated in the hook or slot.
This step matters more than it may seem. If the ball rests only on the edge, it can slip when you tighten the string. The sudden release may damage the string or startle you.
Keep the string lined up with the correct groove in the bridge and nut. Do not force it into a groove that is too narrow.
5. Guide the string through the peg
Run the free end of the string toward the peg. Insert it through the peg hole, leaving about 1 to 2 inches of string beyond the hole.
The exact amount depends on the peg and string. You need enough length for clean wraps, but too much extra string creates a crowded pegbox.
Bend the string slightly after it passes through the hole. This helps it stay in place while you turn the peg.
6. Wind the string neatly
Turn the peg slowly in the direction that winds the string toward the center of the pegbox. The string should wrap in neat, even coils.
Keep the first wrap close to the peg hole. Later wraps should sit beside it rather than crossing over it. Crossed wraps can cause slipping and make tuning difficult.
• Use about two or three wraps for the G, D, and A strings
• Use about three or four lighter wraps for the thinner E string
• Keep the wraps snug but not tightly stacked on top of each other
Do not pull the string tight by hand before winding. Let the peg create steady tension.
7. Watch the bridge
As you bring the string up to tension, watch the bridge. The bridge may lean toward the fingerboard because the strings pull it forward.
The bridge should remain close to upright. If it begins to lean, loosen the string slightly and use clean fingers to move the bridge feet carefully back into place.
Move the bridge in tiny amounts. Never force it while the string is tight. A sudden bridge movement can chip the bridge feet or scratch the violin.
8. Bring the string close to pitch
Use the peg for the large part of the tuning. Bring the string slowly toward its target note, but stop slightly below the final pitch.
This is where many beginners make a mistake. They try to tune the entire string with the fine tuner. That can leave the screw at its limit and place unnecessary strain on the mechanism.
Once the string is close, use the fine tuner for the last small adjustment. This is the central principle behind how to restring a violin with fine tuners.
9. Stretch and retune the string
New strings often go flat during the first few hours. This happens as the string settles around the peg, bridge, nut, and fine tuner.
You can help the process by gently lifting the string a small amount above the fingerboard at several points. Use light pressure only. Do not pull hard or bend the string sharply.
Tune again after a few minutes. Repeat the process several times until the pitch becomes more stable.
10. Repeat one string at a time
Replace the remaining strings separately. After each string, check the bridge and listen for unusual buzzing or rattling.
Changing all strings at once may seem faster, but it removes the tension that supports the bridge and soundpost. One string at a time is slower, yet much safer for routine home restringing.

Correct String Direction and Peg Winding
Correct winding helps the violin stay in tune. It also makes future tuning easier.
When viewing the pegbox from the side, the string should wind toward the pegbox wall without rubbing against nearby pegs. The string should leave the peg in a straight path toward the nut.
Avoid these problems:
• Wrapping the string over itself
• Leaving large gaps between wraps
• Allowing the string to touch another peg
• Winding so close to the pegbox wall that the string rubs
• Leaving a long, sharp tail inside the pegbox
For a standard violin, the G and D pegs are usually on one side of the pegbox, while the A and E pegs are on the other. Peg layouts can vary, so follow the existing string path when replacing one string.
If a peg turns too freely or slips, the issue may not be your winding. The peg could need adjustment, peg compound, or professional fitting. Avoid forcing a slipping peg tighter, as this can damage the pegbox.

Tuning a Violin After Restringing
Tune the strings in this order:
- G
- D
- A
- E
This order moves from the lowest string to the highest. It is not the only valid method, but it creates a clear routine.
The standard violin tuning is:
• G3, approximately 196 Hz
• D4, approximately 293.7 Hz
• A4, approximately 440 Hz
• E5, approximately 659.3 Hz
Many orchestras use A4 at 440 Hz, though some groups tune slightly higher. Follow the tuning standard used by your teacher, ensemble, or orchestra.
Use the peg when the string is more than a small amount away from pitch. Use the fine tuner when the note is already close. Turn the fine tuner in small movements, then wait for the tuner to respond.