How To Tune Kick Drum: Get The Perfect Sound
To tune a kick drum, adjust both heads for clear pitch, steady feel, strong attack, and controlled low-end resonance.
Learning how to tune kick drum heads is less about finding one perfect note and more about balancing punch, depth, sustain, and feel. A well-tuned kick should support the bass line, respond evenly, and sound focused both behind the kit and through a microphone. This guide explains how to tune kick drum heads step by step, with practical tips for different styles, room sizes, and playing needs.
What Kick Drum Tuning Really Means
Kick drum tuning is the process of adjusting the tension of the batter head and resonant head. The batter head is the surface you strike. The resonant head faces the audience and often has a port or microphone hole.
The goal is not always a low pitch. A very loose head can sound deep but may feel weak or produce a dull slap. A very tight head can sound lively and musical but may lose the heavy thump many players want.
A useful kick drum sound has four parts:
• Attack: The sharp sound made when the beater hits the head.
• Body: The main note or low-mid sound of the drum.
• Sustain: The length of the sound after the hit.
• Control: The amount of unwanted ring, boom, or flutter.
Think of the drum as a small speaker. The heads move air, while the shell adds color. If the heads are not balanced, the drum may buzz, choke, or sound flat.
When learning how to tune kick drum heads, remember that tuning depends on more than tension. Head type, shell size, beater material, muffling, room acoustics, and playing style all affect the final sound.

How to Tune Kick Drum Step by Step
Before you start, remove the kick drum from its stand or lift one side so the head can move freely. Take off the hoop and head if you are changing heads. Clean dust and dirt from the bearing edge with a soft, dry cloth.
Follow these steps:
- Seat the head evenly
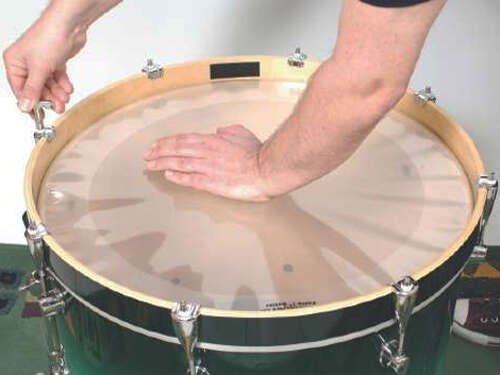
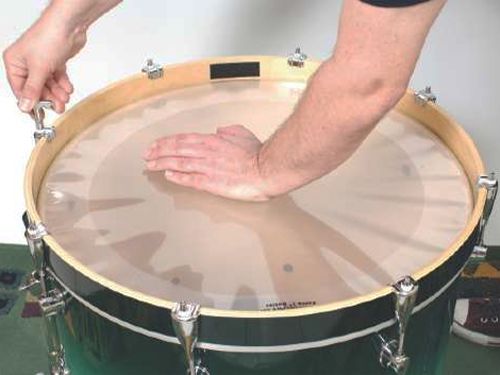
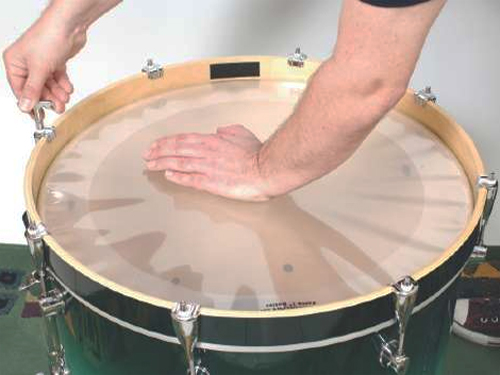
Place the head on the shell. Set the hoop in place and finger-tighten each tension rod. Use a crisscross pattern as you work around the drum.
Press gently in the center of the head with your palm. This helps the head settle over the bearing edge. Do not use extreme force, especially with thin heads.
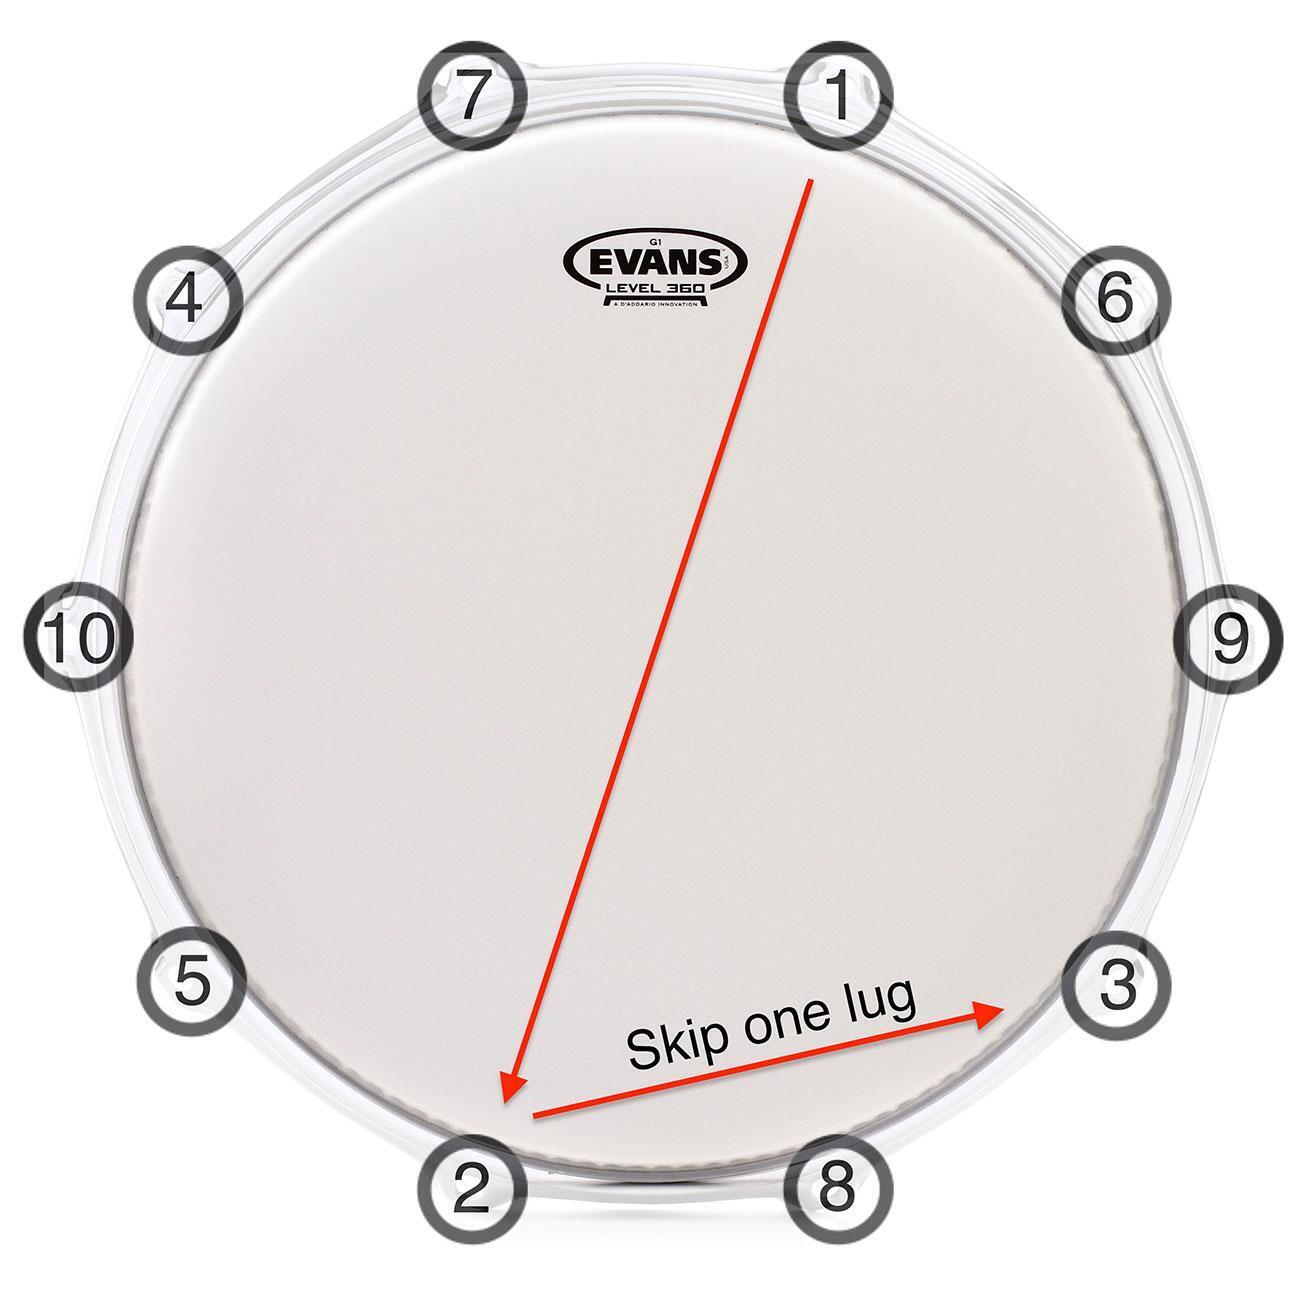
- Tighten in a star pattern
Use a drum key and turn each rod by a small amount. A quarter turn is usually enough. Move across the drum instead of going from one rod to the next around the shell.
This pattern spreads tension evenly. Uneven tension is one of the main causes of strange overtones and poor response.
- Check each tension zone
Tap the head about one inch from each tension rod. Each tap should produce a similar pitch. If one area sounds higher, lower that rod slightly. If it sounds lower, raise it slightly.
Do not judge the sound only from the center. The edge tells you whether the head is seated and evenly tensioned.
- Tune the batter head
for a deep rock or pop sound, keep the batter head low to medium in tension. It should feel firm enough to rebound but not so loose that it wrinkles after every hit.
For jazz, funk, or acoustic music, slightly higher tension can give you more tone and response. The right setting depends on the shell and head.
- Tune the resonant head
The resonant head often works best at medium tension. It can be tuned slightly higher than the batter head for a clear, focused note.
A lower resonant head may create a darker and more open sound. A higher resonant head can shorten the note and improve definition.
- Test the drum in playing position
Put the drum back in place and play it with your normal beater. A kick drum can sound very different when it is on the floor than when it is raised or placed on a rug.
Play both soft and hard hits. Good tuning should respond across the full range, not only at one volume.
A common mistake is making tiny adjustments without listening from the player’s position. Tune, play, move a few feet away, and listen again. The audience hears the drum from the room, not from your ear above the pedal.
Choosing the Right Pitch
There is no universal pitch for a kick drum. A 20-inch kick and a 24-inch kick will not produce the same note at the same tension. Shell depth, wood type, head design, and room size also matter.
Many players tune the kick to support the song’s key. This can work well, but the kick does not need to match the root note exactly. A very low drum may not produce a clear musical pitch.
Start by finding the lowest tension that still gives you:
• A stable note
• Good pedal response
• No loose wrinkles
• Enough attack
• Even tone across the head
If the kick sounds like a cardboard box, raise the tension slightly. If it sounds too high and bouncy, lower the tension in small steps.
When learning how to tune kick drum shells, trust both your ears and your feet. A sound that seems deep in a quiet room may feel slow and weak when played with a band.

How to Tune the Batter and Resonant Heads
The relationship between the two heads shapes the character of the drum.
Batter head lower than resonant head
This setup often gives a focused attack and a clear, controlled note. It works well for rock, pop, worship music, and live performance.
The resonant head adds definition while the lower batter head creates depth. Avoid making the difference too large, or the drum may sound unstable.
Both heads at similar tension
Equal tension can produce a balanced and open tone. This may suit jazz, blues, acoustic music, and players who want the shell to speak clearly.
The drum may have more sustain, so you may need a small amount of muffling.
Batter head higher than resonant head
This can create a softer, darker response. It may work for certain vintage sounds, but too much difference can cause the heads to fight each other.
Make small changes and listen after each adjustment. Tuning by large turns often makes the drum harder to control.
One practical lesson is to mark your preferred tension with a small removable strip of tape near the tension rods. This gives you a useful starting point when changing heads or moving between venues.
Using Muffling Without Killing the Drum
Muffling reduces unwanted sustain and high overtones. It does not replace correct tuning. If the heads are uneven, adding more foam or pillows may only hide the problem.
Common muffling choices include:
• A small internal pillow touching the batter head
• A strip of felt under the batter or resonant head
• An external muffling ring
• A removable foam pad
• A patch near the beater impact point
Start with the least amount possible. Place a small pillow so it barely touches the batter head. Add more contact only if the drum still rings too long.
For a modern studio sound, a controlled head with a small amount of muffling often works well. For a live jazz or acoustic setup, less muffling usually preserves tone and projection.
The front head also affects the sound. A ported resonant head gives easier microphone access and can shorten sustain. An unported head usually produces a fuller, more open note.
Tuning a Kick Drum for Different Music Styles
The best answer to how to tune kick drum heads changes with the style of music.
Rock and metal
Use medium-low batter tension with a slightly higher resonant head. A two-ply batter head can handle hard playing and provide a strong attack.
A small amount of muffling helps keep fast double-kick patterns clear. A hard beater and a small impact patch can add definition.
Pop and worship music
Aim for a focused note with controlled sustain. Medium tension and moderate muffling often work well.
Check the kick with the bass guitar. Too much low end from both instruments can make the mix muddy.
Jazz and acoustic music
Use more open tuning and less muffling. A higher batter tension can give the beater a quick response and allow the shell to produce more tone.
Listen for musical pitch and natural decay rather than only deep bass.
Funk and R&B
A tight, short sound often fits best. Medium to medium-high tension can provide fast response and a clear attack.
Avoid over-muffling. You still need enough body for the drum to feel full.
Home recording
Small rooms often exaggerate low frequencies. Tune for clarity, not for the biggest sound in the room.
Record a short test and listen through headphones and speakers. A kick that sounds huge beside the kit may become muddy in a mix.

How to Tune Kick Drum Heads for Recording
Microphone placement can change your tuning choice. A microphone inside the kick often emphasizes attack and reduces room sound. A microphone outside the port captures more body and resonance.
Before recording, check these areas:
• Make sure both heads are evenly tensioned.
• Remove unwanted rattles from the pedal, spurs, and hoop.
• Listen for a clean beater impact.
• Check the drum at soft and loud volumes.
• Record a short test before tracking the full song.
If the recording sounds too boomy, do not immediately add heavy equalization. First try a small tuning change or reduce muffling contact. If the sound lacks attack, check the beater, impact patch, microphone position, and batter tension.
A useful studio habit is to record the kick alone, then with the bass. The correct kick sound is the one that supports the whole arrangement.

Common Kick Drum Tuning Mistakes
Even experienced players can make tuning harder than it needs to be. Avoid these common problems:
• Tuning only by the center of the head: The center does not reveal uneven tension near the rods.
• Making large adjustments: Big turns can cause one side of the head to become much tighter than the other.
• Using too much muffling: A pillow cannot fix poor seating or uneven tension.
• Ignoring the resonant head: The front head strongly affects sustain, pitch, and projection.
• Tuning while standing too close: The sound at your ear may not match the sound in the room.
• Copying another drummer’s settings: Different shells, heads, rooms, and pedals need different choices.
• Chasing the lowest possible pitch: The lowest sound is not always the strongest or most useful sound.
One of the most useful lessons in how to tune kick drum shells is to make one change at a time. If you change both heads, add a pillow, switch beaters, and move the microphone at once, you will not know what improved the sound.

Kick Drum Tuning Tools
You do not need expensive equipment to tune a kick drum well. Your ears and a drum key are the main tools.
Helpful items include:
• A quality drum key
• A clean cloth
• A small flashlight for checking the bearing edge
• A removable tension marker
• A phone recorder
• A drum dial or tension meter
Tension meters can help you repeat a setup, but they do not replace listening. Two tension rods may show similar readings while producing different sounds because of head wear, shell condition, or bearing-edge differences.
A phone recording is useful because it creates distance between you and the drum. Record the same pattern before and after each change. This makes small improvements easier to hear.
How Often Should You Tune a Kick Drum?
Tune the kick whenever the tone changes, the head develops wrinkles, or the drum stops responding evenly. Heavy players may need to check the batter head more often than light players.
New heads may need a short settling period. After the first rehearsal, check the tension again. Temperature and humidity can also affect drum heads, especially during travel.
Replace a head when it has deep dents, weak response, visible damage, or a dull tone that tuning cannot correct. A worn head often forces you to over-tighten the drum, which can make the sound harsh.
Store the drum away from extreme heat and moisture. Avoid leaving strong pressure on the head for long periods.
Frequently Asked Questions About How to Tune Kick Drum
Should the batter head be tighter than the resonant head?
Usually, the resonant head is equal to or slightly tighter than the batter head. This often gives the kick a focused tone, but the best choice depends on the shell, head type, and music style.
How low should I tune a kick drum?
Tune it as low as possible while keeping a stable tone, clean response, and no loose wrinkles. If the drum feels slow or produces a weak slap, raise the tension slightly.
Should both kick drum heads be tuned to the same pitch?
They do not have to be. Similar tension creates an open sound, while different tension can provide more control and focus.
Does a ported resonant head improve kick drum sound?
A ported head can make microphone placement easier and reduce sustain. It does not automatically sound better, because an unported head may provide more depth and resonance.
Can I tune a kick drum without a tuning device?
Yes. A drum key, careful listening, and even tension are enough for most players. A tuning device can help repeat a setting, but it cannot decide what sounds best in your room.
Why does my kick drum sound like a cardboard box?
The heads may be too loose, the tension may be uneven, or the drum may need a small amount of muffling. Check the head near each tension rod before adding more damping.
Conclusion
Good kick drum tuning comes from balance. Seat both heads well, tighten them evenly, set the batter and resonant heads for the sound you need, and use only enough muffling to control unwanted sustain.
The most reliable way to learn how to tune kick drum heads is to make small changes and listen from several positions. Record your results, note what works, and build a setup that fits your music instead of copying someone else’s settings. Try these steps at your next rehearsal, then share your favorite kick drum tuning method or explore more drum setup guides.

Senior Music Reviewer
Alex Carter is a seasoned music reviewer with over a decade of experience in the world of sound and instruments. Passionate about helping musicians and enthusiasts make informed choices, he brings sharp insights and in-depth knowledge to every review. From classical instruments to modern gear, Alex combines technical expertise with a love for music to deliver content that resonates with readers.
As a Senior Music Reviewer and expert author on Tuneluma.com, Alex is dedicated to sharing honest evaluations, practical advice, and thoughtful commentary to guide readers in their musical journey.