Don’t Stop Believing Chords Piano: Easy Guide
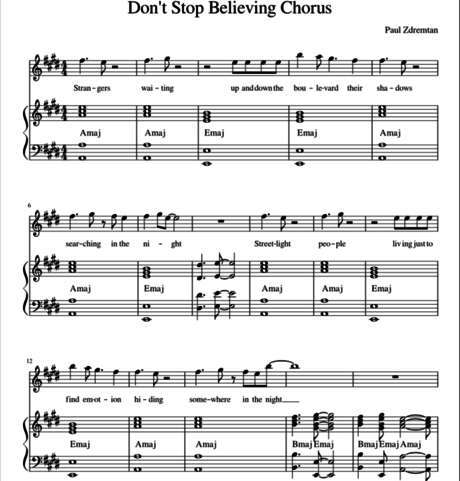
The most useful Don't Stop Believin' chords piano players need are E, B, F#, and G#m in the original key.
Learning the Don't Stop Believin' chords piano players use is a great way to practice steady rhythm, chord changes, and dynamic control. This guide breaks down the main progression, explains easy playing methods, and shares practical tips for making the song sound full without making it too hard.
Don't Stop Believin' Piano Chords at a Glance
Journey’s “Don’t Stop Believin’” is commonly played in B major. Its main sound comes from a small group of chords:
• E major: E, G#, B
• B major: B, D#, F#
• F# major: F#, A#, C#
• G# minor: G#, B, D#
The core progression often follows this pattern:
E | B | F# | G#m
A simple chorus pattern uses:
B | F# | G#m | E
These chords create the song’s familiar lift. The E chord feels open, B feels stable, F# builds tension, and G#m adds a touch of emotion before the progression returns.
If B major feels difficult, you can use a transpose function on a digital keyboard or move the song to an easier key. The musical shape matters more than staying in the original key while you are learning.

Full Chord Structure for Piano
The song uses repeated harmonic ideas rather than many unrelated chords. That makes it friendly for beginners who want to learn a well-known pop-rock song.
Main verse progression
A useful simplified version of the verse is:
E  | B  | F#  | G#m
E  | B  | F#  | F#
Play each chord for one full bar at first. This gives you time to move your hands and keep a steady pulse.
The verse should feel calm and moving forward. Avoid playing every chord with the same force. Start softly, then add energy as the progression develops.
Pre-chorus movement
The pre-chorus builds anticipation. Depending on the arrangement, you may hear the same main chord family with different timing and emphasis.
Try this practice loop:
E  | B  | F#  | G#m
E  | B  | F#  | F#
The important detail is not only the chord order. It is the rise in volume and intensity. Think of the pre-chorus as a road that leads to a wide, bright chorus.
Chorus progression
The chorus is often taught with this repeated pattern:
B | F# | G#m | E
This progression works well for a basic piano arrangement. Repeat it while singing or playing the melody with your right hand.
For a fuller sound, use inversions rather than jumping between root positions. For example:
• B major: B–D#–F#
• F# major: A#–C#–F#
• G# minor: B–D#–G#
• E major: B–E–G#
These shapes keep your hand in a smaller area of the keyboard. That makes the changes smoother and reduces unwanted jumps.

How to Play the Don't Stop Believin' Chords Piano Style
Start with your left hand. Play the root note of each chord as a whole note.
For the main progression, use:
Left hand: E | B | F# | G#
Then play the full chord with your right hand. This basic method is clear and easy to control.
Once that feels comfortable, try a two-part texture:
• Left hand: Root note or octave
• Right hand: Chord triad
For example, over E major, play a low E with your left hand and E–G#–B with your right hand. Over B major, move to B in the left hand and B–D#–F# in the right hand.
Easy rhythm patterns
Use one of these patterns while practicing the Don't Stop Believin' chords piano arrangement:
- Play one chord once at the start of each bar.
- Play four steady quarter-note chords per bar.
- Play a bass note, then a chord, then another bass note, then a chord.
- Use broken chords, playing the notes one at a time.
A simple pop-rock pattern could be:
Bass | Chord | Bass | Chord
Keep the rhythm even. A steady pulse will sound better than a complex pattern played with uneven timing.
Intermediate rhythm pattern
When the basic pattern feels natural, play the left-hand root on beat one and the chord on beats two, three, and four.
Count:
1     2     3     4
Bass  Chord Chord Chord
This creates a stronger groove. Use a metronome and begin at a slow speed, such as 60 beats per minute.

Piano Chord Inversions That Make Changes Easier
Chord inversions are one of the best tools for playing this song smoothly. An inversion changes the order of the notes without changing the chord itself.
For example, B major can appear as:
• Root position: B–D#–F#
• First inversion: D#–F#–B
• Second inversion: F#–B–D#
The chord name stays B major in all three forms.
For the chorus, try these close-position shapes:
B:   B–D#–F#
F#:  A#–C#–F#
G#m: B–D#–G#
E:   B–E–G#
Notice that these shapes keep several notes close together. Your hand will not need to leap across the keyboard after every chord.
A common beginner mistake is to use root position for every chord. That is not wrong, but it can make the arrangement sound jumpy. Inversions help the harmony flow like connected speech instead of separate words.

How to Make the Arrangement Sound Like the Record
The original recording has a large, layered sound. A solo piano cannot copy every guitar, keyboard, bass, and vocal part at once. However, you can capture the song’s character with good dynamics and clear rhythm.
Use a gradual dynamic build
Begin the verse with a light touch. Increase your volume during the pre-chorus, then open the sound in the chorus.
Try this dynamic plan:
• Verse: Soft and controlled
• Pre-chorus: Medium volume
• Chorus: Strong and bright
• Final chorus: Fullest sound
Do not confuse loudness with energy. A strong performance also depends on timing, accents, and contrast.
Add octaves carefully
Octaves can make the left hand sound more powerful. Play E–E, B–B, F#–F#, and G#–G# instead of single bass notes.
Use octaves only when your hands feel relaxed. Tension can lead to poor technique, especially during repeated sections. Keep your wrist loose and avoid striking the keys too hard.
Use the sustain pedal with care
The sustain pedal can connect the chords, but too much pedal will blur the harmony. Change the pedal when the chord changes.
A useful beginner rule is:
- Play the new chord.
- Press the pedal.
- Lift and replace the pedal as the next chord begins.
Listen for a clean sound. If the bass notes blend into a muddy cloud, use less pedal or change it more often.

A Simple Practice Plan
Learning the Don't Stop Believin' chords piano players use becomes easier when you divide the work into short steps.
Step 1: Learn the chord shapes
Practice E, B, F#, and G#m on their own. Say each chord name aloud as you play it.
Step 2: Practice the main loop
Repeat:
E | B | F# | G#m
Do not add the melody yet. Focus on even timing and relaxed movement.
Step 3: Add the left hand
Play the root note with your left hand and the chord with your right hand. Start slowly.
Step 4: Add inversions
Use close-position chords so that your right hand moves as little as possible.