How Do You Read Guitar Chord Charts: Easy Beginner Guide
Read guitar chord charts by viewing the six strings, fret lines, dots, and finger numbers together.
Learning how do you read guitar chord charts turns chord changes from guesswork into a clear, repeatable skill. Once you understand the chart’s viewpoint, string symbols, fret markers, and finger numbers, you can play thousands of chords without reading standard music notation. This guide explains each part with simple examples, practice tips, common mistakes, and real playing advice.

What Is a Guitar Chord Chart?
A guitar chord chart is a small diagram that shows where to place your fingers on the fretboard. It gives you a visual shape for a chord, such as G, C, D, or A minor.
Think of the chart as a picture of the guitar neck. Each line and symbol has a job:
• Vertical lines represent the guitar strings.
• Horizontal lines represent the frets.
• Dots show where to place your fingers.
• Numbers may show which fingers to use.
• An “O” means to play a string open.
• An “X” means not to play a string.
The most important point in how do you read guitar chord charts is understanding that the chart shows the guitar from the front. The thickest string is usually on the left, while the thinnest string is on the right.
A standard six string guitar has these strings:
-
Low E, the thickest string
-
A
-
D
-
G
-
B
-
High E, the thinnest string
The low E and high E strings share the same note name, but they sound two octaves apart. Their position on the chart tells you which one you are using.
How to Read the Guitar Chord Chart Layout
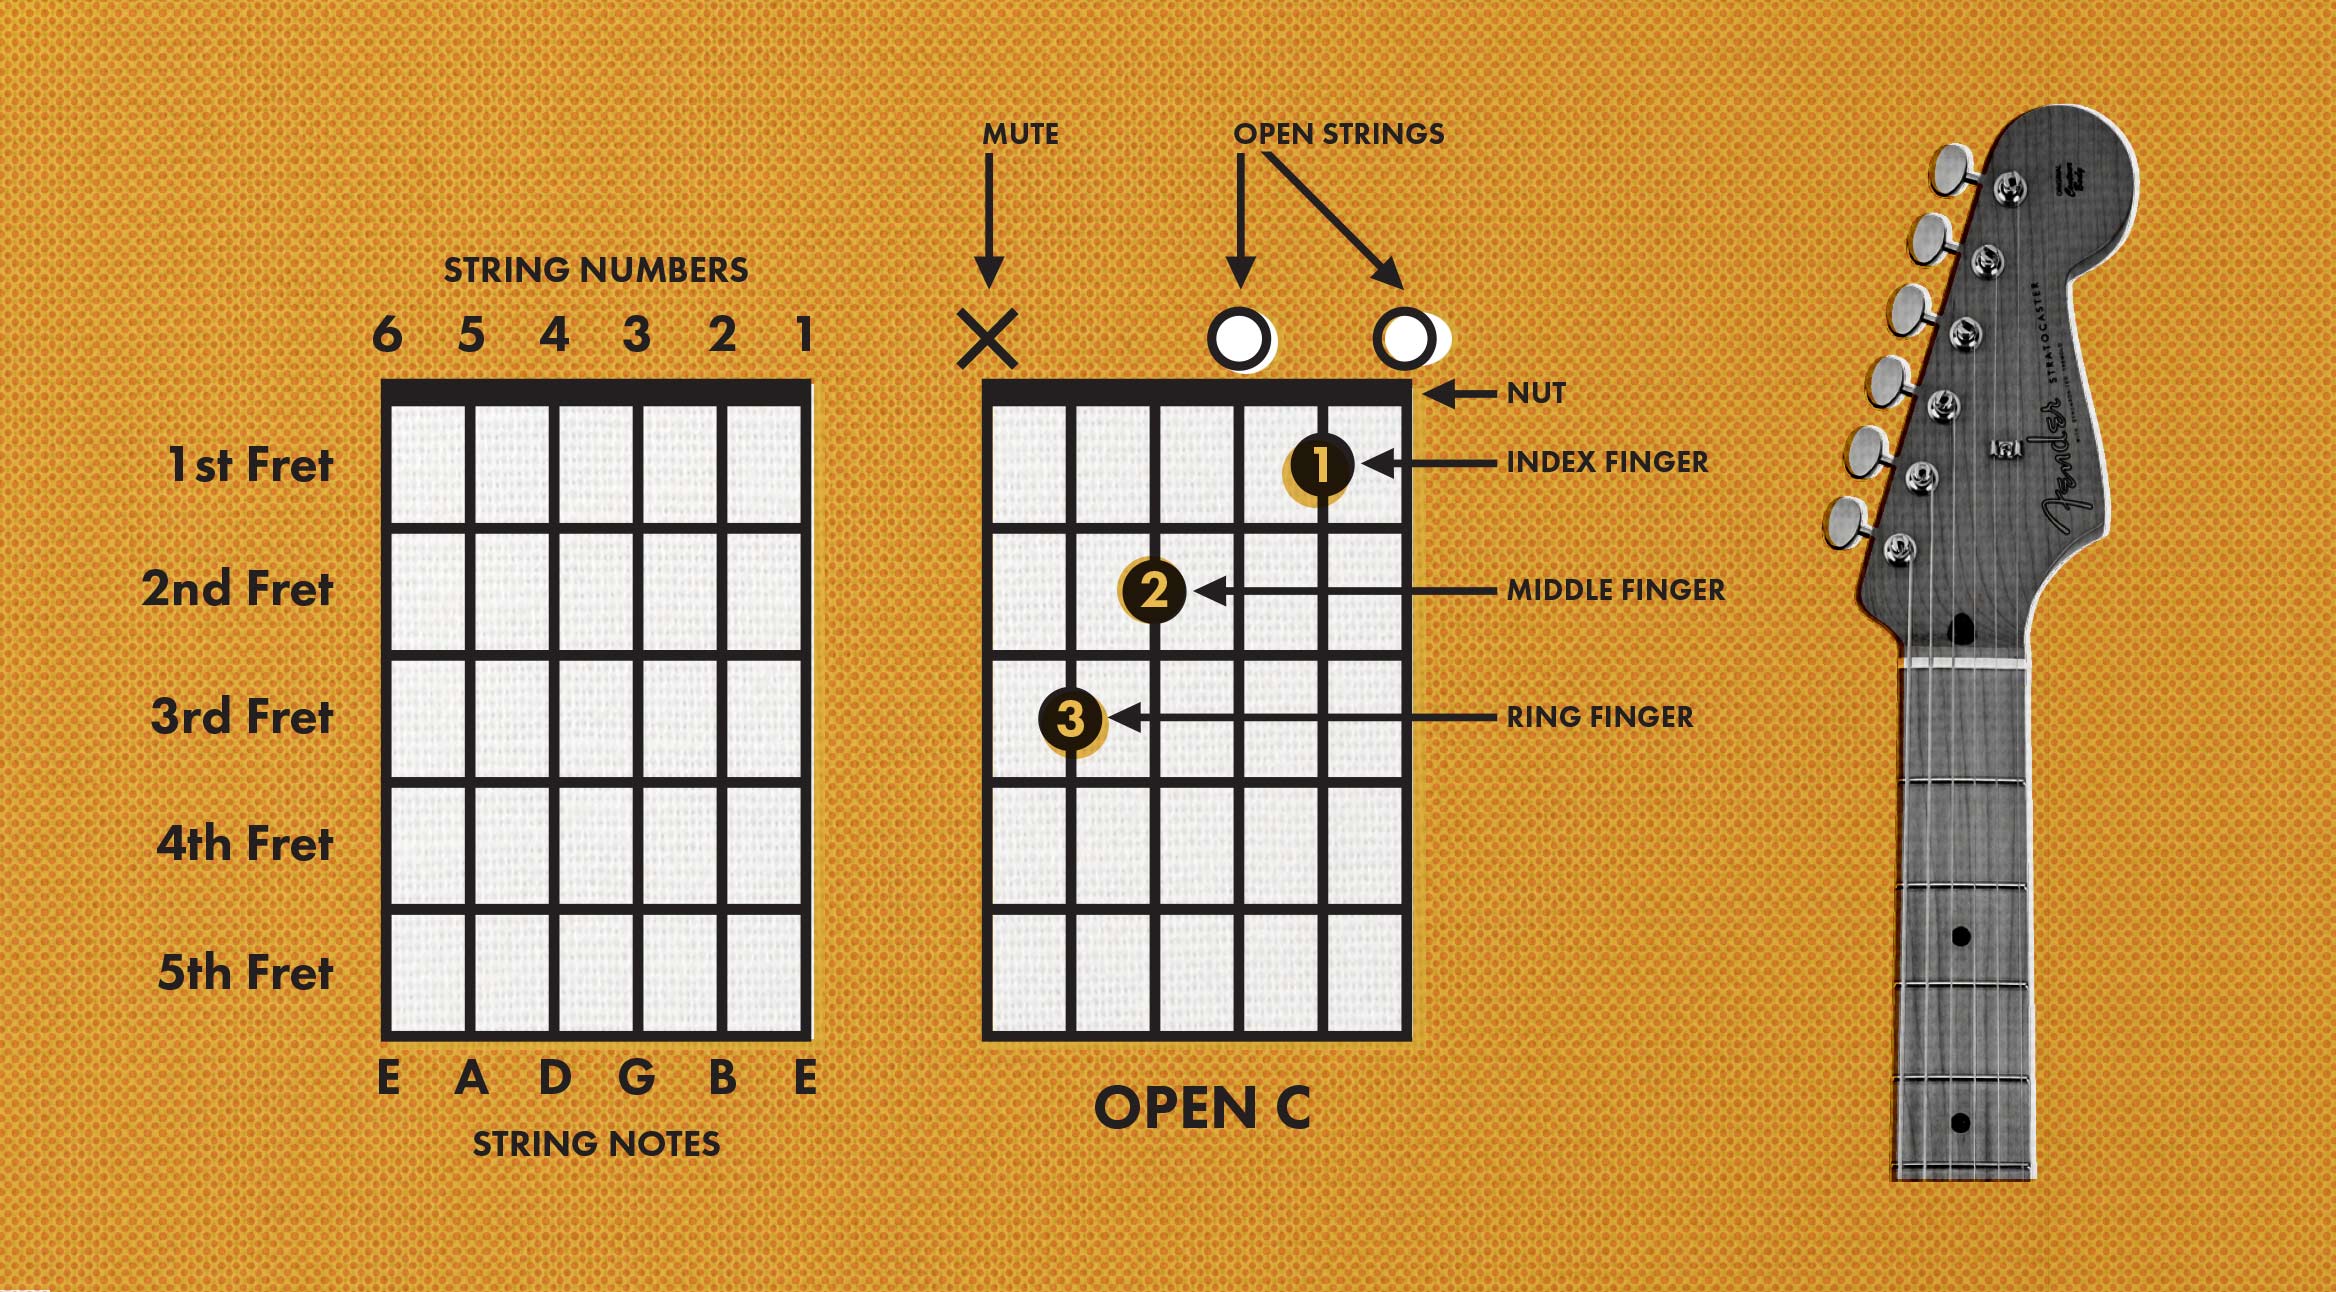
Most beginner chord diagrams use six vertical lines and five or more horizontal lines. The six vertical lines show the strings. The horizontal lines show the fret spaces.
The top horizontal line can cause confusion. It may represent the guitar’s nut, or it may be the first fret line. Look for a thick black line or a small label to identify the nut.
Here is the basic layout:
• Left vertical line: low E string
• Right vertical line: high E string
• Top horizontal line: nut or first fret reference
• Spaces below the top line: fret positions
• Dots inside spaces: finger locations
When a chord chart shows a thick bar at the top, that bar usually represents the nut. In this case, the first open position sits directly below it.
Some charts use a small number beside the diagram. For example, “5fr” means the chart begins at the fifth fret. This matters because the shape is no longer in the open position.
To understand how do you read guitar chord charts, always ask three questions:
-
Which string does each dot sit on?
-
Which fret contains each dot?
-
Should each remaining string ring open or stay silent?
Answering these questions gives you the full chord shape.

Understanding Strings, Frets, and the Nut
The guitar strings run vertically in a chord chart. The low E string appears on the far left. The high E string appears on the far right.
This view is different from looking down at your guitar while holding it. When you look at the fretboard, the thickest string is closest to your face. On a chord diagram, it is usually drawn on the left.
The frets run across the neck. A dot in the first space means your finger goes behind the first fret. It does not mean you press on the metal fret itself.
Place your finger just behind the fret wire. This gives the note a clean sound and reduces buzzing. Pressing in the middle of the space often works, but pressing close to the fret usually feels easier.
The nut is the strip at the top of the neck. Open strings vibrate from the nut to the bridge. When a chart shows “O” above a string, do not press that string anywhere.
When a chart shows “X,” mute or skip the string. You can mute it by lightly touching it with a finger from your fretting hand or by avoiding it with your picking hand.
A key part of how do you read guitar chord charts is learning that the chart is not a complete picture of every guitar part. It shows the note positions needed for one chord shape. Your hands still need to create clean pressure and a relaxed angle.
What the Dots and Finger Numbers Mean
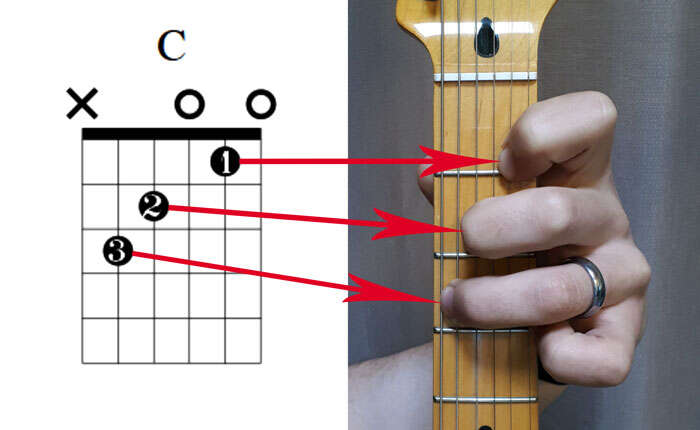
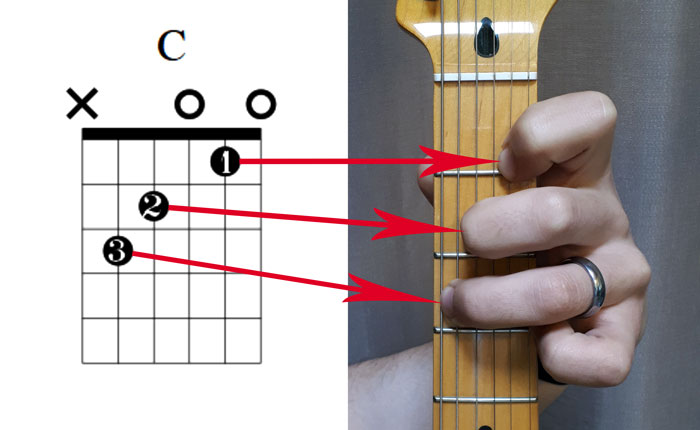
The dots on a chord diagram show where your fingers go. A dot may contain a number, such as 1, 2, 3, or 4.
These numbers refer to your fretting hand fingers:
• 1 means index finger
• 2 means middle finger
• 3 means ring finger
• 4 means pinky
Your thumb is not numbered. It usually rests behind the neck for support.
For example, a basic open D major chord often uses these finger positions:
• Index finger on the third string at the second fret
• Middle finger on the first string at the second fret
• Ring finger on the second string at the third fret
The fourth, fifth, and sixth strings are usually not played in this chord shape. This is why the chart may show “X” above those strings.
Finger numbers are helpful, but they are not always absolute rules. A different fingering may work better for a certain song or chord change. Still, begin with the suggested fingering because it is usually chosen to make the shape stable and easy to change.
When learning how do you read guitar chord charts, do not focus only on placing the dots. Also check whether your fingers block nearby strings. A correct shape can still sound bad if one finger leans into the wrong string.

How to Read Open Chord Charts
Open chords use one or more strings that ring without fretting. They are common in folk, country, rock, blues, and pop music.
Common open chords include:
• C major
• G major
• D major
• A major
• E major
• E minor
• A minor
Let’s use E minor as a simple example. A typical E minor chart shows:
• Open low E string
• Middle finger on the A string at the second fret
• Ring finger on the D string at the second fret
• Open G string
• Open B string
• Open high E string
You strum all six strings. The open strings help create the full, ringing sound associated with the chord.
A minor uses a similar idea, but the low E string is usually muted. The A string rings open, while fingers press on the second fret of the D and G strings and the first fret of the B string.
One useful lesson in how do you read guitar chord charts is to study the strings that are not fretted. These open strings are part of the chord. They are not empty spaces or optional decorations.
Before strumming, pick each string one at a time. Listen for a clear note. If a string buzzes or sounds muted, adjust your finger position before playing the whole chord.

How to Read Barre Chord Charts
Barre chords use one finger to press several strings at once. The diagram may show a long curved line, a thick straight line, or a bar across multiple strings.
The index finger often creates the barre. Other fingers form the rest of the chord shape.
For example, an F major chord may use an E major shape moved up one fret. The index finger covers the first fret across several strings. The other fingers complete the shape.
A barre chord chart may include:
• A thick line across multiple strings
• A number showing the fret position
• A curved line labeled with a finger number
• Open circles for strings that still ring open
Barre chords can feel difficult at first. The problem is often not weak fingers. It is poor hand position or too much tension.
Try these steps:
-
Place your index finger across the fret.
-
Keep the finger close to the fret wire.
-
Turn the index finger slightly toward its bony side.
-
Add the other fingers one at a time.
-
Pick each string to find muted notes.
-
Relax your thumb and wrist between attempts.
The main lesson in how do you read guitar chord charts for barre chords is to notice the fret number. The shape may look familiar, but its location changes the chord name.
For instance, an E shape at the first fret creates F major. The same shape at the third fret creates G major. The index finger acts like a movable nut.

How to Read Chord Chart Symbols
Chord diagrams use a small set of symbols. Once you know them, most charts become easy to scan.
Open string symbol
An “O” above a string means play that string without pressing a fret. It should ring clearly.
Muted string symbol
An “X” above a string means do not play it. Some charts use the word “mute” instead.
Finger number
A number inside a dot shows the recommended fretting finger. A number outside the diagram may show the fret position.
Barre symbol
A curved or thick line across strings means one finger presses several strings. The diagram may label the barre with a finger number.
Fret number
A number such as “5fr” tells you where the chart begins. Count from that fret rather than assuming the chart starts at the nut.
Roman numerals
Some advanced charts use Roman numerals to identify fret positions. For example, V means the fifth fret.
Chord names
The letter above the chart tells you the chord. A small “m” means minor. Other symbols may show seventh, major seventh, suspended, diminished, or added tone chords.
Understanding these symbols is central to how do you read guitar chord charts. Do not rush past the small details. One “X” or “O” can change the sound from full and correct to muddy and wrong.

How to Turn a Chord Chart Into a Real Chord
Reading the diagram is only the first step. You must convert the picture into a comfortable hand shape.
Follow this process:
-
Hold the guitar in a stable position.
-
Find the fret numbers shown on the chart.
-
Place each finger on its assigned string and fret.
-
Keep your fingertips rounded.
-
Avoid touching nearby strings.
-
Check the open and muted strings.
-
Pick each string slowly.
-
Strum only after every string sounds clear.
Your fingertips should press near the fret wire, not directly on top of it. Your wrist should stay loose. If your wrist bends sharply, move the guitar neck slightly upward.
A common beginner mistake is pressing too hard. The goal is to press firmly enough for a clear note, not to squeeze the neck. Excess pressure causes hand fatigue and makes chord changes slower.
When I help players work through how do you read guitar chord charts, I often suggest using a “freeze and check” method. Form the chord, stop, pick each string, fix one problem, and repeat. This builds accuracy faster than repeated strumming over a weak shape.

How to Practice Guitar Chord Charts
Good practice is short, focused, and consistent. You do not need to play for hours to improve.
Start with two chords that appear in the same song. For example, practice G and C, or A and D. Form the first chord, strum four times, and then change to the second chord.
Use this simple routine:
• Hold the first chord for ten seconds.
• Pick each string once.
• Correct any buzzing or muted notes.
• Relax your hand.
• Change to the second chord.
• Repeat the process slowly.
You can also practice silent chord changes. Place your fingers down without strumming, lift them, and place them again. This trains your hand to remember the shape.
A metronome can help. Begin at 40 to 60 beats per minute. Change chords every four beats. Increase the speed only when the changes stay clean.
Do not measure progress only by speed. Clean tone, relaxed movement, and correct rhythm matter more. Fast changes with buzzing notes will not sound musical.
The best way to improve how do you read guitar chord charts is to use real songs. Choose songs with three or four chords. Simple progressions help you connect the chart to rhythm, memory, and musical context.
Common Mistakes Beginners Make
Many chord chart problems come from small reading errors. These mistakes are normal, and they are easy to correct.
Reading the chart backward
Some players place the low E string on the right. This reverses the whole chord shape.
Check the chart orientation before placing your fingers. The low E string is usually on the left.
Pressing on the fret wire
Your finger should sit just behind the fret. Pressing on the wire can create a weak or dead note.
Move your finger slightly toward the headstock side of the fret space.
Ignoring muted strings
An “X” is not a suggestion. If you strum a muted string, the chord may sound muddy.
Practice controlling your pick or lightly muting the string.
Using flat fingers
Flat fingers often touch neighboring strings. Use rounded fingertips instead.
Keep your thumb behind the neck and allow your fingers to arch over the strings.
Strumming too soon
Many players strum before checking the shape. This hides the real problem.
Pick each string alone first. Then strum once the notes sound clear.
Holding too much tension
A tight hand slows every chord change. Shake out your hand often and use the least pressure needed.
These corrections make how do you read guitar chord charts much easier. The chart itself is rarely the true problem. Most issues come from orientation, finger angle, pressure, or string control.
Chord Charts Compared With Tab and Standard Notation
A chord chart shows a chord shape. Guitar tablature shows which notes to play and when. Standard notation shows pitch and rhythm using a musical staff.
Each system serves a different purpose:
• Chord charts help you play harmony.
• Tablature helps you play riffs, melodies, and picking patterns.
• Standard notation gives detailed information about pitch, rhythm, and musical expression.
You do not need to read standard notation before learning chord charts. Many successful guitarists begin with chord diagrams and later add tab or notation.
A song may include all three. The chord chart tells you the shape. The tab shows a picking pattern. The rhythm notation explains timing.
This is why how do you read guitar chord charts is a useful first step, but not the entire guitar learning process. Chord diagrams help you accompany songs, while tab and notation expand your ability to play detailed parts.
Charts also have limits. They may not show the best fingering for every player, the exact rhythm, or the desired tone. Use your ears and listen to the recording when the chart leaves questions unanswered.
How to Read More Advanced Chord Names
After learning basic major and minor chords, you may see more detailed names. These names describe the notes included in the chord.
Here are common examples:
• G7: a dominant seventh chord
• Cmaj7: a major seventh chord
• Dsus4: a suspended fourth chord
• Asus2: a suspended second chord
• Bdim: a diminished chord
• Eadd9: an added ninth chord
The chart still works in the same way. Read the strings, frets, dots, and symbols. The chord name simply tells you the sound or note structure the shape represents.
A slash chord, such as D/F#, means play a D chord with F sharp as the lowest bass note. The diagram may show a special bass note or a muted low string.
Do not feel pressured to memorize every chord name at once. Learn the shape first, then connect it to the name. Over time, your fingers will recognize common patterns before you consciously read every dot.
The same principles of how do you read guitar chord charts apply to simple and advanced chords. More symbols may appear, but the diagram still answers the same basic question: where should each finger go, and which strings should sound?
Tips for Reading Chord Charts on a Phone or Screen
Digital chord charts can be useful, but small screens create new problems. A diagram may appear sideways, blurry, or cropped.
Before playing, check these details:
• Turn your phone so the chart is easy to view.
• Zoom in on small finger numbers.
• Confirm the low E and high E sides.
• Look for a fret number near the diagram.
• Check whether the chart uses a left handed layout.
Some websites show chord diagrams for left handed guitarists. These may look reversed compared with standard right handed charts. If the shape seems impossible, check the layout before changing your fingering.
Screen brightness and finger numbers can also cause mistakes. When possible, use a clear chart from a trusted music education platform or a reputable guitar method book.
Learning how do you read guitar chord charts from digital sources requires the same care as reading printed diagrams. The format changes, but the musical information remains the same.
Frequently Asked Questions About How Do You Read Guitar Chord Charts
How do you read guitar chord charts from left to right?
The left side usually represents the low E string, and the right side represents the high E string. Read the dots by matching each one to its string and fret.
What does an X mean on a guitar chord chart?
An X means you should not play that string. You can skip it with your picking hand or mute it lightly with a fretting hand finger.
What does an O mean on a guitar chord diagram?
An O means the string is played open. Do not press that string on any fret.
Are the dots on a chord chart the frets?
The dots show where your fingers go within the fret spaces. Place your finger just behind the metal fret wire, not directly on top of it.
What do the numbers inside the dots mean?
The numbers show which fretting hand fingers to use. Number 1 is the index finger, 2 is the middle finger, 3 is the ring finger, and 4 is the pinky.
How do you read guitar chord charts for barre chords?
Look for a thick line across several strings and check the fret number. The index finger usually presses the barre while the other fingers complete the chord shape.
Do guitar chord charts show strumming patterns?
Usually, no. A chord chart shows the fingering shape, but it does not normally show the rhythm or strumming pattern. You need separate rhythm instructions or a recording for that information.
Can beginners learn guitar with chord charts alone?
Beginners can learn many songs with chord charts alone, especially songs based on simple open chords. Adding rhythm practice, ear training, and basic tab will help you become a more complete guitarist.
Conclusion
Learning how do you read guitar chord charts starts with four ideas: identify the strings, locate the frets, follow the dots, and respect the “O” and “X” symbols. Then check each note, keep your hand relaxed, and practice slow chord changes with real songs.
Do not worry if your first chords buzz or feel awkward. Every guitarist builds comfort through small, repeated corrections. Pick one simple chord pair today, read the chart carefully, and practice clean changes for five minutes. Explore more guitar lessons, try a few beginner songs, and share which chord chart you are learning next.

Senior Music Reviewer
Alex Carter is a seasoned music reviewer with over a decade of experience in the world of sound and instruments. Passionate about helping musicians and enthusiasts make informed choices, he brings sharp insights and in-depth knowledge to every review. From classical instruments to modern gear, Alex combines technical expertise with a love for music to deliver content that resonates with readers.
As a Senior Music Reviewer and expert author on Tuneluma.com, Alex is dedicated to sharing honest evaluations, practical advice, and thoughtful commentary to guide readers in their musical journey.