How Do You String A Classical Guitar: Easy Guide
To string a classical guitar, remove the old strings, tie new nylon strings securely, and tune them slowly.
Learning how do you string a classical guitar is easier when you understand its tie-on bridge, nylon strings, and gentle tuning needs. Unlike a steel-string guitar, a classical guitar usually has no bridge pins, so each string must be tied by hand. This guide explains the full process, common mistakes, useful tools, and simple ways to protect your guitar while you work.
What You Need Before You Start
Before learning how do you string a classical guitar, gather the right strings and a few basic tools. A clean, calm setup makes the job much easier.
You will need:
• A full set of classical guitar strings
• A string winder, if you have one
• Wire cutters
• A soft cloth
• A guitar tuner
• A small ruler or string cutter
• A stable table or workbench
Use strings made for classical guitar. Classical guitars need nylon or composite strings. Steel strings can create too much tension and may damage the neck, bridge, or top.
Classical guitar strings often have three plain or composite treble strings and three bass strings with a metal winding. String tension may be labeled low, normal, or high. Normal tension is a safe starting point for most players.
Check the package before opening it. Some sets use ball-end strings, but most traditional classical guitar strings have loose ends that must be tied at the bridge.

Understand the Classical Guitar String Order
Knowing the string order is a key part of understanding how do you string a classical guitar. When you hold the guitar in playing position, the strings are arranged from thickest to thinnest:
- Sixth string: low E
- Fifth string: A
- Fourth string: D
- Third string: G
- Second string: B
- First string: high E
The sixth, fifth, and fourth strings are bass strings. They have a wound metal surface. The third, second, and first strings are treble strings and may look clear, white, or slightly colored.
Many string packages label each string. Some also use different lengths or colored ends. Never rely only on thickness if you are unsure. Compare the new strings with the old ones before removing everything.
A simple way to remember the tuning is E, A, D, G, B, E. The thickest string is closest to your face when the guitar rests on your lap, while the thinnest string is closest to the floor.

Should You Change All Six Strings at Once?
When people ask how do you string a classical guitar, they often wonder whether to replace one string or all six. Both methods work, but changing all six strings gives the most even sound.
Replace one string at a time if:
• You want to keep the neck tension steady
• You are new to string changes
• You want to avoid mixing up the string order
• Your bridge or saddle moves easily
Remove all strings at once if:
• You need to clean the fingerboard
• You want to inspect the bridge and saddle
• You are comfortable handling a loose neck and bridge area
• Your guitar maker allows this method
A nylon-string guitar usually tolerates having all strings removed. Still, changing one string at a time is the safest choice for beginners. It also lets you use the old strings as a visual guide.
In my experience helping players with string changes, the biggest beginner mistake is removing every string before studying how the bridge knots are made. Take a quick photo first. That small step can save a lot of frustration.

Step 1: Loosen and Remove the Old String
The first physical step in how do you string a classical guitar is removing the old string safely.
Turn the tuning key slowly until the string becomes loose. Do not cut a string while it is under full tension. A sudden release can make the string whip toward your hand or face.
Once the string is slack:
- Cut it near the middle with wire cutters.
- Pull the pieces away from the tuning machine.
- Unwrap the string from the bridge.
- Place the old string in a trash bag or coil it carefully.
If the string is difficult to remove from the tuning post, loosen it more. Do not pull hard against the machine head. Excess force can bend the post or scratch the headstock.
Use this moment to wipe dust from the area around the bridge and tuning machines. Avoid using household cleaners. A dry, soft cloth is enough for most routine cleaning.

Step 2: Prepare the New String
A new string may have a plain end and a factory-wrapped end. The wrapped end usually goes through the bridge, but check the package instructions because designs vary.
Uncoil the string gently. Nylon strings often hold a curl from the package. Straighten the string with your fingers, but do not stretch it sharply.
Before tying it, identify the correct string. A thick bass string should not go into a treble position. The wrong string may feel loose, sound dull, or fail to reach the correct pitch.
If the string has a ball end, follow the manufacturer’s instructions. Some ball-end classical strings can pass through the bridge without a traditional knot, but do not assume every bridge works the same way.
Step 3: Tie the String to the Bridge
The bridge tie is the part that makes how do you string a classical guitar different from restringing a steel-string guitar.
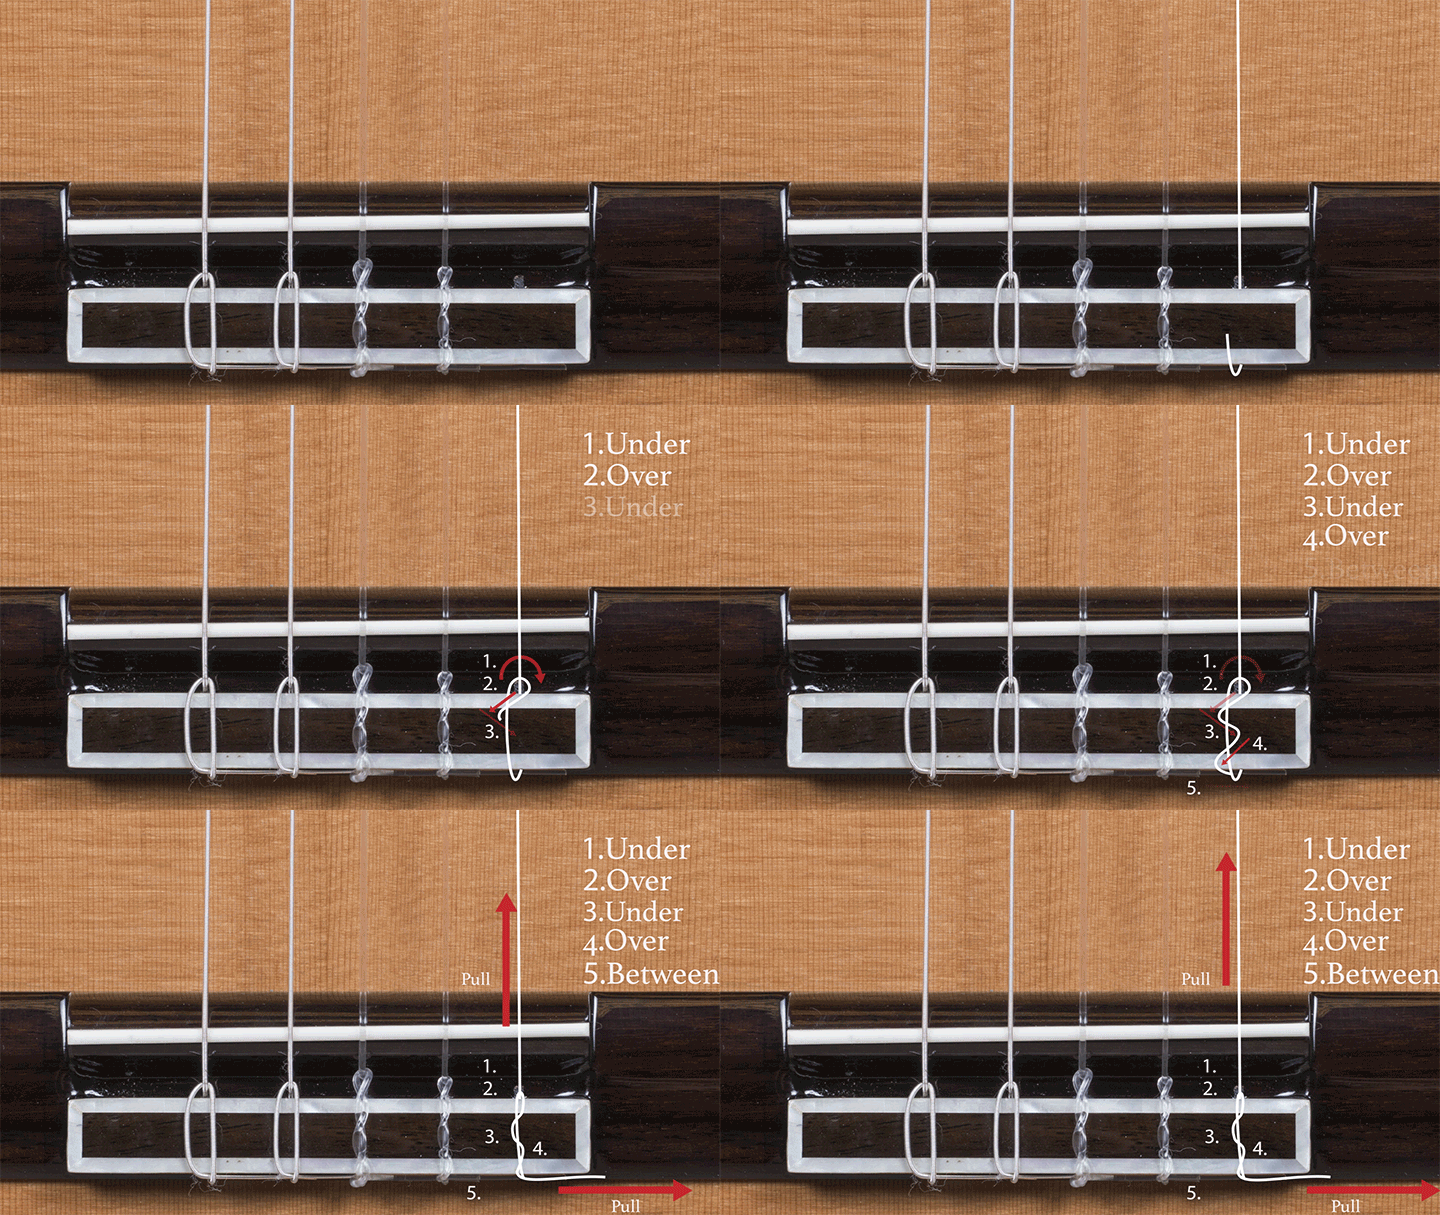
Start with the sixth string or another string you choose. Feed the loose end through the bridge from the soundboard side toward the bottom of the guitar. Pull about 3 to 4 inches of string through the bridge.
For a standard tie:
- Pass the loose end under the long part of the string.
- Wrap the loose end over the bridge edge.
- Tuck the end under the string again to form a loop.
- Pull the knot snug toward the bridge.
- Leave about 1/8 to 1/4 inch of extra string beyond the knot.
The bass strings are often easier because their winding helps the knot grip. Treble strings are smoother, so they need more careful wrapping.
On the first and second strings, make an extra wrap if the string slips. The end should point toward the center of the bridge, not toward the soundboard edge. Keep the knot low and neat so it does not press against the guitar top.
The knot should hold before you begin winding. If it slides, untie it and try again. A loose bridge knot is one of the most common causes of a string that will not stay in tune.
Step 4: Attach the String to the Tuning Post
After tying the bridge, guide the string up the neck to the correct tuning machine. Leave enough slack to create several neat wraps around the post.
A useful guide is to pull the string gently above the tuning post, then add about 2 to 3 inches of extra length. Bass strings may need slightly less slack than treble strings.
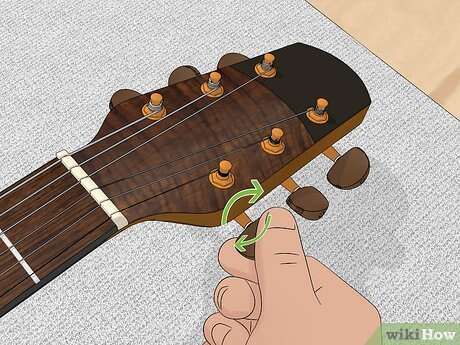
Insert the string through the hole in the tuning post. Then:
- Pull the string back toward the bridge.
- Bend the string at the post to hold it in place.
- Turn the tuning key so the wraps move toward the center of the headstock.
- Keep light tension on the string with your other hand.
- Make neat wraps without crossing over earlier wraps.
For many classical guitars, the string should wrap around the post three to five times. Treble strings may need more wraps because they are smooth and thin.
Keep the wraps close together. A messy coil can slip, make tuning unstable, or create extra noise. The string should leave the post at a clean angle and travel straight toward the nut.

Step 5: Tune the String Slowly
Tuning is the final major part of how do you string a classical guitar. New nylon strings stretch more than steel strings, so they may go flat many times during the first day.
Tune the string close to its target pitch, but do not force it. Use an electronic tuner and raise the pitch slowly. If you pass the note, lower the pitch below it and tune upward again.
After reaching the correct note:
• Pull the string gently away from the fingerboard
• Move your hand along the string and repeat
• Tune it again
• Check the bridge knot and tuning post
This process helps remove some slack. Use gentle pressure. Strong pulling can damage a fresh string or loosen the bridge knot.
Tune the guitar in this order if you want balanced tension:
- Sixth string
- First string
- Fifth string
- Second string
- Fourth string
- Third string
This pattern spreads tension across the neck. You can also tune from the sixth string to the first string one by one. The important point is to tune slowly and check the whole guitar again at the end.

How Long Do New Classical Guitar Strings Take to Settle?
New nylon strings may take several hours or a few days to settle. The exact time depends on the string material, tension, temperature, humidity, and how often you play.
During the first day, retune the guitar often. This is normal. It does not mean you installed the strings incorrectly.
You can speed up the settling process by:
• Tuning the guitar several times
• Gently stretching each string
• Playing simple scales and chords
• Checking the bridge knot after each retuning
Do not over-stretch the strings. Nylon can lose its tone if handled too roughly. Composite strings may settle faster, but they still need patience.
A classical guitar should normally be tuned to E, A, D, G, B, and E from the sixth string to the first. Some players use alternate tunings, but standard tuning is best while new strings settle.
Common Mistakes to Avoid
Knowing how do you string a classical guitar also means knowing what can go wrong. Most problems are easy to prevent.