How To Replace A Violin String: Easy Step-By-Step Guide
Replace a violin string by loosening the old string, fitting the new one, and tuning it slowly to pitch.
Learning how to replace a violin string is a useful skill for every player. A broken string can happen before a lesson, rehearsal, or concert, but the repair is simple when you know what to check. This guide explains the process step by step, with safe tuning tips, common mistakes, and practical advice used by teachers and repair professionals.

What You Need Before You Replace a Violin String
Before you replace a violin string, gather the right string and a few simple tools. A calm setup helps you avoid scratches, slipping pegs, and sudden string breaks.
You will need:
• A replacement string that matches the correct note: G, D, A, or E
• A violin tuner or tuning app
• A clean, soft cloth
• A pencil with graphite for the nut and bridge grooves
• Fine tuners, if your violin uses them
• A peg compound, only if a peg slips or feels unusually stiff
Choose a string made for your violin size. Most full-size violins use 4/4 strings, while smaller instruments need strings made for 1/2, 1/4, or another size. Using the wrong size can affect tuning, comfort, tone, and string tension.
String brands also differ in sound and feel. Steel strings often respond quickly and stay stable. Synthetic-core strings can offer a warmer sound. Gut strings have a rich tone but need more care and may change pitch more easily with temperature and humidity.
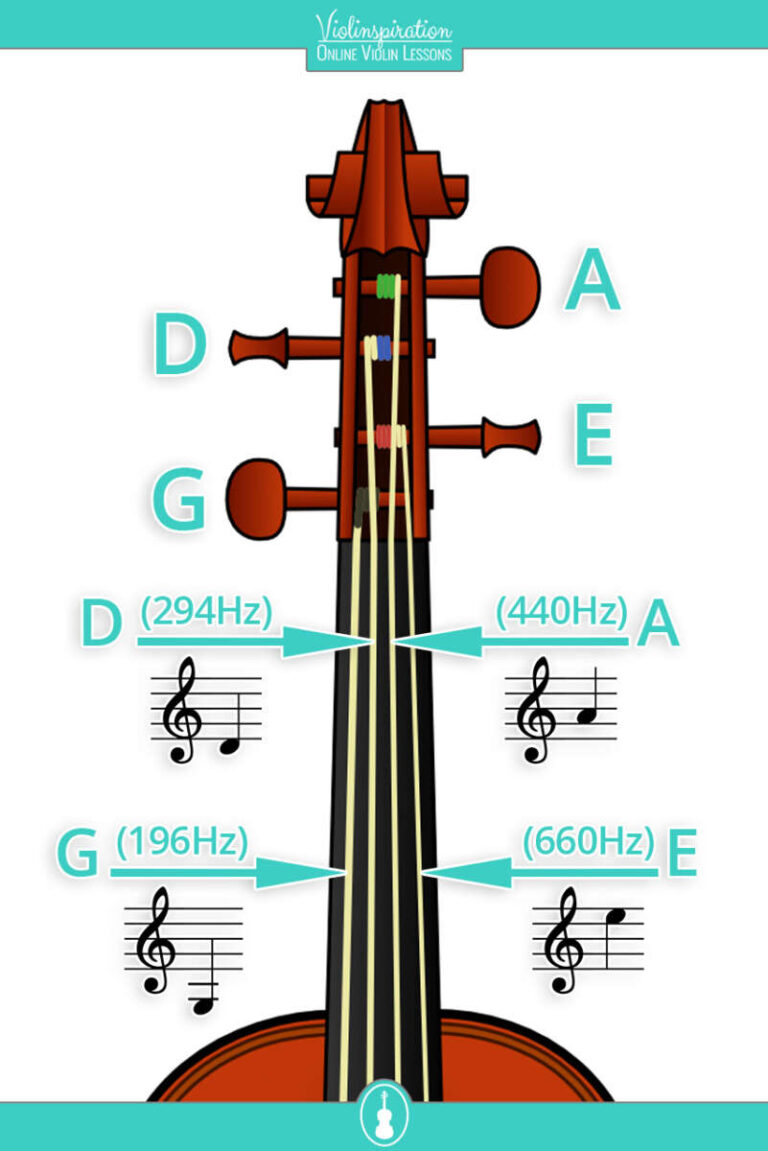
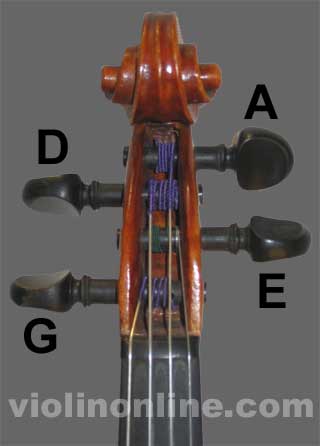
Check the package before opening it. Make sure the string name matches the string you need. The thickest string is the G string, followed by D, A, and the thin E string.

How to Replace a Violin String Safely
The safest method is to work on one string at a time. This keeps the bridge and soundpost stable. Removing all four strings at once can allow the bridge to fall or shift, especially on a student violin.
Step 1: Place the Violin on a Safe Surface
Set the violin on a clean table or hold it securely in your lap. Place a soft cloth under the instrument if the surface is hard.
Keep the violin away from the edge of the table. The scroll should not hang over the edge, and the instrument should not rest on the fine tuners or tailpiece in a way that could cause pressure damage.
Before you begin, look at the bridge. Its feet should sit flat on the violin top, and it should stand nearly upright between the f-holes. Take a quick photo if you are unsure of its normal position.
Step 2: Loosen and Remove the Old String
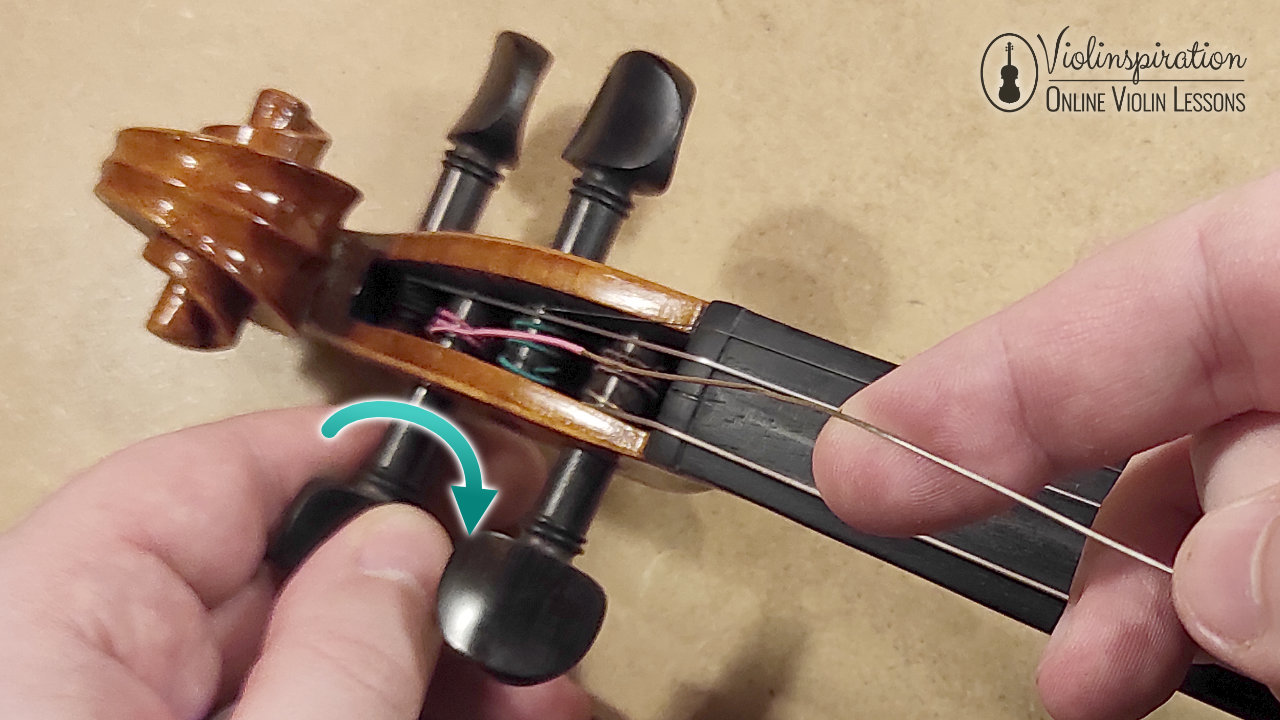
Turn the correct tuning peg toward you to lower the pitch. Continue until the string feels loose.
Remove the string from the peg hole first or from the tailpiece, depending on its condition. If the string has snapped, protect your eyes and fingers from sharp ends. Coil the old string and place it in a safe bin.
Do not pull a tight string straight across the violin. A loose string is easier to handle and puts less stress on the bridge and tailpiece.
Step 3: Check the Bridge and Nut
With the old string off, inspect the two places that hold it: the bridge and the nut.
The bridge is the thin wooden piece between the fingerboard and tailpiece. The nut is the small raised piece at the end of the fingerboard near the pegbox. Each has a groove that guides the string.
Look for:
• A deep or rough groove
• A bridge that leans toward the fingerboard or tailpiece
• Cracks in the bridge
• A string groove that is too wide or too narrow
• Dark dust or sharp wood around the groove
Rub a small amount of pencil graphite into the groove. Graphite can reduce friction as the string moves during tuning. Do not use oil or household lubricant.
Step 4: Fit the New String at the Tailpiece
Unwrap the new string and identify its end. Many strings have a small metal ball. This ball sits in the tailpiece slot or fine tuner.
For a violin with fine tuners, place the ball into the tuner’s hook or slot. For a tailpiece without fine tuners, place the ball into the matching hole or slot.
Make sure the string is fully seated. If the ball is not in place, the string may slip or damage the tailpiece.
Step 5: Guide the String Over the Bridge and Nut
Lay the string gently in the correct bridge groove. Then guide it into the matching nut groove.
The string should follow a straight path from the tailpiece, over the bridge, along the fingerboard, through the nut, and toward the pegbox. It should not sit on the edge of either groove.
Keep the string centered as you work. This small detail makes a real difference. A string that sits outside its groove can pull the bridge sideways or create a weak, buzzing tone.
Step 6: Insert the String Into the Peg
Turn the tuning peg so its hole is easy to reach. Insert the string through the hole by about 1/8 to 1/4 inch.
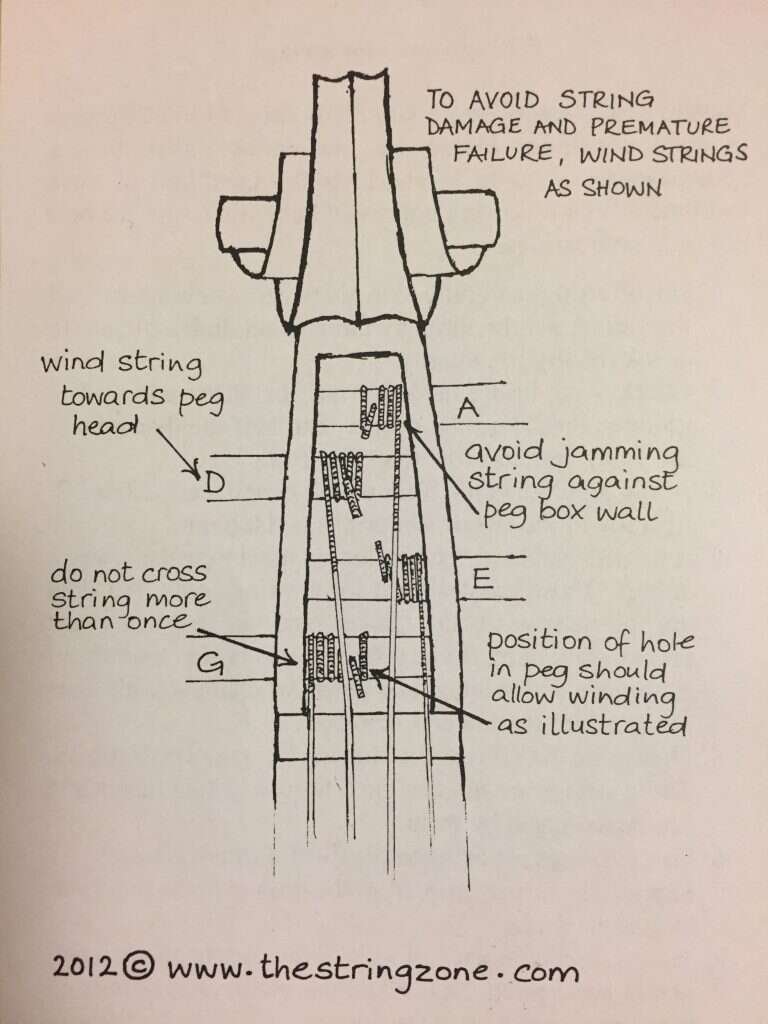
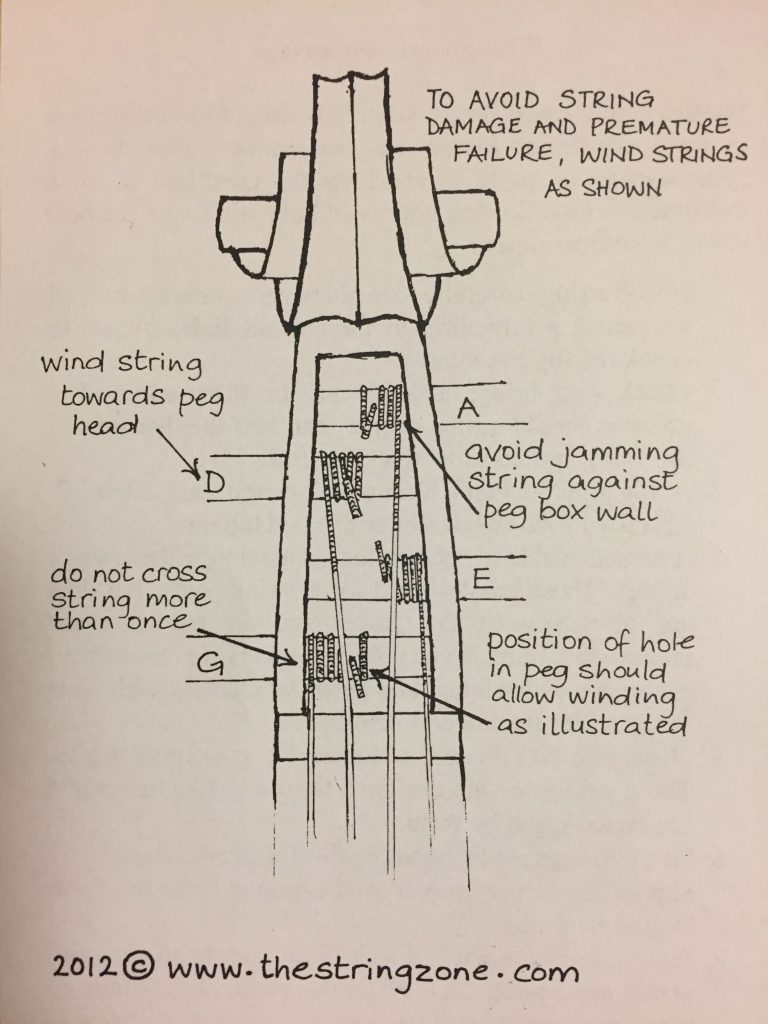
Begin turning the peg slowly. Guide the string so each wrap sits neatly beside the previous wrap. Keep the coils close to the peg wall without stacking them over one another.
For most pegs, the string should wind toward the pegbox wall. The exact direction depends on the peg location, but the key goal is a clean wrap and a straight string path.
Step 7: Bring the String Up to Pitch Slowly
Turn the peg in small movements. Stop often to check the bridge, nut, and string position.
Bring the string close to its target note, but do not rush the final tuning. New strings stretch, so the pitch may drop several times during the first hour or day.
Use the correct standard pitch:
• G3 for the G string
• D4 for the D string
• A4 for the A string
• E5 for the E string
Tune upward when possible. If you go too sharp, lower the pitch below the note and then raise it slowly. This helps reduce slack around the peg.
Step 8: Stretch the String by Hand
Once the string is near pitch, lift it gently at the center of the fingerboard. Use only light pressure. You can also pull the string slightly upward in a few places between the bridge and fingerboard.
Do not yank the string. Strong stretching can damage the winding or pull the bridge out of position.
Retune after each gentle stretch. Repeat this process until the pitch becomes more stable.
When I teach players how to replace a violin string, I stress patience at this stage. Most problems blamed on a “bad” string come from rushed winding, poor seating, or tuning too quickly.
How to Keep the Violin Bridge Straight
A bridge can lean while you replace a violin string. This often happens because the string pulls the bridge toward the pegbox as its tension increases.
Check the bridge after every few turns of the peg. Look at it from the side. The bridge should stand almost straight, with its feet flat against the violin top.
If the bridge begins to lean, loosen the string slightly. Then place both thumbs near the lower bridge corners and use very gentle pressure to guide it upright. Move slowly and never force a bridge that feels stuck.
A professional should inspect the instrument if:
• The bridge is cracked
• A bridge foot does not sit flat
• The soundpost falls
• The tailpiece shifts badly
• The string groove is damaged
• The peg will not turn or hold
The bridge is under constant string pressure. A small adjustment is normal, but a major correction can cause damage.
How to Tune a New Violin String
After you replace a violin string, tuning takes time. A new string does not reach stable pitch at once.
Start with a reliable electronic tuner. A clip-on tuner or chromatic tuning app works well for most players. Tune in this order only if needed: G, D, A, and E. If you replace one string, tune that string first, then check the other three.
Use the peg for large pitch changes. Use the fine tuner for small changes. Do not force a fine tuner all the way down. If it reaches its limit, loosen it and reset it before continuing.
Watch the tuner and listen to the instrument. Electronic tools are helpful, but trained ears also notice buzzing, weak response, or an unusual change in tone.
A new string may need several tuning checks during:
• The first five minutes
• The first practice session
• The first day
• The next few days, especially in a new climate
Temperature and humidity affect violin strings and wood. A string may stay stable indoors but shift after moving between a warm room and a cold car.
Common Mistakes When Replacing a Violin String
Even experienced players can make small errors. Most are easy to prevent.
Removing All the Strings at Once
This removes the tension that supports the bridge and helps hold the soundpost in place. Replace one string at a time unless a qualified repairer is handling the instrument.
Winding the String Over Itself
Crossed wraps can cause slipping and make the peg hard to turn. Guide each coil neatly toward the pegbox wall.
Forgetting the Nut Groove
If the string does not sit in the nut groove, it may buzz, feel too high, or pull the bridge out of line.
Tuning Too Fast
A quick turn can raise the pitch sharply. This may break the string, especially the thin E string.
Using the Wrong String
A violin string is not interchangeable with a viola or cello string. Even strings for the same violin size can have different tension levels.
Ignoring Sharp Metal Ends
Cut string ends can scratch hands, cases, or the violin finish. Fold or trim them carefully after the string holds its pitch.
Forcing a Stiff Peg
A stiff peg may have a fitting problem. Too much force can crack the pegbox or damage the peg. A luthier should handle persistent peg trouble.

How to Replace Different Violin Strings
The basic method is the same for all four strings, but each string has a few special details.
Replacing the G String
The G string is the thickest and usually has a deep, full sound. It may take longer to stretch and can require more turns around the peg.
Watch the bridge closely because the thicker string creates strong tension. Make sure the string sits fully in the G grooves at the nut and bridge.
Replacing the D String
The D string often settles more easily than the G string. Still, check the bridge after each tuning change.
A D string that is not seated well may produce a dull buzz near the nut or bridge.
Replacing the A String
The A string is used often and may wear from frequent tuning. Tune it carefully because the higher pitch makes it easier to overshoot the target.
If the A string breaks near the peg, inspect the peg hole for a sharp edge. A rough hole can damage new strings.
Replacing the E String
The E string is thin and can break suddenly. Tune it in very small steps and keep your face and eyes away from the string’s direct path.
Some E strings include a removable loop or ball end. Use the end that matches your fine tuner or tailpiece. Never force a ball-end string into a slot designed only for a loop.

When Should You Replace a Violin String?
Replace a violin string when it breaks, sounds dull, feels rough, or no longer stays in tune. A string may also need replacement if the winding becomes loose or shows visible wear.
There is no single schedule for every player. A beginner who practices twice a week may keep strings for many months. A daily player, orchestra member, or professional may replace them more often.
Signs of a worn string include:
• A flat or weak tone
• Slow response under the bow
• Rough spots under the fingers
• Fraying or loose winding
• Frequent tuning changes
• A whistle or strange overtone
Strings lose performance gradually. Players sometimes adapt to the change and do not notice it until a fresh set reveals more focus and response.
A single replacement string is fine when one string breaks unexpectedly. However, replace the full set when all strings are old or when the tone balance has become uneven.

How to Make New Violin Strings Last Longer
Good care can extend string life and protect the violin.
Wipe the strings and instrument with a clean, dry cloth after playing. Rosin dust can collect under the strings and damage the finish over time.
Wash and dry your hands before playing. Skin oils and sweat can wear string windings, especially during long practice sessions.
Store the violin in a suitable case. Avoid leaving it in a hot car, near a heater, or in direct sunlight. Sudden changes in heat and humidity can affect both strings and wood.
Do not use household cleaners, alcohol, or furniture polish on the violin. If the instrument needs deep cleaning, ask a qualified violin repairer.
A small amount of graphite at the nut can help the string move smoothly. If the same string keeps breaking in one spot, do not simply install another one. Find the cause first.

When to Ask a Luthier for Help
Most players can replace a violin string at home. Some problems, however, need professional care.
Contact a violin luthier if the soundpost falls, the bridge cracks, the pegbox splits, or the tailpiece moves out of place. A luthier should also check a peg that slips repeatedly or will not turn smoothly.
Ask for help if a new string breaks several times in the same place. The cause may be a sharp bridge groove, nut groove, fine tuner, or peg hole.
A professional setup can improve tuning, bridge fit, peg movement, and string height. This is especially helpful for a young player who struggles with constant slipping or buzzing.
Learning how to replace a violin string does not mean you must handle every repair alone. Knowing when to stop is part of good instrument care.
Frequently Asked Questions About How to Replace a Violin String
How long does it take to replace a violin string?
A first attempt may take 10 to 20 minutes. With practice, most players can replace a violin string in about five minutes, not including the time needed for repeated tuning.
Can I replace all four violin strings at once?
It is safer to replace one string at a time. Removing all four can let the bridge move or the soundpost fall, which may require professional adjustment.
Why does my new violin string keep going flat?
New strings stretch as they settle, so some pitch loss is normal. If the string keeps slipping after several days, check the peg wraps, peg fit, nut groove, and tailpiece connection.
How much should I stretch a new violin string?
Use gentle pressure only. Lift the string slightly from the fingerboard, then retune it; never yank or sharply pull the string.
Can I use a pencil on the violin string groove?
Yes, a small amount of graphite from a regular pencil can reduce friction in the nut and bridge grooves. Do not apply oil, grease, or liquid lubricant.
Should I tune the violin with the pegs or fine tuners?
Use the pegs for large pitch changes and the fine tuners for small adjustments. If a fine tuner is nearly at its limit, reset it before tuning further.
Why did my bridge move when I replaced a string?
String tension can pull the bridge forward or sideways. Loosen the string slightly and check the bridge position; seek professional help if the bridge is cracked or difficult to move.
Conclusion
Replacing a violin string is a simple repair when you work slowly and protect the bridge. Use the correct string, change one string at a time, seat it properly in the tailpiece, bridge, and nut, then tune it in small steps.
The first few attempts may feel tense, but the process soon becomes routine. Keep a spare set in your case, check the bridge after tuning, and ask a luthier for help when a problem involves cracks, a fallen soundpost, or repeated string breaks. Practice these steps on a calm day so you are ready when a string breaks before your next lesson or performance.

Senior Music Reviewer
Alex Carter is a seasoned music reviewer with over a decade of experience in the world of sound and instruments. Passionate about helping musicians and enthusiasts make informed choices, he brings sharp insights and in-depth knowledge to every review. From classical instruments to modern gear, Alex combines technical expertise with a love for music to deliver content that resonates with readers.
As a Senior Music Reviewer and expert author on Tuneluma.com, Alex is dedicated to sharing honest evaluations, practical advice, and thoughtful commentary to guide readers in their musical journey.