How To Mic A Drum Kit: Pro Tips For Punchy Drums
Place close mics on kick, snare, toms; use spaced overheads and a room mic for depth.
I’ve spent years recording drummers in studios and on stages, and I know what works. This guide walks you through how to mic a drum kit step by step, with clear mic choices, placement tips, phase checks, and mixing notes. Read on to get practical setups you can use right away for live shows or studio tracking.
Why mic a drum kit the right way matters
Good drum miking captures power, clarity, and feel. A well-miced kit gives the song punch and keeps cymbals from masking kick and snare. Bad miking makes drums sound thin, muddy, or inconsistent.
I’ve recorded kits in tight rooms and big halls. When mics are placed well, you hear the drummer’s energy and dynamics. Proper technique also saves time during mixing and helps the band sit better in the mix.

Basic concepts and tools you need
Understand a few core ideas before you start. Microphone type, polar pattern, and position shape the drum sound. Phase and bleed matter more than many people expect.
Essential gear list:
- Microphones for kick, snare, toms, overheads, and optional room mics
- Mic stands and clamps
- XLR cables and a snake or multitrack interface
- Headphones or monitors for checks
- A phase/polarity switch on your preamp or DAW
Microphone types and when to use them
Choose mics by role, not brand. Different mics excel at capturing specific drum elements.
Common choices and roles:
- Dynamic mics: good for snare and toms. They handle loud SPL and focus on midrange.
- Large-diaphragm dynamics: often used on kick for low-end weight.
- Condenser mics: great for overheads and cymbals; they capture detail and air.
- Ribbon mics: smooth high end, useful as room or overhead mics for a vintage tone.
Match mic to purpose. For example, use a tight-cardioid dynamic on snare for attack, and a pair of condensers overhead for cymbal clarity.

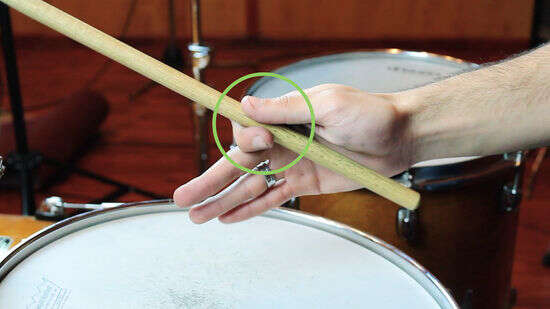
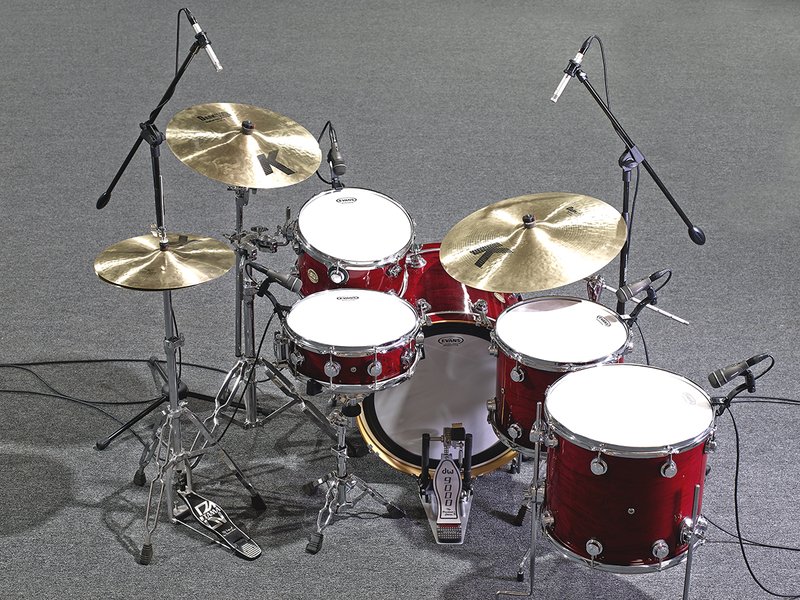
Step-by-step mic placement
This walkthrough uses a common 8-mic setup suitable for studio and adaptable for live work. I’ll show variations and quick swaps.
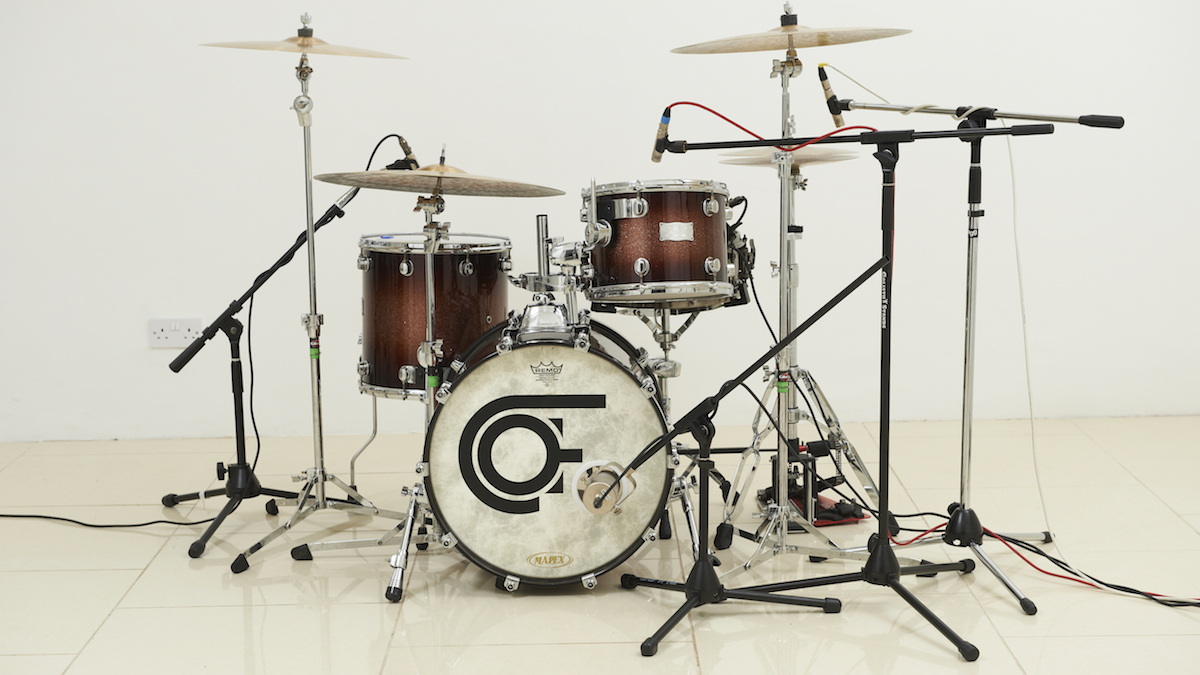
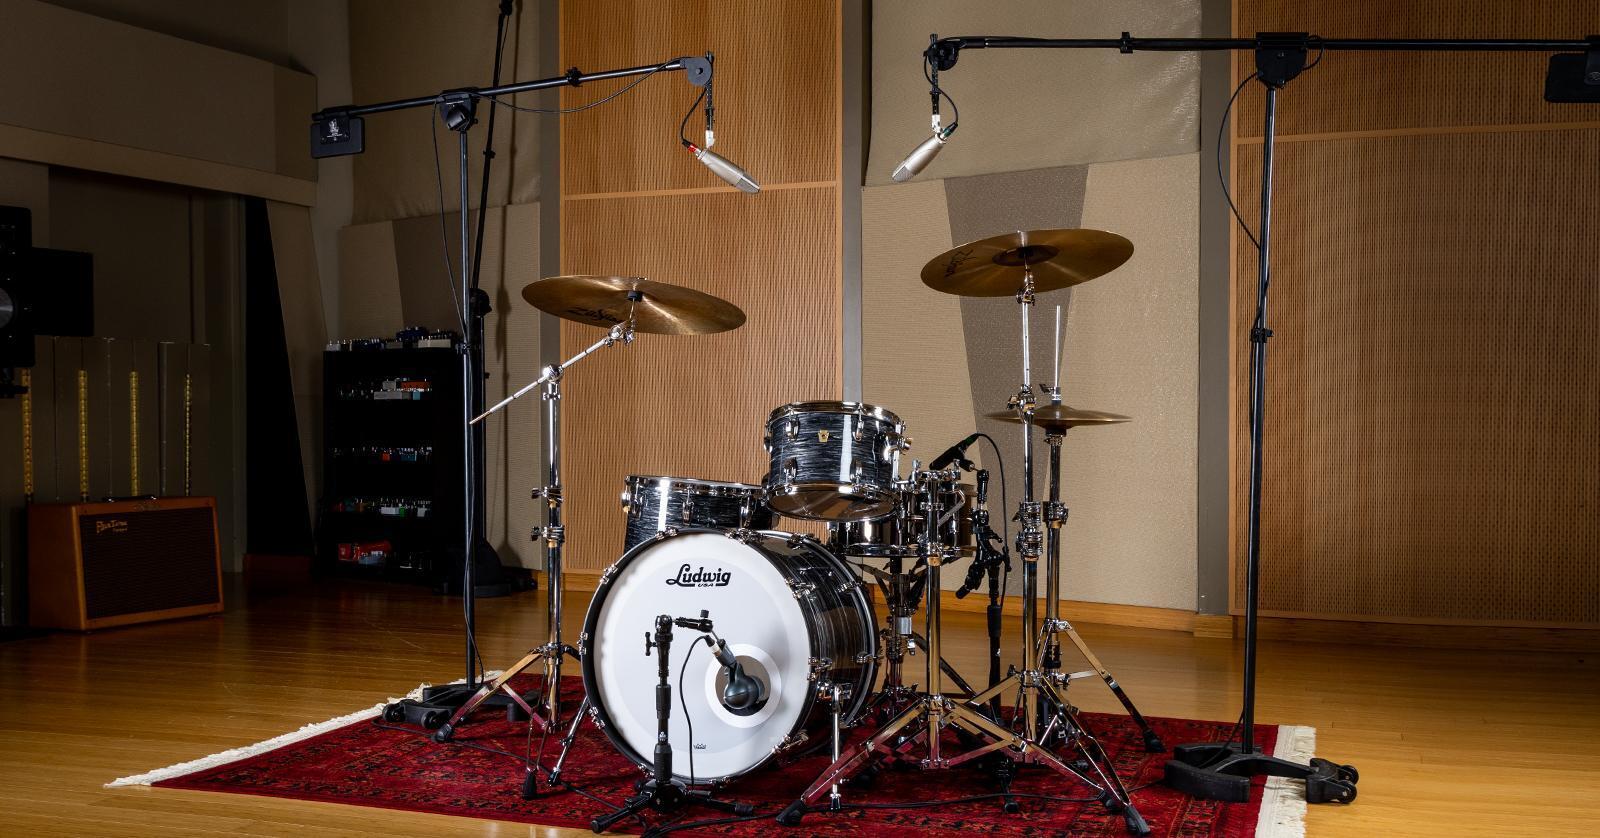
Kick drum
- Place a large-diaphragm dynamic inside the kick 2–6 inches from the beater for attack.
- Or place it just outside the hole for more boom and less beater click.
- Slight angle toward the beater tightens transient; farther back adds low-end.
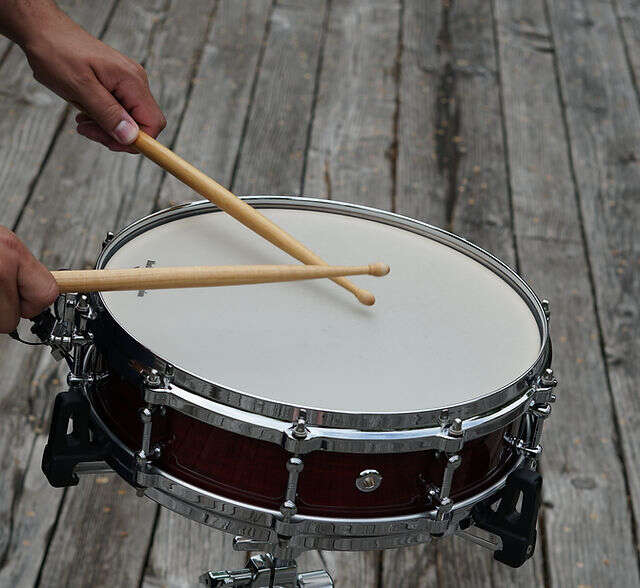
Snare drum
- Place a dynamic mic 1–2 inches above the rim, aimed at the center for body.
- Consider a bottom snare mic flipped phase to capture snare sizzle; check phase with top mic.
- Tight, angled placement increases attack and reduces cymbal bleed.
Toms
- Mount dynamics 1–3 inches above the head, angled toward the center.
- Closer mics give punch; pull back for more open tone.
- Tune toms before miking. Good tuning cuts down bleeding and improves clarity.
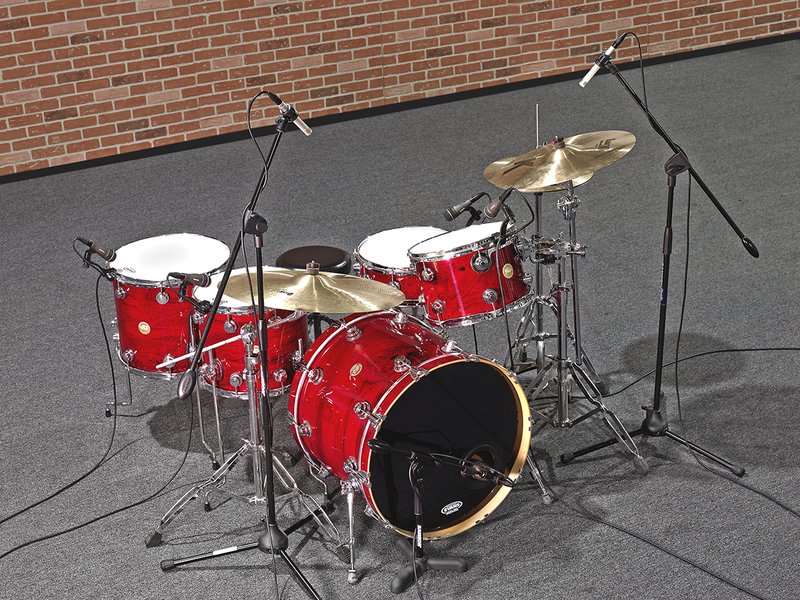
Overheads
- Use a spaced pair or XY pair about 2–4 feet above the kit.
- Aim to capture cymbals and a balanced stereo image of the kit.
- Spaced pairs give width; XY gives mono-compatibility and consistent phase.
Hi-hat
- Use a small-diaphragm condenser 6–8 inches above the edge, slightly off-axis.
- Close placement reduces bleed from snare and cymbals while keeping articulation.
Room mics
- Place a pair 6–12 feet away, depends on room size and desired ambiance.
- Use omnidirectional or figure-8 for room character.
- Room mics add depth when blended low under the close mics.
Combine and check
- Start rough mix with close and overheads, then bring in room mics.
- Check phase and mono compatibility at each step.
Phase, polarity, and bleed: small fixes, big results
Phase problems thin low end and smear transients. Fix them early.
Phase checklist:
- Flip polarity on one mic if two mics pick the same source and cancel.
- Move a mic slightly; a few inches changes phase relationships.
- Check kick-snare-tom interactions by listening in mono to find cancellations.
Bleed control tips:
- Use tight patterns and close placement to reduce bleed.
- Damp tom edges if they ring too long.
- Gate sparingly; use transient shaping and careful EQ first.

Quick setups for different goals
Adapt microphone count and placement to your goal. Here are trusted presets.
Studio tracking (full control)
- Kick, snare top, snare bottom, 2–3 toms, 2 overheads, 1–2 room mics.
- Record each mic to its own track for flexibility.
Live sound (travel and speed)
- Kick, snare, 2 overheads, optional tom mics.
- Use clamps to reduce stand clutter. Prioritize bleed control and phase.
Minimalist (podcast, rehearsal)
- Overhead XY pair and kick mic. Works fast and gives a natural kit sound.
- Useful for small budgets and quick setups.
Mic selection by budget and use-case
You don’t need pro-level mics to get a great sound. Choose affordable, reliable options for key spots.
Budget-friendly choices:
- Kick: cheaper large-diaphragm dynamic or dynamic with a pad
- Snare: classic dynamic with good transient response
- Overheads: affordable small-diaphragm condensers in matched pair
- Room: modest large-diaphragm condenser or a pair of condensers
Mid-range and pro tips:
- Invest most in overheads and kick for tonal control.
- Replace disposable cables and clips when worn; bad gear hurts tone more than cheap mics.

Basic EQ and compression starting points
Start simple. Use EQ to carve, not to fix everything. Compress to glue, not squash.
Kick
- Low shelf cut/boost around 60–80 Hz for weight.
- Add 2–4 kHz boost for beater click if needed.
Snare
- High-pass around 100 Hz to remove rumble.
- Boost 200 Hz for body, 4–6 kHz for snap.
Overheads
- High-pass to remove low-end buildup.
- Gentle lift around 8–12 kHz for sheen.
Compression
- Use fast attack and medium release on kick/snare to tame peaks.
- Bus compression on drum group can glue kit pieces together. Use light ratios.
Common mistakes and how to avoid them
Avoid these pitfalls I’ve seen many engineers make early on.
Common errors:
- Miking without tuning the drums. A tuned kit records better with fewer fixes.
- Ignoring phase checks. Phase cancellations can ruin the low end.
- Over-miking without purpose. More mics = more work balancing bleed and phase.
Quick fixes:
- Tune drums, then mic.
- Check phase in mono often.
- Remove any mic you don’t need. Simplify.
Workflow tips and a practical checklist
A consistent workflow speeds sessions and improves results.
Session checklist:
- Tune drummer and tune drums.
- Place mics roughly, then refine while drummer plays simple grooves.
- Check levels and phase in mono and stereo.
- Record a test take and listen on multiple speakers.
- Save mic positions and pictures for repeatability.
My real-world tip: take a quick phone photo of every mic position. It saves time when the drummer asks to return to a previous sound.
Troubleshooting: quick answers to common problems
If the kick sounds weak, try moving the mic toward the beater. If the snare lacks snap, angle the mic toward the rim and check phase with the bottom snare mic. If overheads sound harsh, back them up a little and add a slight high-frequency cut.
PAA-style quick questions
What’s the minimum mics for a usable drum sound?
- Two mics can work: kick and a stereo overhead pair or XY. It’s a fast, usable solution for demos.
How far should overheads be from the kit?
- Start 2–4 feet above the cymbals. Closer yields detail; farther gives more room tone.
Should I mic the snare bottom?
- Bottom snare mics add snare wire texture. Flip polarity and blend with the top snare to taste.
Frequently Asked Questions of how to mic a drum kit
What is the best mic for a kick drum?
The best mic depends on desired sound. Large-diaphragm dynamics or specialized kick mics deliver punch and low-end; experiment with inside vs outside placement.
How many microphones do I need to mic a drum kit?
It depends on sound goals. A full studio setup uses 8–12 mics; a live or minimal setup can work well with 3–5 mics.
How do I check for phase problems?
Listen in mono and flip polarity on suspect mics. Move mics slightly and listen for fuller low end; that indicates improved phase alignment.
Should overheads be stereo or mono?
Overheads should be stereo to capture kit width and cymbal image. Choose XY for phase stability or spaced pairs for wider stereo.
Can I use condenser mics on a live stage?
Yes, but be careful with stage volume and avoid placing them where they will feedback. Use good gain staging and directional patterns to minimize problems.
Conclusion
You now have a clear roadmap for how to mic a drum kit, from mic choices and placement to phase checks and mixing starts. Start simple, trust your ears, and refine placement with small moves. Try a basic 8-mic setup, test in mono, and save your favorite positions with photos.
Take action: set up a quick test session, try the placements here, and tweak until the kit feels alive in the mix. If this helped, leave a comment about your gear or a photo of your mic setup — I’d love to hear what you capture.

Senior Music Reviewer
Alex Carter is a seasoned music reviewer with over a decade of experience in the world of sound and instruments. Passionate about helping musicians and enthusiasts make informed choices, he brings sharp insights and in-depth knowledge to every review. From classical instruments to modern gear, Alex combines technical expertise with a love for music to deliver content that resonates with readers.
As a Senior Music Reviewer and expert author on Tuneluma.com, Alex is dedicated to sharing honest evaluations, practical advice, and thoughtful commentary to guide readers in their musical journey.