What Makes You Beautiful Piano: Easy Chords & Guide
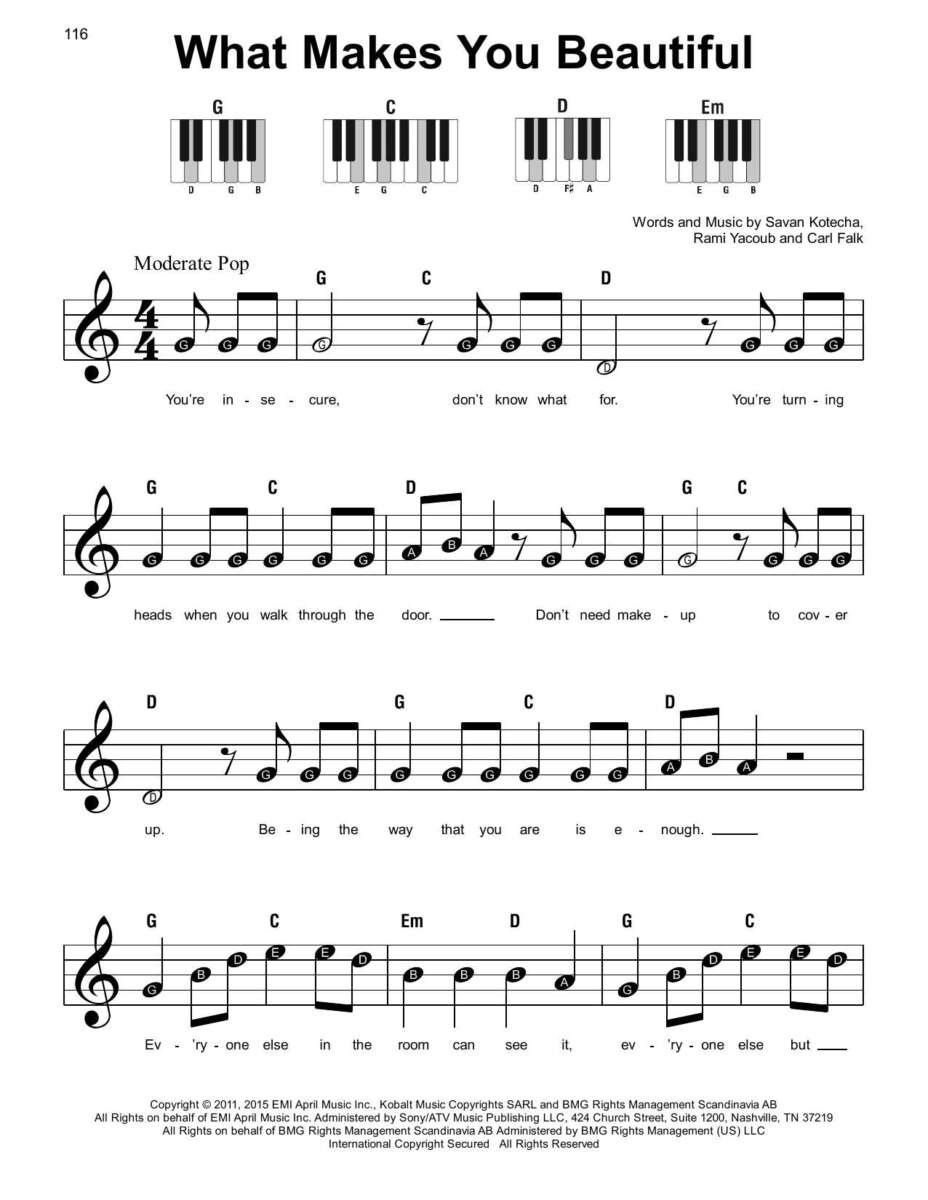
Learning “What Makes You Beautiful” on piano is a good first pop-song project. The song uses a small group of familiar chords, a steady beat, and a clear verse–chorus form.
For US players, the easiest starting point is a simplified version in C major:
C – F – G – Am
The original recording is commonly played in E major, using:
E – A – B – C#m
You do not need to play the full studio arrangement to make the song sound right. Start with block chords in the left and right hands, then add rhythm, inversions, and melody notes as your skill grows.

What key is “What Makes You Beautiful” in?
The original recording of “What Makes You Beautiful” by One Direction is commonly charted in E major. The main chord family includes E, A, B, and C-sharp minor.
Many beginner piano lessons move the song to C major. This makes the chords easier because the basic shapes use mostly white keys.
| Original-style chord | Easy C-major chord | Chord notes |
|---|---|---|
| E | C | C–E–G |
| A | F | F–A–C |
| B | G | G–B–D |
| C#m | Am | A–C–E |
This is a transposed arrangement, not a claim that the recording uses the C-major chords. The song keeps the same relative chord movement after the key changes.
Why C major works well for beginners
C major has no sharps or flats in its basic scale. That helps you:
- Find the chords faster
- Read simple chord charts
- Keep your hand in one comfortable position
- Focus on rhythm instead of key signatures
- Sing along without changing the song’s structure
If you want to play with the original recording, use the E-major chords. If you want the easiest first version, use C, F, G, and Am.

Easy piano chords for “What Makes You Beautiful”
The main simplified chord pattern is:
C – F – G – Am


In the original key, the matching pattern is:
E – A – B – C#m
These chords can support much of a basic piano arrangement. Exact chord changes may vary by section or by the sheet music edition you use.
How to play each chord
Play these notes together with your right hand:
- C major: C–E–G
- F major: F–A–C
- G major: G–B–D
- A minor: A–C–E
For a first attempt, use your left hand to play only the root note:
- C chord: play C
- F chord: play F
- G chord: play G
- A minor chord: play A
This creates a simple two-hand texture. Your left hand gives the song its base, while your right hand supplies the chord.
Beginner fingering
A simple right-hand setup is:
- C major: thumb on C, middle finger on E, little finger on G
- F major: thumb on F, middle finger on A, little finger on C
- G major: thumb on G, middle finger on B, little finger on D
- A minor: thumb on A, middle finger on C, little finger on E
You can use these shapes at first. Later, use chord inversions so your hand moves less.

A simple section-by-section chord map
A beginner arrangement can use the following general map:
| Song section | Easy chord idea in C major |
|---|---|
| Verse | C – F – C – G |
| Pre-chorus | Am – F – C – G |
| Chorus | C – G – Am – F |
| Bridge or middle section | Am – F – C – G |
| Final chorus | C – G – Am – F |
This map is a simplified teaching arrangement. Listen to the recording while following a licensed chord chart or sheet-music edition, because publishers and arrangers may show different chord changes.
The key point is the movement between the four chords. The chorus pattern, C–G–Am–F, is especially common in pop music because it creates a strong sense of lift and return.
Matching chords to the original key
To play along with the recording, use this matching map:
| Easy key | Original-style key |
|---|---|
| C | E |
| F | A |
| G | B |
| Am | C#m |
The original-key chorus becomes:
E – B – C#m – A


The original-key verse may use related combinations of E, A, and B, with C-sharp minor appearing in some sections.

How to play the rhythm
The song has a steady pop feel. You can begin with one chord per measure, then add movement.
Pattern 1: One chord per measure
Count:
1 – 2 – 3 – 4
Hold the chord for all four beats. Change chords when the next section or measure begins.
This is the easiest method and helps you learn the structure.
Pattern 2: Four even chord hits
Play the chord on every beat:
1 – 2 – 3 – 4
Keep each hit short and even. Do not press harder on every beat. Aim for a light, steady pulse.
Pattern 3: Pop-style broken chords
Play the notes of each chord one at a time:
1 – 2 – 3 – 4
For C major, you might play:
C – G – E – G
For F major:


F – C – A – C
For G major:
G – D – B – D
For A minor:
A – E – C – E
This pattern gives the song more motion without requiring a complex arrangement.
Pattern 4: Left-hand root and right-hand chord
Try this:
- Left hand: play the root note on beat 1
- Right hand: play the chord on beats 2, 3, and 4
For a C chord:
- Beat 1: left-hand C
- Beats 2–4: right-hand C–E–G
Keep the left hand soft. If it is too loud, the bass can cover the melody.

How to use chord inversions
An inversion changes the order of the notes in a chord. The chord stays the same, but your hand can move more smoothly.
For example:
- C major: C–E–G
- F major: C–F–A
- G major: B–D–G
- A minor: C–E–A
These shapes keep several notes close together. That reduces large jumps across the keyboard.
A smooth right-hand progression
Try this sequence:
- C major: C–E–G
- G major: B–D–G
- A minor: C–E–A
- F major: C–F–A
Your hand stays near the middle of the keyboard. This makes the chorus easier to play and gives it a connected sound.


Do not worry if the notes feel unfamiliar at first. Play each chord slowly, then change between two chords until the movement feels natural.

How to add the vocal melody
You can add the melody with your right hand after the chords feel comfortable. Do not try to play the full vocal line and full chords at the same time on your first attempt.
A practical method is:
- Learn the chord pattern.
- Find the melody by ear in small phrases.
- Play the melody with one finger.
- Add simple left-hand root notes.
- Replace the single notes with chord tones where appropriate.
The melody should remain louder than the chords. On an electronic keyboard, lower the accompaniment volume if the piano has that feature.
Avoid copying or printing the song’s full lyrics. Use the official recording or licensed sheet music to match words to notes.

A 15-minute practice plan
Short practice sessions work well for this song because the chord set is small.
Minutes 1–3: Learn the four chords
Play C, F, G, and Am as block chords. Say the chord names aloud.
Minutes 4–6: Practice chord changes
Move between:
- C and F
- F and G
- G and Am
- Am and F
Start slowly. Accuracy matters more than speed.
Minutes 7–10: Add the left hand
Play the root note with your left hand and the chord with your right hand.
For example:
- Left hand C with right-hand C major
- Left hand G with right-hand G major
- Left hand A with right-hand A minor
- Left hand F with right-hand F major
Minutes 11–13: Add a rhythm
Use four even beats per measure. Keep your tempo steady.
Minutes 14–15: Play one full section
Choose the chorus first. The repeating chord pattern makes it easier to hear your progress.
A metronome can help, but begin at a slow speed. The original recording is often listed near 125 beats per minute, though the exact feel depends on the source and arrangement. Build speed only after you can change chords without stopping.

Common problems and how to fix them
The chords sound wrong
Check the key first. If you are playing with the recording, C–F–G–Am will not match the original key without transposition.
Use:
E–A–B–C#m
Or use a keyboard transpose function if your instrument has one. Read the keyboard manual before changing the setting, and remember to return it to normal afterward.
Your hand jumps too much
Use inversions. Keep the notes close together instead of returning to each chord’s root position.
For the chorus, try:
- C: C–E–G
- G: B–D–G
- Am: C–E–A
- F: C–F–A
The song loses its energy
A chord held for four beats may sound flat. Add a broken-chord pattern or light repeated hits.
Keep the rhythm even. Pop piano sounds stronger when the pulse is steady, not when every note is played loudly.
You cannot change chords in time
Slow down. Practice only two chords at a time for one minute.
For example, alternate between C and G. Then add Am. Finally, add F. This isolates the hand movement and reduces frustration.
The piano sounds muddy
Do not play the left-hand notes too low or too loudly. Use one root note instead of large bass octaves until you have better control.
Also release each chord cleanly before the next one. A sustain pedal can blur the harmony if you hold it through every chord change.

Should you play the easy version or the original key?
Choose the version that matches your goal.
| Goal | Better choice |
|---|---|
| Learn the song quickly | C major |
| Play with the original recording | E major |
| Sing in a lower or higher range | Transpose to a comfortable key |
| Build beginner technique | C–F–G–Am |
| Practice sharps and chord symbols | E–A–B–C#m |
| Create a fuller arrangement | Use inversions and broken chords |
There is no rule that says a beginner must use the original key. A transposed version is still useful if it preserves the song’s chord relationships and rhythm.
If you sing along, choose the key that fits your voice. A piano arrangement should support the singer rather than force the singer into an uncomfortable range.

What to check in sheet music or online tutorials
Not every piano tutorial uses the same arrangement. Before you practice, check:
- The stated key
- Whether the chart uses chord names or full notation
- The tuning or pitch reference
- The section labels
- Whether the arrangement includes a capo-style transposition
- Whether the tutorial is for piano, guitar, or another instrument
- Whether the chord symbols match the recording
A guitar chord chart may show shapes that are easy for guitar but less natural on piano. Convert the chord names to piano notes rather than copying the finger shapes.
Licensed sheet music is the best choice when you need the exact vocal melody, rhythm, or piano part. A simplified chord chart is better when your goal is to sing and accompany yourself.

Key takeaways
- The easiest beginner version uses C, F, G, and Am.
- The original-style key is commonly charted as E major.
- The matching original-key chords are E, A, B, and C#m.
- Start with block chords, then add left-hand roots and broken patterns.
- Use inversions to reduce hand movement.
- Learn the chorus first because its chord pattern repeats clearly.
- Use licensed sheet music for the exact melody and arrangement.
Frequently asked questions
Is “What Makes You Beautiful” easy to play on piano?
Yes. A simplified arrangement is suitable for many beginners because it uses four main chords and a steady pop rhythm. The full recording is more detailed, but you can create a recognizable version with basic block chords.
What are the piano chords for “What Makes You Beautiful”?
A common easy-key version uses:
C – F – G – Am
A common original-key version uses:
E – A – B – C#m
The exact order can change between the verse, pre-chorus, chorus, and other sections.
Can I play the song with only my right hand?
Yes. Play the chord notes with your right hand. For an even simpler version, play only the root notes or the top note of each chord. Add the left hand after the chord changes feel comfortable.
What key should I use if I want to sing?
Use the key that fits your voice. C major is easier for many beginners, while E major matches the original-style arrangement. You can also transpose the song higher or lower by using a different chord family.
Do I need a sustain pedal?
No. You can learn the chords and rhythm without one. When you add a pedal, change it with each new chord. Holding it too long can make the harmony sound blurred.
Conclusion
The simplest way to learn “What Makes You Beautiful” on piano is to begin in C major with C, F, G, and Am. Practice the chord changes slowly, keep a steady four-beat pulse, and add inversions when your hands feel ready.
Once you can play the pattern without stopping, choose whether to stay in the easy key or move to E major to match the original recording. Your next step is to practice the chorus for five minutes, then add the verse using the same relaxed rhythm.

Senior Music Reviewer
Alex Carter is a seasoned music reviewer with over a decade of experience in the world of sound and instruments. Passionate about helping musicians and enthusiasts make informed choices, he brings sharp insights and in-depth knowledge to every review. From classical instruments to modern gear, Alex combines technical expertise with a love for music to deliver content that resonates with readers.
As a Senior Music Reviewer and expert author on Tuneluma.com, Alex is dedicated to sharing honest evaluations, practical advice, and thoughtful commentary to guide readers in their musical journey.