What Order To Change Violin Strings: Easy Guide
Change violin strings one at a time, usually from G to D, A, and then E, while keeping the bridge stable.
Knowing what order to change violin strings can make the job safer and less stressful. The key is not only the string order, but also how you remove, fit, stretch, and tune each string. This guide explains the best method used by violin teachers, repair shops, and experienced players, along with common mistakes that can damage your bridge or make tuning harder.
What Order to Change Violin Strings?
There is no strict rule that says you must change violin strings in one exact sequence. However, the safest method is to replace one string at a time and work from the lowest string to the highest:
- G string
- D string
- A string
- E string
This sequence is simple and easy to remember. It also lets you check the bridge and soundpost area as you work.
Some players prefer to begin with the A string or replace the strings in the reverse order, from E to G. These methods can also work. The most important rule is to avoid removing all four strings at once unless a trained violin technician is doing a full setup.
When asking what order to change violin strings, think of the violin as a small wooden frame under tension. Each string adds pressure to the bridge and body. Removing every string at once can allow the bridge to move or the soundpost to fall.

Why You Should Change One Violin String at a Time
A violin bridge is held in place mainly by string tension and careful fitting. It is not glued to the top of the instrument. When all four strings are removed, the bridge may tip forward, fall flat, or shift out of position.
The soundpost inside the violin can also move. This small wooden dowel sits between the top and back plates. It helps transfer vibration and supports the instrument. If it falls, the violin may need professional attention.
Changing one string at a time helps maintain:
• Bridge position
• Soundpost pressure
• String tension
• Familiar tuning balance
• A stable setup
From years of watching beginners change strings, the most common error is not choosing the “wrong” string first. It is loosening all four strings before the player understands how the bridge sits. Once the bridge moves, tuning becomes confusing and the instrument may sound weak or harsh.
The answer to what order to change violin strings is therefore less about a rigid rule and more about preserving steady tension.
The Best Order to Change Violin Strings
For most players, the following order is practical:
1. Change the G string
the G string is the thickest and lowest string. Loosen it slowly by turning the peg toward you in small movements.
Remove the old string from the peg and tailpiece. Clean away dust near the pegbox and tailpiece, but do not use oil or household cleaner on the violin.
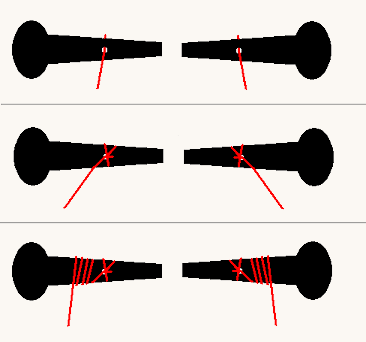
Fit the new G string through the tailpiece or fine tuner. Leave enough length to wrap around the peg two or three times. Keep the coils neat and close to the peg wall.
2. Change the D string
The D string is the next lowest string. Follow the same process, but watch the bridge closely as you bring the string up to pitch.
The bridge should remain upright. Its feet should sit flat on the top, and the bridge should stay between the inner notches of the f-holes.
3. Change the A string
The A string often feels more delicate than the G and D strings. Wind it neatly and avoid sharp bends near the nut or bridge.
If your violin has a fine tuner on the A string, start with the tuner near the middle of its adjustment range. This gives you room to tune both higher and lower.
4. Change the E string
The E string is the thinnest and most likely to break during installation. Turn the peg slowly and bring the string up to pitch in small steps.
Many E strings use a small protective tube near the bridge. Keep the tube centered over the bridge groove if the string includes one. This prevents the thin string from cutting into the bridge.
This G-to-E approach is the clearest answer to what order to change violin strings for a normal restringing job.
How to Change Violin Strings Safely
Before you begin, place the violin on a clean, soft surface. A folded towel can help protect the finish, but make sure it does not press against the bridge.
You will need:
• A complete set of violin strings
• An electronic tuner
• A soft cleaning cloth
• Peg compound if a peg slips or sticks
• A pencil for the nut and bridge grooves
• A bridge protector or soft cloth if needed
Follow these steps for each string:
-
Loosen the old string slowly.
-
Remove it from the peg and tailpiece.
-
Check the bridge position before installing the new string.
-
Place the new string into the correct tailpiece hole or fine tuner.
-
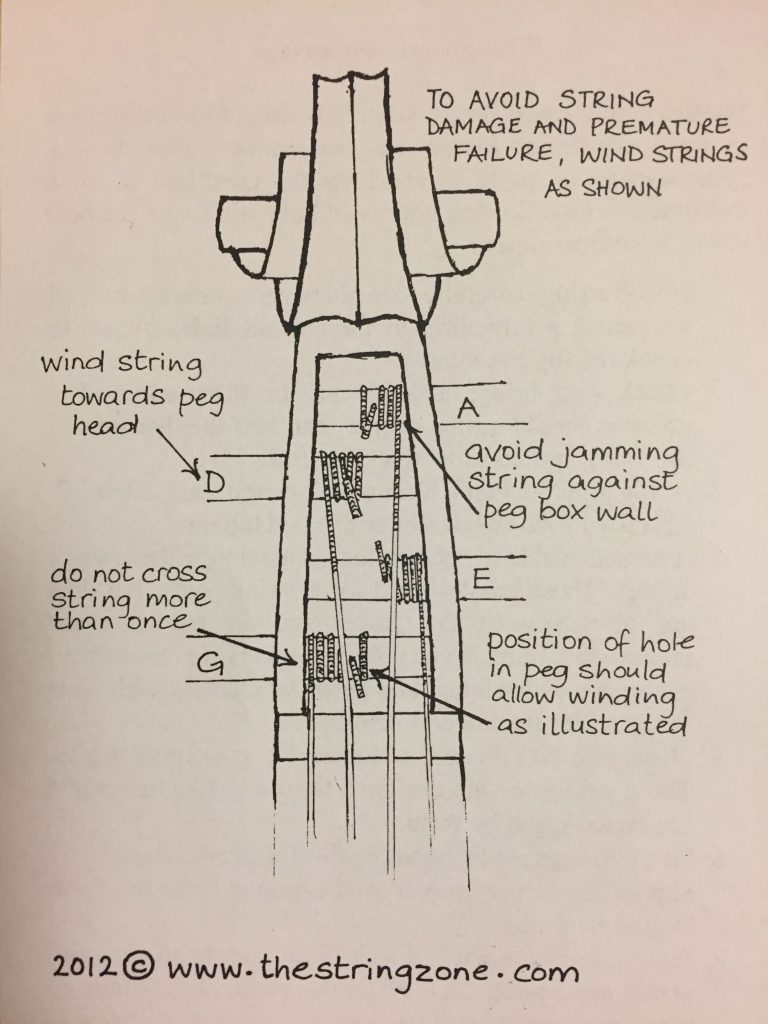
Guide the string through the matching peg hole.
-
Leave about two inches of string beyond the peg hole.
-
Turn the peg so the string winds neatly toward the pegbox wall.
-
Keep light pressure on the string while winding.
-
Bring the string only close to its note at first.
-
Check the bridge again before final tuning.
The string should wind in clean, even coils. Loose coils can slip. Overlapping coils can make the peg hard to turn and may cause sudden tuning changes.
A small amount of graphite from a pencil can reduce friction in the nut and bridge grooves. Do not use grease, cooking oil, or unknown lubricants. They can collect dust and may harm the instrument.

How to Keep the Bridge From Moving
Bridge movement is one of the main risks when changing violin strings. As you tune, the bridge may slowly lean toward the fingerboard.
Look at the bridge from the side. Its back surface, the side facing the tailpiece, should usually stand close to a right angle with the violin top. The front side may lean slightly toward the fingerboard, depending on the bridge design.
After installing each string, gently check the bridge feet. They should remain flat against the top. Do not force the bridge if it has shifted badly, because pressing in the wrong direction can damage the violin.
If the bridge leans, loosen the strings slightly before making a small correction. Hold the bridge with both thumbs and move it carefully, using even pressure. If you feel strong resistance, stop and ask a violin teacher or repair professional for help.
A warped bridge should not be forced back into shape. It may need replacement or professional adjustment.
Understanding what order to change violin strings is useful, but bridge awareness matters even more than the order itself.

Tuning After Installing New Strings
New strings stretch during their first several hours or days. They may go flat often at first. This is normal.