How To Put A String Back On A Violin: Easy Guide
To put a string back on a violin, fit it through the fine tuner, bridge, peg, and tailpiece carefully.
Learning how to put a string back on a violin is a useful skill for every player. A loose string can look confusing at first, but the process is simple when you understand the path from the tailpiece to the tuning peg. This guide explains each step, common mistakes, safe tuning methods, and signs that your violin needs professional care.
What You Need Before You Start
Before learning how to put a string back on a violin, place the instrument on a clean, flat surface. A table with a soft cloth works well. Keep the violin away from the edge so it cannot slide or fall.
You will need:
• The correct violin string
• A violin tuner or pitch app
• A soft cloth
• A pencil
• A peg compound, if the peg slips
• A small amount of patience
First, check the string. If it is still straight and has no sharp bends, you may be able to put it back on. Replace it if you see rust, flat spots, kinks, frayed winding, or damage near the ball end.
Violin strings are under strong tension. A damaged string can break without much warning. The broken end may also scratch your hand or damage the violin’s finish.

Identify the Correct String
A violin has four strings. From lowest pitch to highest pitch, they are G, D, A, and E. When you hold the violin in playing position, the G string is on your left and the E string is on your right.
Each string has a matching tuning peg and a specific place on the bridge. The pegbox often has two pegs on each side:
• The G and A pegs usually sit on the left side when you face the scroll.
• The D and E pegs usually sit on the right side when you face the scroll.
Peg layouts can vary slightly between instruments. Before removing anything, look closely at the original string path. A quick photo can help you remember where the string belongs.
The E string is usually the thinnest. It may have a small loop or a ball end, depending on the design. The other strings are thicker and often use ball ends that fit into the tailpiece.
Check the Violin Before Restringing
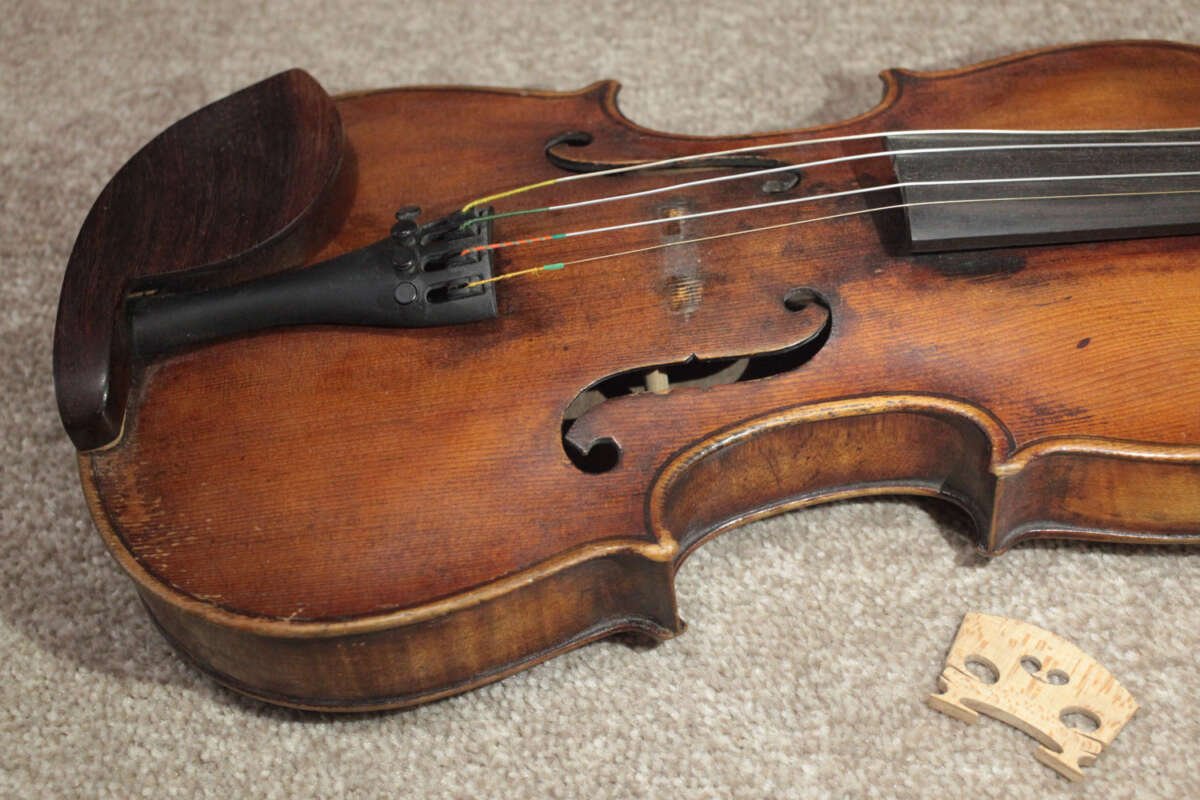
Before you learn how to put a string back on a violin, inspect the bridge. The bridge is the thin wooden piece between the fingerboard and tailpiece. It holds the strings at the correct height.
The bridge should stand almost straight. Its feet should sit flat on the violin’s top. The side facing the tailpiece is usually more vertical, while the side facing the fingerboard has a slight slope.
If the bridge has fallen, do not guess its position. A bridge that is too far forward, too far back, or turned around can affect tone and may damage the instrument.
Also check the soundpost. It is the small wooden post visible through the f-holes. If it has fallen, stop and take the violin to a qualified repair shop. The soundpost supports the violin’s top and should not be repositioned casually.

How to Put a String Back on a Violin
The following steps explain how to put a string back on a violin safely. Work slowly, especially when the string is close to full tension.
1. Loosen the tuning peg
Turn the correct tuning peg toward you to unwind it. Leave a small amount of string on the peg if the string is still attached.
If the string is completely off, turn the peg until you see the peg hole. The hole should point in a useful direction for feeding the string through.
Do not pull the peg out of the pegbox. Removing it can make the string path harder to manage and may loosen the other strings.
2. Attach the string to the tailpiece
Find the ball end of the string. Place the ball into the matching slot or hole in the tailpiece.
Some violins have fine tuners built into the tailpiece. If your violin uses a fine tuner, place the string’s ball end into the tuner’s hook or slot.
For an E string with a loop end, hook the loop onto the fine tuner. Make sure the loop is fully seated. A poorly placed loop can slip when you tune.
3. Guide the string over the violin
Lay the string gently across the top of the violin. It should pass over the bridge and fingerboard in a straight line.
Do not pull the string sharply from side to side. The string may scratch the varnish or knock the bridge out of place.
At this stage, check that the string sits in the correct bridge groove. The groove should hold the string without pinching it.
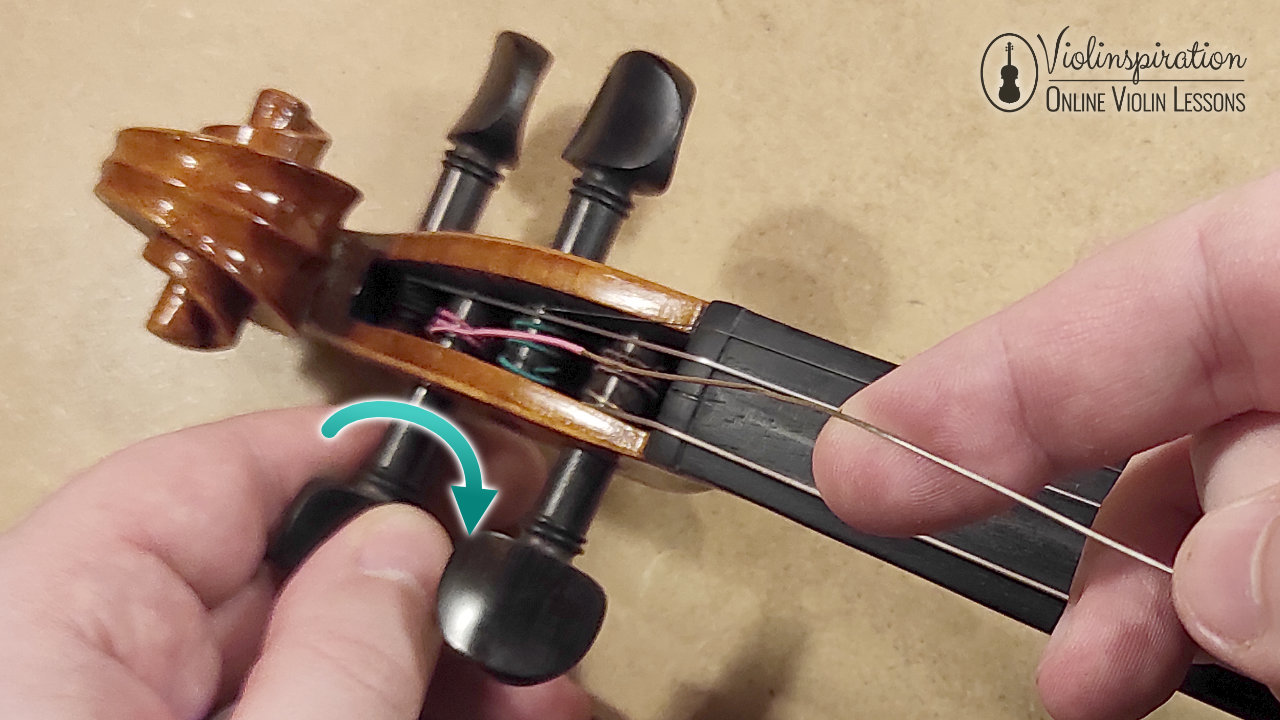
4. Feed the string through the peg
Guide the free end toward the correct tuning peg. Feed it through the hole in the peg.
Leave about 1/8 to 1/4 inch of string extending through the hole. This small amount gives the winding a starting point. Too much extra string creates a messy coil.
If the string is too short to reach the peg, it may be the wrong string or it may have been cut too short.
5. Turn the peg in the correct direction
Turn the peg so the string winds toward the inside wall of the pegbox. The coils should move toward the pegbox wall without touching it.
The string should wind neatly beside itself. Avoid crossing the coils over one another. Crossed coils can make the peg slip or make tuning feel uneven.
Keep gentle tension on the string with your other hand. This helps the string wrap tightly around the peg instead of forming loose loops.
6. Watch the bridge as tension increases
As you turn the peg, stop several times to check the bridge. The bridge may begin to lean toward the fingerboard as the strings tighten.
If it starts to lean, loosen the string slightly. Then use both thumbs to move the bridge gently back into an upright position. Keep your fingers away from the bridge feet and avoid sudden force.
The bridge should remain centered between the f-holes. Many violins have small reference marks that help show the correct bridge position.
7. Bring the string to rough pitch
Use a tuner to bring the string close to its correct pitch. Do not tune quickly. Make small turns and listen for changes.
The standard violin pitches are:
• G3 for the G string
• D4 for the D string
• A4 for the A string
• E5 for the E string
New strings stretch during the first hours and days. The pitch may drop often at first. This is normal.

How to Wind the String Correctly
Winding is one of the most important parts of how to put a string back on a violin. A neat winding pattern helps the peg hold its position.
Keep the coils close together, but do not stack them on top of one another. Leave a small gap between the coils and the pegbox wall. The string should not rub hard against the wood.
The free end should point away from the pegbox. If it points inward, it can touch nearby strings or make tuning difficult.
A common beginner mistake is turning the peg while holding the string too loosely. This creates slack. The peg may then unwind as soon as the player releases it.
Another mistake is forcing a stiff peg. If the peg will not turn smoothly, stop. A small amount of proper peg compound may help, but a badly fitted peg needs adjustment by a violin technician.

Keep the Bridge and String Grooves Safe
The bridge and nut have small grooves that guide each string. These grooves must be smooth and correctly sized.
If a groove is too tight, the string may catch during tuning. The pitch may jump suddenly, then fall back. This problem is known as string binding.