A Chord Guitar Finger Position: Easy Guide
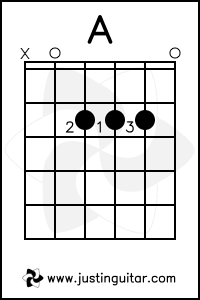
The standard a chord guitar finger position uses three fingers on the second fret while the open A string rings.
The a chord guitar finger position is one of the first shapes most players learn, and it appears in countless rock, pop, country, blues, and worship songs. Once your fingers sit correctly, the chord sounds bright and full without needing a difficult stretch.
This guide explains the standard A major chord, finger placement, string choices, common mistakes, practice methods, and useful variations. The goal is not only to show where your fingers go, but also to help you make the chord sound clean and musical.

What Is the A Major Chord?
The A major chord contains three main notes:
- A, the root note
- C♯, the major third
- E, the perfect fifth
On guitar, these notes appear several times in the open A shape. The most common version uses the open A string, three fingers on the second fret, and the open high E string.
The standard chord diagram looks like this:
A major: X 0 2 2 2 0
Read this pattern from the thickest string to the thinnest string:
- 6th string, low E: Do not play
- 5th string, A: Play open
- 4th string, D: Press the second fret
- 3rd string, G: Press the second fret
- 2nd string, B: Press the second fret
- 1st string, high E: Play open
The a chord guitar finger position may feel crowded at first. That is normal. The three fretted notes sit side by side, so your hand must stay relaxed and your fingers must approach the strings at a slight angle.

A Chord Guitar Finger Position Step by Step
The most common fingering uses your index, middle, and ring fingers. This setup works well for beginners and makes it easier to move to many other open chords.
Finger placement
Use this a chord guitar finger position:
- Place your index finger on the second fret of the fourth string, the D string.
- Place your middle finger on the second fret of the third string, the G string.
- Place your ring finger on the second fret of the second string, the B string.
- Leave the fifth string open.
- Leave the first string open.
- Avoid the sixth string.
Your fingertips should press just behind the metal fret wire. Do not place them directly on top of the fret. A position close to the fret gives a clear sound with less pressure.
Keep your thumb behind the neck. It does not need to squeeze hard. Think of your hand as holding a small ball rather than crushing a jar.
Finger numbers
Guitar teachers often use these numbers:
- 1 means index finger
- 2 means middle finger
- 3 means ring finger
- 4 means pinky finger
So, the usual a chord guitar finger position is:
1st finger: 2nd fret, D string
2nd finger: 2nd fret, G string
3rd finger: 2nd fret, B string
Some players use their index, middle, and ring fingers in a different order. The sound matters more than the exact order, as long as every note rings clearly.
How to Read the A Chord Diagram
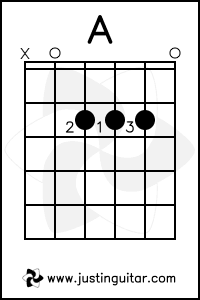
A chord diagram represents the guitar neck as if you are looking directly at it. The vertical lines show the strings, and the horizontal lines show the frets.
The thickest string appears on the left side of a standard diagram. The thinnest string appears on the right. This can feel backward when you first start, so check the string names often:
6th string: low E
5th string: A
4th string: D
3rd string: G
2nd string: B
1st string: high E
Common symbols include:
- X means do not play the string
- O means play the string open
- A numbered dot shows where to place a finger
- A curved line may show a barre
For the open A major chord, the pattern is:
X 0 2 2 2 0
The first number refers to the low E string. The final number refers to the high E string. This simple pattern is one of the most useful shapes in beginner guitar.

How to Make the A Chord Sound Clean
A correct a chord guitar finger position is only the first step. Your fingers must also create enough space for each string to vibrate.
Use these checks:
- Curl each finger so the fingertip touches the string.
- Keep your knuckles rounded.
- Avoid touching the nearby strings with the sides of your fingers.
- Keep your wrist loose.
- Press only as hard as needed.
- Strum from the fifth string down.
After placing the chord, play each string one at a time. Start with the fifth string and move toward the first string. Listen for buzzing, muted notes, or weak sounds.
If the D, G, or B string sounds dead, lift your fingers slightly and place them closer to the fret. If the high E string sounds muted, check whether your ring finger is leaning into it.
I often compare this process to tuning a flashlight. A tiny change in angle can move the light from blurry to clear. Your fingers may need only a small adjustment to remove a buzz.

Common A Chord Mistakes
Many players struggle with the A major chord because the fingers must fit into a narrow space. Most problems come from hand position rather than a lack of strength.
Pressing too hard
New players often squeeze the neck with the thumb and fingers. This creates tension and can make the hand tire quickly. Use the lightest pressure that produces a clean note.
Playing the low E string
The low E note is not part of the usual open A major voicing. It can make the chord sound muddy because it adds a low E beneath the A root.
A soft accidental brush may not ruin the chord, but practice stopping your strum at the fifth string. Keep your picking hand controlled.
Flattening the fingers
If your fingers lie flat, they may touch nearby strings. This causes muted notes. Raise your knuckles and use the tips of your fingers.
Placing fingers far from the fret
Fingers placed in the middle of the fret need more pressure. Move them close to the fret wire without touching it.
Collapsing the wrist
A sharply bent wrist can cause discomfort. Bring the guitar neck slightly upward and keep the wrist in a natural curve. Stop if you feel sharp pain or numbness.

Alternative A Major Fingerings
The standard a chord guitar finger position is not the only option. Different fingerings help with comfort, speed, and chord changes.
Three finger mini barre
Some players place one finger across the second fret of the D, G, and B strings. The shape becomes:
X 0 2 2 2 0
This method can be fast, but it may mute one of the strings if your index finger does not lie evenly. It is useful when moving between A, D, and E chords.
Four finger version
You can use your index, middle, ring, and pinky fingers across the three second fret notes. This is less common for beginners, but it may help players who prefer to keep the fingers separated.
A major barre chord
The fifth fret A major barre chord uses an E shape:
5 7 7 6 5 5
Your index finger bars the fifth fret, while the other fingers form an E major shape. This version lets you move the same shape to play other major chords.
The barre version requires more hand strength and control. Learn the open A first, then build toward the barre chord when your hand feels ready.

A Chord Variations You Should Know
Learning related A chords makes your playing more flexible. These shapes share some notes with A major but create different moods.
A7 chord
A common open A7 shape is:
X 0 2 0 2 0
Compared with A major, the G string becomes open. A7 has a bluesy and tense sound. It often wants to resolve to D major.
Am chord
The open A minor chord is:
X 0 2 2 1 0
The second string moves from the second fret to the first fret. This changes C♯ to C, giving the chord a darker minor sound.
Asus2 chord
The A suspended second chord is:
X 0 2 2 0 0
The B string becomes open. Asus2 sounds open and unfinished, which makes it useful in modern pop and rock progressions.
Asus4 chord
The A suspended fourth chord is:
X 0 2 2 3 0
The pinky presses the third fret of the B string. You can move between Asus4 and A major for a simple but effective musical effect.

Practice Exercises for the A Chord
Good practice builds accuracy before speed. Spend a few minutes on each exercise rather than rushing through many repetitions.
Exercise one: silent placement
Place the a chord guitar finger position without strumming. Lift your fingers, relax your hand, and place the shape again.
Repeat this ten times. Try to place all fingers at the same moment. This trains muscle memory.
Exercise two: string by string
Play the fifth, fourth, third, second, and first strings one at a time. Every note should ring clearly.
If one string buzzes, stop and fix the shape. Do not keep strumming through the mistake.
Exercise three: slow strumming
Strum down once. Wait. Check the sound. Then strum again.
Use a slow count:
1, 2, 3, 4
Aim for four clean strums before increasing your speed.
Exercise four: chord changes
Practice these changes:
- A to D
- A to E
- A to E7
- A to Am
- A to Asus4
Change chords every four beats. Keep your fingers close to the strings instead of lifting them high.
Exercise five: rhythm patterns
Once the chord sounds clean, try:
Down, down, up, up, down, up
Start slowly. Rhythm should stay steady even when your chord changes are not perfect.

Songs and Progressions Using A Major
The A major chord appears in many useful progressions. These patterns help you practice the a chord guitar finger position in a musical setting.
Try these progressions:
A | D | E | A
This is a classic major progression. It works well for country, rock, folk, and blues.
A | E | F#m | D
This progression appears in many pop and rock styles. If F#m is difficult, use an easier version or practice only the movement between A, E, and D first.
A | G | D | A
This progression has a strong folk and rock sound. The G chord may take time, so move slowly.
A useful practice habit is to play each chord for four beats. Keep your strumming hand moving, even when you miss a chord. This teaches you to recover without losing the beat.
A Chord Guitar Finger Position for Left Handed Players
Left handed guitarists use the same musical shape, but the string layout is reversed in practice. If you play a left handed guitar, follow a left handed chord diagram or mirror a standard diagram carefully.
The key idea stays the same:
- The A string remains open.
- The D, G, and B strings are pressed at the second fret.
- The low E string is not played.
- The high E string remains open.
Do not rely on a flipped image unless you know it is made for your guitar orientation. Many beginners accidentally place the shape backward when switching between diagrams.
How Long Does It Take to Learn the A Chord?
Many beginners can form the A major chord within one practice session. Making every note ring cleanly may take several days or weeks.
Progress depends on practice quality, hand comfort, and previous guitar experience. Five focused minutes each day often helps more than one long session filled with tension.
A useful goal is to hold the a chord guitar finger position for ten seconds, strum it cleanly, and change to another chord without stopping. When you can do this slowly, increase your speed little by little.
Do not judge progress by speed alone. A clear chord played slowly is better than a fast chord full of muted strings.
Personal Tips From Teaching and Playing
One mistake I see often is placing the fingers first and checking the thumb last. The thumb affects the whole hand, so place it behind the neck and keep it relaxed from the start.
Another lesson is to practice chord changes before your hand feels tired. When fatigue begins, your fingers lose their shape and you may build poor habits. Short sessions keep the movement fresh.
I also recommend recording a few strums on your phone. The recording may reveal buzzing that you do not notice while playing. This simple check gives you honest feedback without needing expensive equipment.
Your fingertips may feel tender during the first weeks. Mild soreness can be normal, but sharp pain, tingling, or numbness is a warning to stop and rest. Guitar should challenge your coordination, not injure your hand.
Frequently Asked Questions About a Chord Guitar Finger Position
What is the correct a chord guitar finger position?
Place your index finger on the second fret of the D string, your middle finger on the second fret of the G string, and your ring finger on the second fret of the B string. Play the open A and high E strings, but avoid the low E string.
Which strings should I strum for A major?
Strum from the open A string through the high E string. Avoid the low E string because it can make the chord sound unclear or muddy.
Why does my A chord sound muted?
Your finger may be touching a nearby string, or it may be too far from the fret wire. Curl your fingers, use the fingertips, and test each string one at a time.
Can I use one finger to play the A chord?
Yes, you can use an index finger mini barre across the D, G, and B strings at the second fret. This can be quick, but each string must still ring clearly.
Is A major harder than D major?
Many beginners find A major difficult because three fingers must fit beside each other. D major can feel easier for some players, while others prefer the wider shape of A.
How can I change from A to D faster?
Keep your fingers close to the strings and practice the movement slowly. Look for shared finger paths rather than lifting your whole hand away from the neck.
Conclusion
The a chord guitar finger position uses the open A string, three notes at the second fret, and the open high E string. Keep your fingers curled, place them near the fret wire, avoid the low E string, and check each note one at a time.
Start with clean, slow practice. Then add chord changes, steady rhythm, and useful variations such as A7, Am, Asus2, and Asus4. With a few focused minutes each day, this basic shape can become one of the most reliable tools in your guitar playing.
Pick up your guitar today and practice ten clean A chords. Then try moving from A to D and A to E, and explore more beginner chord guides to keep building your confidence.

Senior Music Reviewer
Alex Carter is a seasoned music reviewer with over a decade of experience in the world of sound and instruments. Passionate about helping musicians and enthusiasts make informed choices, he brings sharp insights and in-depth knowledge to every review. From classical instruments to modern gear, Alex combines technical expertise with a love for music to deliver content that resonates with readers.
As a Senior Music Reviewer and expert author on Tuneluma.com, Alex is dedicated to sharing honest evaluations, practical advice, and thoughtful commentary to guide readers in their musical journey.