How To Make Drum Patterns: Beat-Making Guide
Build drum patterns by setting a steady groove, placing core hits, and adding small changes with purpose.
Learning how to make drum patterns is part rhythm, part sound choice, and part feel. A strong pattern does more than fill time; it gives a song motion, mood, and a clear place to land. This guide explains the process from basic kick-and-snare grooves to human timing, fills, swing, sound selection, and genre-based ideas you can use in any DAW.

What Is a Drum Pattern?
A drum pattern is a repeated sequence of percussion sounds arranged across time. It may include a kick drum, snare, clap, hi-hat, tom, cymbal, shaker, or other percussion sound.
Most drum patterns use a grid based on musical time. In common 4/4 time, one bar has four beats. Each beat can be divided into eighth notes, sixteenth notes, triplets, or other smaller parts.
A drum pattern usually has three jobs:
• Keep time with a steady pulse
• Support the song’s emotion and groove
• Create movement between sections
Think of the beat as the floor of a house. The bass and melody can change, but the drum pattern gives everything a place to stand.

How to Make Drum Patterns: Start With the Grid
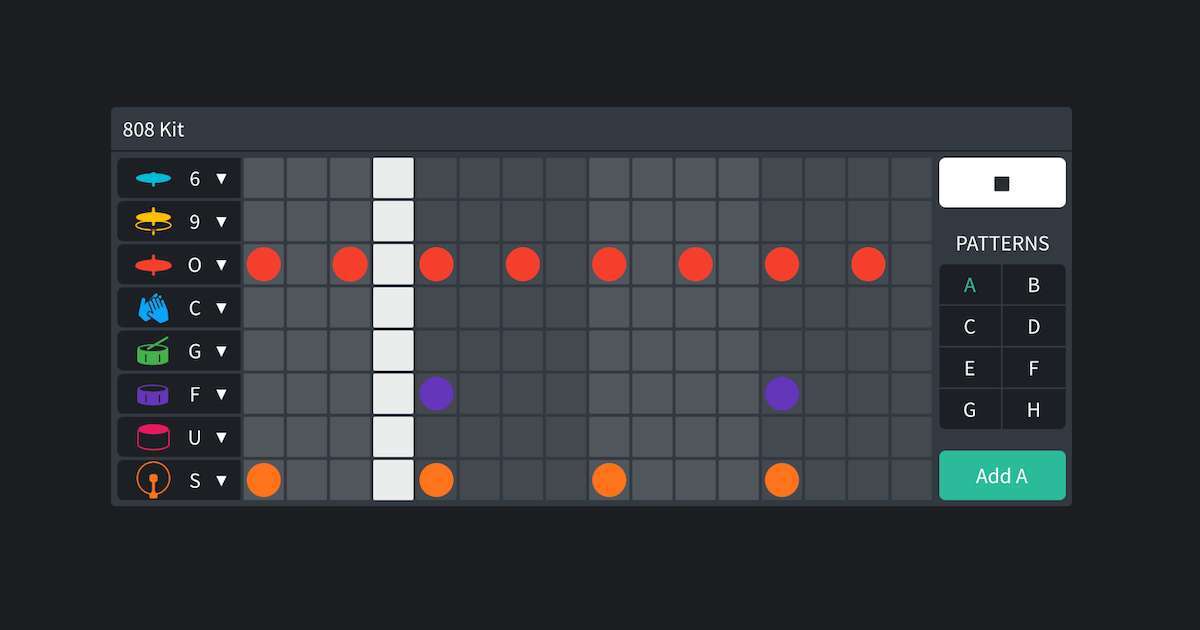
The easiest way to learn how to make drum patterns is to begin with a simple grid. Open your digital audio workstation, create a MIDI drum track, and set the project to 4/4 time.
Start with one or two bars. A short loop makes mistakes easy to hear and fix.
Choose a Tempo
Tempo controls the speed of the pattern. It is measured in beats per minute, or BPM.
Common starting points include:
• 70 to 90 BPM for slow hip-hop, R&B, and relaxed beats
• 90 to 110 BPM for pop, funk, and mid-tempo grooves
• 120 to 130 BPM for house, disco, and dance music
• 130 to 160 BPM for drum and bass, hardcore, and fast electronic styles
These ranges are only starting points. A half-time beat at 140 BPM can feel slower than a full-time beat at 100 BPM.
Set the Musical Division
Use quarter notes for a basic pulse. Then try eighth notes or sixteenth notes for more movement.
For example, a sixteenth-note grid divides each beat into four parts:
1 e & a
This gives you four possible spaces for each drum hit. Many modern drum patterns use this division because it allows tight hi-hats, ghost notes, and syncopated kicks.
Use a Metronome First
A metronome can feel plain, but it teaches strong timing. Build the first version of your pattern against the click before adding swing or loose timing.
One mistake I often see in beginner patterns is too much detail too soon. If the basic groove does not work with only a kick, snare, and hi-hat, extra percussion will not solve the problem.

Build the Core Drum Pattern
A strong pattern often starts with three parts: kick, snare, and hi-hat. This simple setup is enough to create a clear groove.
Place the Snare or Clap
In a basic 4/4 pattern, place the snare or clap on beats 2 and 4.
Count the bar like this:
1, 2, 3, 4
The snare lands on 2 and 4. This creates the backbeat used in many pop, rock, funk, and hip-hop patterns.
You can also place the snare slightly before or after the expected beat. This can create urgency or relaxation, but keep the main backbeat clear at first.
Add the Kick Drum
Place the kick on beat 1. This gives the bar a strong start.
Then add another kick on beat 3 or between the main beats. Listen to how each choice changes the groove. A kick on beat 3 can sound stable, while a kick before beat 3 can create forward motion.
Try this simple pattern:
• Kick on beats 1 and 3
• Snare on beats 2 and 4
• Hi-hat on every eighth note
Once it feels steady, remove one kick or move it to a new position. Small changes often create more character than a crowded pattern.
Add the Hi-Hat
Closed hi-hats can mark eighth notes or sixteenth notes. Begin with eighth notes:
1 & 2 & 3 & 4 &
Then try sixteenth notes:
1 e & a 2 e & a 3 e & a 4 e & a
Do not make every hi-hat hit equally loud. Small changes in volume help the pattern breathe.

How to Make Drum Patterns Feel Musical
A drum pattern can be technically correct and still sound lifeless. Musical rhythm depends on contrast, space, repetition, and timing.
Use Repetition With Small Changes
A good loop gives the listener something familiar. A great loop adds small changes that keep the ear interested.
For a two-bar pattern, keep bar one simple. Add one extra kick, open hi-hat, or ghost snare in bar two. This creates a sense of conversation between the bars.
Useful changes include:
• An extra kick before the next downbeat
• A soft snare between the main snare hits
• An open hi-hat at the end of a bar
• A short tom fill before a new section
• A missing hi-hat hit that creates space
Add Syncopation
Syncopation means placing emphasis away from the expected strong beats. It can make a pattern feel lively and less predictable.
For example, instead of placing every kick on a main beat, place one kick just before beat 3. The listener feels the push into the next beat.
Use syncopation with care. If every sound avoids the main beats, the groove can lose its center.
Create Space
Silence is part of rhythm. Removing a drum hit can make the next hit feel stronger.
Try muting: