How To Attach Violin Strings: Easy Step-By-Step Guide
To attach violin strings, secure each string at the tailpiece, guide it over the bridge, and wind it correctly onto the peg.
Learning how to attach violin strings is a useful skill for every player. The process looks simple, but small details matter. Correct string placement protects the bridge, keeps the violin in tune, and helps the strings settle with a clear, stable sound. This guide explains how to attach violin strings safely, whether you are replacing one broken string or changing the full set.
What you need before attaching violin strings
Before learning how to attach violin strings, prepare a clean, quiet work area. A table or padded bench works well. Keep the violin away from the edge so it cannot fall.
You will need:
• A full set or replacement violin string
• An electronic tuner
• A soft cloth
• A pencil or graphite lubricant
• Peg compound, if a peg slips or feels too tight
• A string winder, if desired
• A small pair of wire cutters for trimming excess string
Check your violin’s string type before buying replacements. Common sets use G, D, A, and E strings. Steel-core, synthetic-core, and gut strings each have different tones and tuning behavior.
Place a cloth under the violin if you are working on a hard surface. This prevents scratches and gives the instrument a little grip.

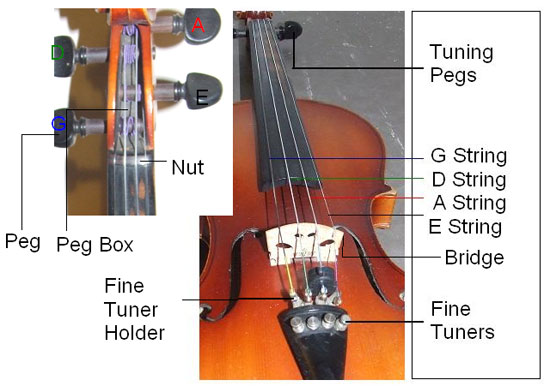
Learn the parts involved
Knowing the violin’s parts makes how to attach violin strings much easier to understand.
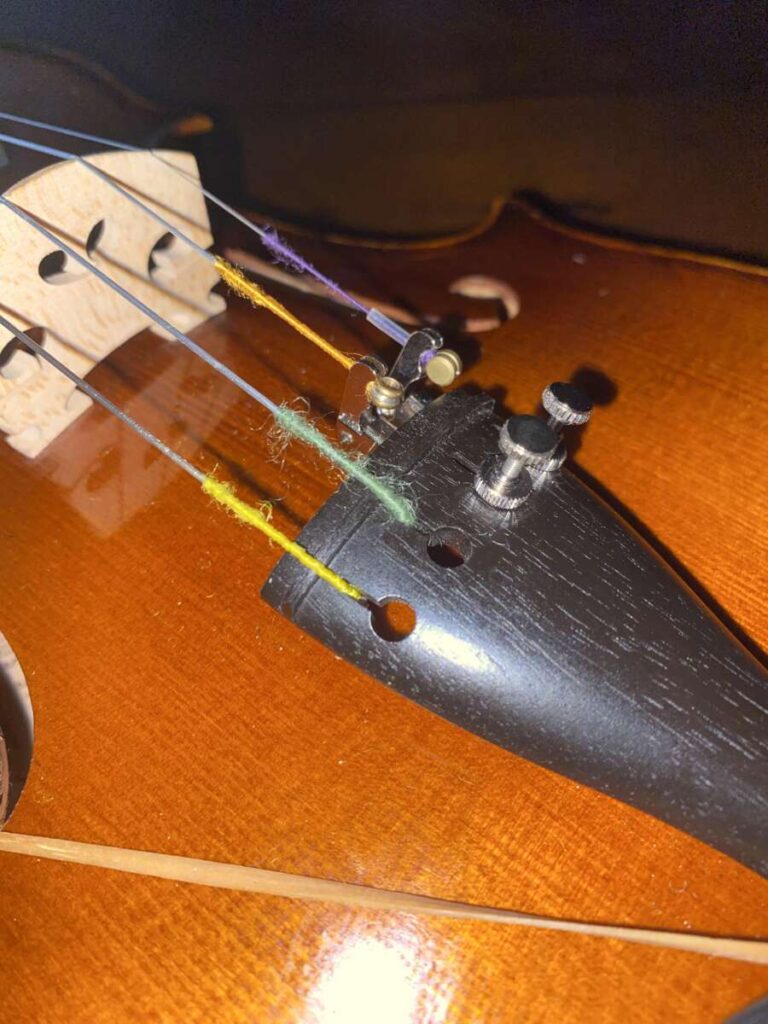
• Tailpiece: The part near your chin that holds the lower ends of the strings
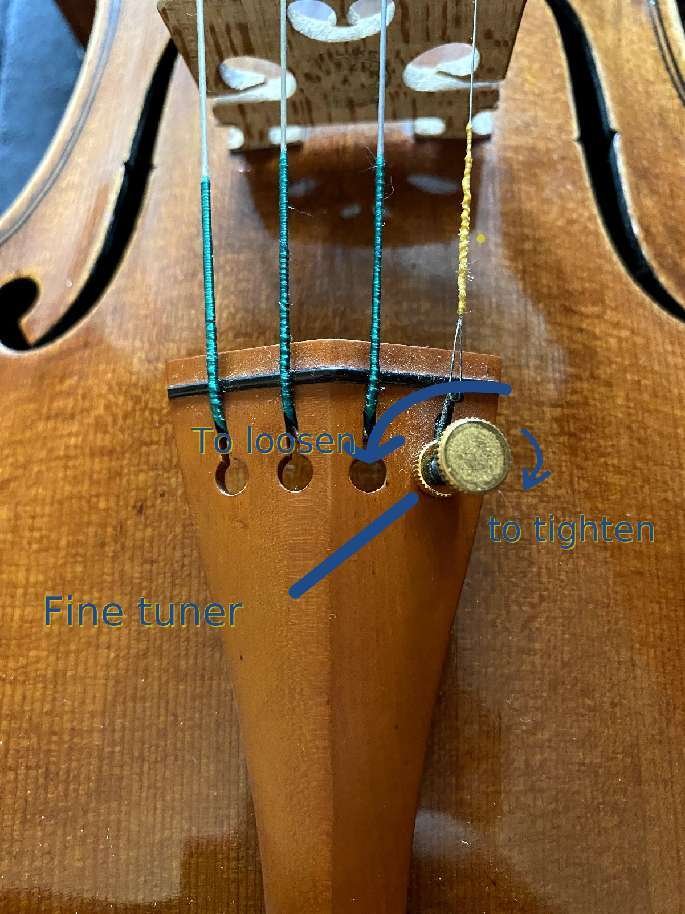
• Fine tuner: A small tuner attached to the tailpiece, often used for the E string
• Bridge: The thin wooden piece that supports the strings
• Pegbox: The carved section that holds the tuning pegs
• Peg: The wooden handle used to tune each string
• Nut: The small piece between the fingerboard and pegbox
• String hole: The hole through the peg where the string passes
• Ball end: The small metal or brass ball found on many string ends
• Loop end: A small loop used with some tailpieces or fine tuners
The bridge is not glued to the violin. String tension holds it in place. That is why the bridge can lean, fall, or move when string tension changes.
When learning how to attach violin strings, remember this simple path:
String anchor → tailpiece → bridge → nut → peg → pegbox.
The string must follow this path without crossing another string or slipping out of its groove.
How to attach violin strings step by step
The safest way to learn how to attach violin strings is to replace one string at a time. Keeping three strings under tension helps the bridge and soundpost remain stable.
1. Identify the correct string
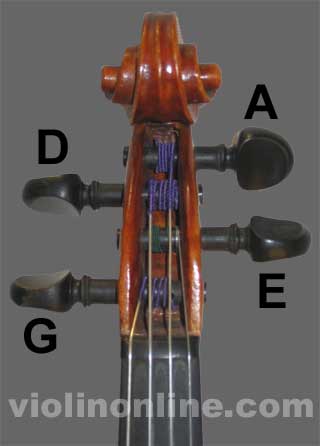
Read the package carefully. Violin strings are labeled G, D, A, and E.
The lowest string is G. Moving upward in pitch, the order is:
- G
- D
- A
- E
Do not rely only on color. String colors vary by brand, while the printed label is more reliable.
2. Loosen and remove the old string
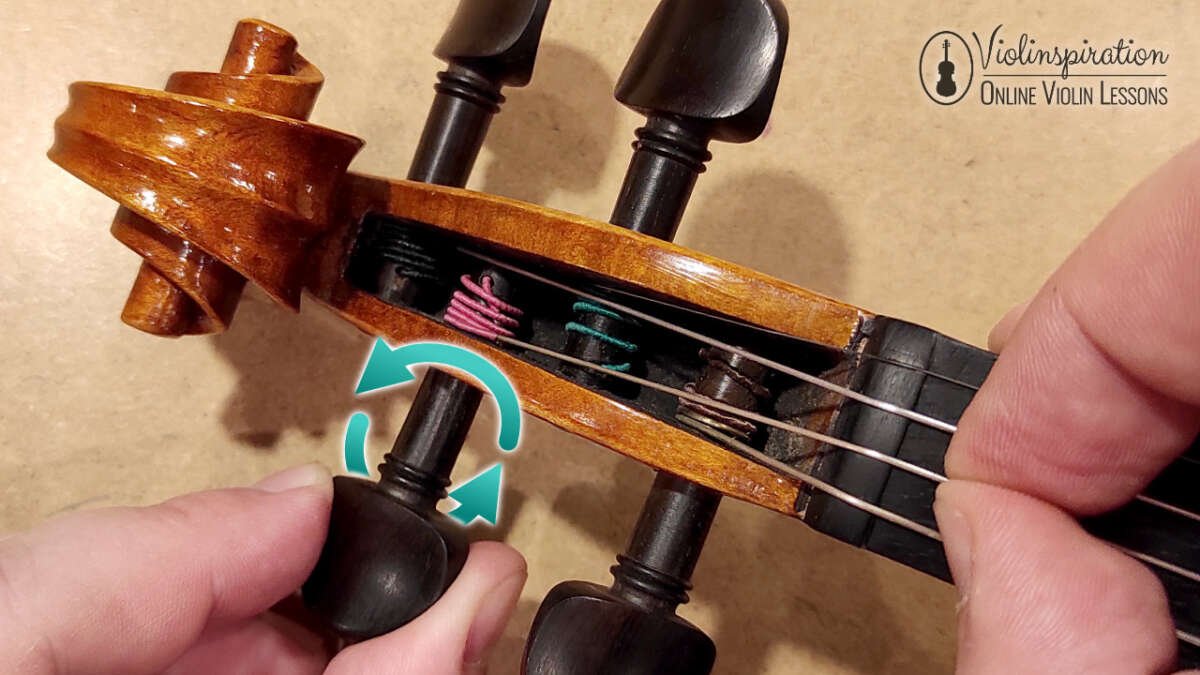
turn the correct tuning peg toward you slowly. As the string loosens, unwind it from the peg.
Remove the lower end from the tailpiece. If the string has a ball end, lift the ball from the slot or fine tuner. If it has a loop end, carefully remove the loop from the hook.
Avoid pulling a tight string away from the violin. A sudden release can make the string snap or cause the bridge to shift.
3. Check the bridge position
Before installing the new string, look at the bridge. Its feet should sit flat on the violin’s top, between the f-holes.
The bridge usually leans very slightly toward the tailpiece or stands nearly upright, depending on the instrument and setup. Do not force it into place if you are unsure. A damaged or badly tilted bridge should be checked by a violin repair professional.
4. Attach the lower end
Place the string’s ball or loop into the correct tailpiece slot.
If the violin has a fine tuner, make sure the string sits in the tuner’s hook or slot. The string should not rest against a sharp edge. On many violins, the fine tuner is used mainly for the E string, though some tailpieces have four built-in tuners.
5. Guide the string over the bridge
Lay the string in the correct bridge groove. The groove should hold the string without crushing it.
The bridge grooves should line up with the nut grooves. The string should travel in a straight line from the tailpiece, over the bridge, across the fingerboard, and toward the pegbox.
6. Pass the string through the peg
Turn the tuning peg so the hole is easy to reach. Push the string through the peg hole, leaving about 1.5 to 2 inches of loose string beyond the hole.
Do not pull the string tight yet. A small amount of slack is needed to create clean wraps around the peg.
7. Wind the string neatly
Turn the peg slowly while guiding the string with your other hand. The wraps should sit side by side rather than stacking in a messy pile.
For most violin strings, two or three neat wraps are enough. The string should wind toward the pegbox wall, but it must not rub hard against the pegbox or touch a neighboring string.
8. Bring the string to pitch slowly
Raise the pitch in small steps. Stop if the string twists, catches, or makes a sharp popping sound.
Use a tuner to reach the correct notes:
• G3 for the G string
• D4 for the D string
• A4 for the A string
• E5 for the E string
New strings stretch during the first hours or days. Tune them often instead of forcing them quickly to pitch.

How to attach violin strings without moving the bridge
A common concern when changing strings is bridge movement. The best protection is to replace one string at a time and tune it gradually.
Check the bridge after installing each string. Its feet should remain flat, and the top edge should not lean sharply toward the fingerboard.
As tension increases, the bridge may creep toward the fingerboard. This can happen because the strings pull across the bridge instead of sliding smoothly through the grooves.
To reduce friction, apply a very small amount of graphite to the bridge groove and nut groove. A sharpened pencil is often enough. Do not use oil, soap, or heavy lubricant on the violin.
If the bridge begins to lean, loosen the strings slightly and ask a qualified luthier for help. Pulling a bridge upright under full tension can damage the bridge or the violin’s top.

How to wind violin strings correctly
Proper winding is one of the most important parts of how to attach violin strings. A poorly wound string may slip, make tuning difficult, or break near the peg.
Use these winding rules:
• Keep the first wrap close to the peg cheek
• Let each wrap sit beside the previous one
• Avoid crossing the string over itself
• Leave enough space for the peg to turn freely
• Keep the string away from the pegbox wall
• Make sure the string stays in the nut groove
The final wraps should help hold the string in place without pressing it tightly against the pegbox. If the wraps bunch up, unwind the string and start again. It is usually faster to correct the problem early than to fight unstable tuning later.
A string winder can save time, but use it gently. Fast turning can raise the pitch too quickly and increase the risk of breaking a string.

How to attach violin strings on different tailpieces
Most violin strings attach in one of two ways: with a ball end or with a loop end.
Ball-end strings
A ball-end string has a small metal ball at the tailpiece end. Place the ball into the tailpiece slot or fine tuner.
Make sure the ball is fully seated. If it sits halfway in the slot, it may pop out when you begin tuning.
Loop-end strings
A loop-end string has a small loop instead of a ball. Place the loop over the correct hook or fine tuner arm.
Loop ends are common with some E strings. Never force a loop over a sharp or oversized hook. The loop can stretch or break.
Built-in fine tuners
Some tailpieces have four fine tuners. In that case, each string passes through its own tuner.
Turn the fine tuner counterclockwise before installing the string, leaving room to raise the pitch later. If the screw is already fully turned in, it cannot make the string much sharper.

How to attach violin strings when changing the full set
Changing all four strings at once can be useful, but it requires more care. Removing every string releases nearly all tension from the bridge and soundpost.
If you change the full set, install and tune the strings in stages. Start with the G and E strings, then add the D and A strings, or follow the method recommended by your luthier.
Keep the bridge centered and check that it remains upright. The soundpost is held in place by the violin’s internal tension. If it falls, do not try to reset it through an f-hole with household tools. A trained repairer should handle it.
For beginners, changing one string at a time is the safer method. It also makes it easier to compare the new string with the old one and avoid confusion.
Common mistakes when attaching violin strings
Even experienced players can make small errors. These are the problems I see most often when people ask how to attach violin strings.
Putting the string in the wrong position
The string order is G, D, A, and E from thickest to thinnest. A string placed in the wrong groove will feel unusual and produce poor tension.
Winding too much string
Many loose wraps make the peg bulky and unstable. Two or three neat wraps are usually enough.
Pulling the string too hard
New strings need time to stretch. Pulling them sharply can damage the string or bridge.
Forgetting the bridge groove
A string that sits beside the groove can move during tuning. This may create a dull tone or push the bridge out of alignment.
Tuning too quickly
Raise the pitch slowly. A tuner cannot protect a string from a sudden break if the peg turns too far.
Using the wrong replacement string
A violin string is not interchangeable with a viola or cello string. Check the instrument size and string package before installation.

How long do new violin strings take to settle?
New violin strings often need several tuning sessions before they stay stable. Some settle within a few hours, while others may take several days of normal playing.
Synthetic-core strings often stretch more than steel-core strings. Temperature, humidity, playing time, and the condition of the nut and bridge also affect tuning stability.
Tune the violin before playing and check it again during practice. If one string keeps slipping after several days, inspect the peg fit, winding, nut groove, and tailpiece connection.
A string that breaks repeatedly at the same point may indicate a sharp edge or setup problem. Replacing the string alone may not solve it.
When to ask a violin repair professional
Replacing a string is safe for most players. However, some problems need professional care.
Contact a luthier if:
• The bridge falls and will not stand correctly
• The soundpost falls inside the violin
• A peg spins freely or will not hold
• A peg is extremely tight
• The string cuts deeply into the bridge or nut
• The tailpiece cracks
• The bridge is badly warped
• A string breaks repeatedly near the same spot
A violin is a light, carefully balanced instrument. A small setup issue can affect tuning, tone, and playability. Professional adjustment is often cheaper than repairing damage caused by force.
How to care for violin strings after installation
Wipe the strings with a clean, dry cloth after playing. Rosin dust can build up and make the strings feel rough.
Do not use household cleaners, alcohol, or water on the violin. These products may harm the varnish or loosen glue.
Store the violin in a suitable case. Avoid hot cars, direct sunlight, heaters, and very dry rooms. Sudden changes in temperature and humidity can affect the wood and string tension.
Replace strings when they sound dull, feel rough, show corrosion, or no longer hold pitch well. There is no single replacement schedule for every player. A beginner who plays a few times a week may replace strings less often than a professional who practices for hours each day.
Frequently Asked Questions About How to Attach Violin Strings
Which string goes where on a violin?
From the thickest string to the thinnest, the order is G, D, A, and E. The G string sits closest to the player’s left side when the violin is held in playing position.
Should I replace all violin strings at once?
Replacing one string at a time is safer for beginners because it keeps tension on the bridge and soundpost. A full set can be changed at once, but the bridge must be watched carefully as the strings are installed and tuned.
How many times should I wrap a violin string around the peg?
Most violin strings need about two or three neat wraps around the peg. The wraps should sit beside one another and should not cross or press hard against the pegbox wall.
Why does my new violin string keep slipping?
A string may slip because the peg is not fitted well, the string is poorly wound, or the string has not settled. Check the winding first, then ask a luthier to inspect the peg and nut if the problem continues.
Can I attach a violin string without a fine tuner?
Yes. The string can attach directly to the tailpiece if it has the correct ball or loop end. Fine tuners make small pitch changes easier, but they are not required for every string.
How do I know if the bridge is in the right position?
The bridge feet should sit flat, and the bridge should stand nearly upright between the f-holes. The strings should rest in their grooves and line up with the fingerboard and tailpiece.
Why did my violin string break while tuning?
A string can break from over-tightening, age, corrosion, or a sharp edge at the bridge, nut, peg, or fine tuner. If a new string breaks in the same place more than once, have the violin checked by a professional.
Conclusion
Learning how to attach violin strings gives you more confidence and helps keep your instrument in good condition. Replace one string at a time, follow the G-D-A-E order, seat the lower end correctly, guide the string through the bridge and nut, and wind it neatly onto the peg.
Tune slowly and check the bridge as you work. With a little patience, how to attach violin strings becomes a simple part of regular violin care rather than a stressful repair. Practice the steps on your next string change, and share your questions or experiences with other violin players.

Senior Music Reviewer
Alex Carter is a seasoned music reviewer with over a decade of experience in the world of sound and instruments. Passionate about helping musicians and enthusiasts make informed choices, he brings sharp insights and in-depth knowledge to every review. From classical instruments to modern gear, Alex combines technical expertise with a love for music to deliver content that resonates with readers.
As a Senior Music Reviewer and expert author on Tuneluma.com, Alex is dedicated to sharing honest evaluations, practical advice, and thoughtful commentary to guide readers in their musical journey.