How To Change Splice Piano Roll To Drums Fl Studio: Guide
Drag your Splice sample into FL, map slices to FPC or Sampler pads, and disable pitch tracking.
I have used FL Studio and Splice for years, and I’ll walk you through exactly how to change Splice piano roll to drums in FL Studio. You’ll learn clear, tested steps to turn pitched Splice samples or loops into playable drum kits, how to map slices to pads, and how to sequence them cleanly in the Piano roll or Channel Rack. This guide covers FPC, Sampler, Slicex, workflow tips, and common mistakes—so you can make tight drum parts fast.
Understanding piano roll versus drums in FL Studio
The piano roll is meant for pitched notes. It changes sample pitch when you place notes up and down. Drums are one-shots. You want each hit to trigger without changing pitch.
When you load a Splice sound into a channel, FL links notes to pitch. To change splice piano roll to drums fl studio, you must map samples as one-shots or to drum pads. That keeps the hit at its original pitch.
Key concepts:
- Channel Sampler plays samples and tracks pitch by MIDI note.
- FPC gives pad-based trigger mapping where each pad is a fixed sample.
- Slicex and Fruity Slicer split loops into slices you can trigger as drums.
Preparing your Splice samples for FL Studio
Get the sample into your project first. Drag and drop or sync Splice to a folder FL can browse.
Steps:
- Open Splice desktop app or find your sample in your Splice folder.
- Drag the WAV (one-shot or loop) directly onto FL’s Channel Rack or Playlist.
- Confirm the sample appears in the Channel Sampler or Slicex.
Keep file names clear. Rename slices or samples to help later sequencing. This preparation makes changing splice piano roll to drums fl studio much faster.

Method 1 — Use FPC to turn Splice sounds into a drum kit
FPC is perfect when you want a drum pad layout. It maps samples to MIDI notes. Then you can use Piano roll to sequence pads as drums.
Steps:
- Open FPC from the Add menu.
- Drag each Splice sample onto different FPC pads. Drop a sample onto pad 1, pad 2, etc.
- Adjust pad settings: volume, panning, pitch (leave pitch at unity for one-shots).
- Assign the FPC channel to the Mixer for processing.
- Open the Piano roll for the FPC channel and draw notes. Each MIDI note triggers a pad.
Why this works:
- FPC locks each sample to its pad and its MIDI note. You no longer change pitch by moving notes in piano roll. This directly answers how to change splice piano roll to drums fl studio in a robust way.
Tips:
- Set root note mapping for pads if you want a custom MIDI layout.
- Use the Velocity and Randomization controls for human feel.
Method 2 — Use the Channel Sampler and disable pitch tracking
If you prefer the Channel Rack, you can still keep samples from pitching across notes.
Steps:
- Load a Splice one-shot into a Sampler channel (drag to Channel Rack).
- Open channel settings (click the waveform icon).
- In the Time / Pitch section, set Mode to Stretch or Resample depending on the sample type.
- Set the Pitch knob to zero and set the root note to match the sample’s original pitch.
- Right-click the Channel button and choose “Piano roll” to sequence. Keep notes on a single key to avoid pitch change.
Alternative: use the “Cut itself” and “Hold” settings to make the sample behave like a drum one-shot.
How this helps:
- This method avoids changing pitch when sequencing. It’s a quick way to change splice piano roll to drums fl studio without creating an FPC kit.
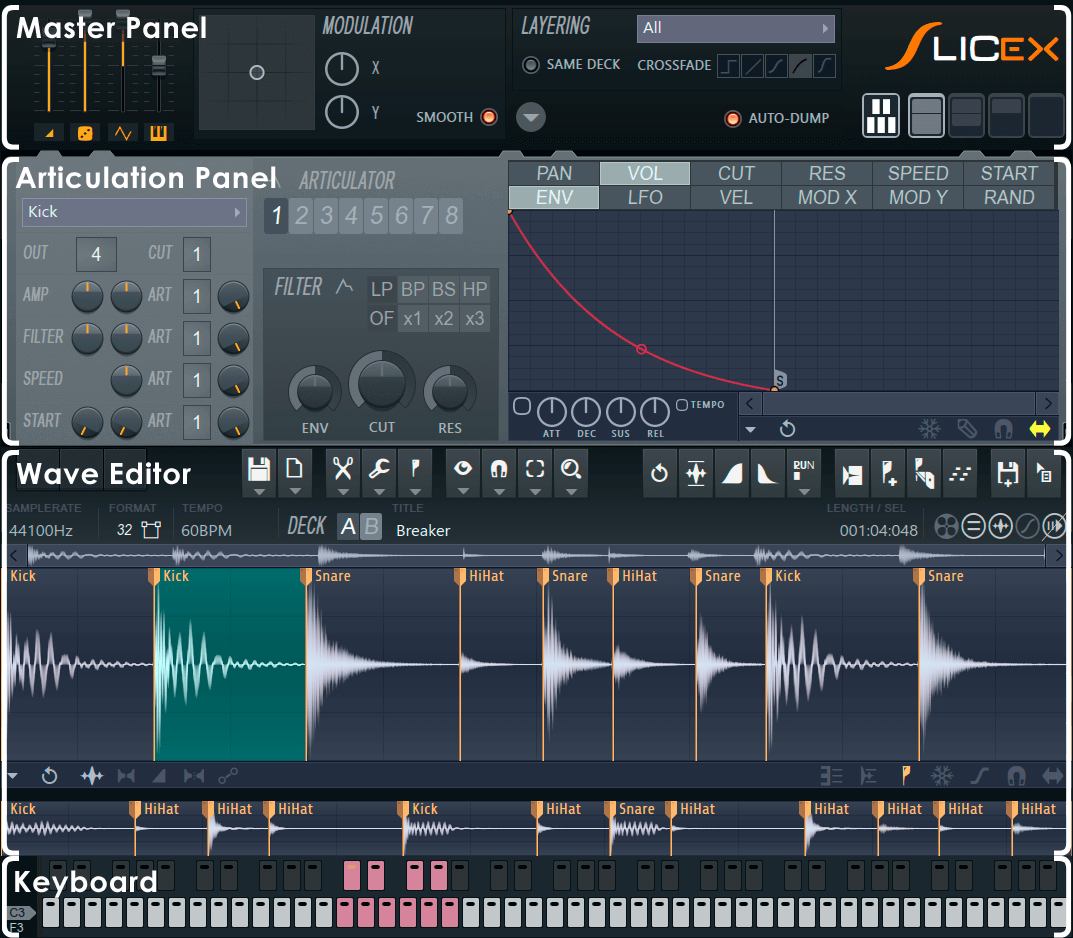
Method 3 — Slice loops and assign slices as drum hits (Slicex / Fruity Slicer)
When you have a loop from Splice, slicing it into hits often yields the best drum parts.
Steps:
- Drag a Splice loop to Slicex or Fruity Slicer.
- Let FL auto-detect transient markers or place markers manually.
- Use “Map to new sampler” or export slices to individual samples.
- Load those slices into FPC or an individual Sampler channel per hit.
- Sequence the slices in Piano roll or Channel Rack as drums.
Why slice:
- You can isolate hats, kicks, and claps from a loop.
- Slices can be tuned, layered, and triggered without pitch shifting from piano roll notes.
This method is central if your aim is to change splice piano roll to drums fl studio when working with full loops rather than single hits.

Workflow tips, layering, and processing
Small choices make big differences. I use these go-to steps when I change splice piano roll to drums fl studio.
Tips:
- Normalize raw hits, then fine-tune volume and gain staging.
- Layer a punchy transient on top of a low kick to tighten the low end.
- Use high-pass on snares and claps to avoid mud.
- Add short reverb or parallel compression on groups, not on single hits.
- Name channels clearly. Organize by kit: Kick, Snare, Hats, Percs.
Mixing tip from experience:
- Sequence with humanized velocity. Lower velocity for ghost notes. It makes loops feel alive and keeps the drum sample from sounding robotic.

Common mistakes and traps to avoid
Knowing pitfalls saves time. Here are mistakes I made when I started trying to change splice piano roll to drums fl studio.
Common errors:
- Leaving samples on different keys and wondering why pitch shifts.
- Not setting root notes correctly, causing tiny pitch offsets.
- Over-slicing loops and losing musical feel.
- Forgetting to route pads and channels to the mixer for EQ and compression.
Fixes:
- Always test a trigger note on one key before sequencing.
- Organize samples and disable pitch tracking for drums.
- Use group channels for bus processing to glue drum sounds.
Quick common questions (PAA-style)
Q: Can I turn a melodic Splice sample into a drum kit?
A: Yes. Use FPC or Sampler channels and set each hit as a one-shot. Disable pitch tracking to keep hits at original pitch.
Q: Should I use Slicex or FPC for loops?
A: Use Slicex to chop loops. Then assign slices to FPC if you want pad mapping and MIDI sequencing.
Q: Will changing splice piano roll to drums fl studio affect sample quality?
A: Not if you avoid extreme pitch shifting and use proper sample formats. One-shots keep original sound quality.

Frequently Asked Questions of how to change splice piano roll to drums fl studio
What is the fastest way to change splice piano roll to drums fl studio?
Drag samples to FPC or the Channel Rack and map each hit to its own pad or channel. Sequencing MIDI notes on those pads gives instant drum behavior.
Do I need extra plugins to convert Splice samples into drums?
No. FL Studio’s built-in FPC, Sampler, Slicex, and Fruity Slicer can handle the task without third-party plugins.
How do I stop a sample from changing pitch when I move notes in the piano roll?
Map the sample to a single pad or keep all notes on the same MIDI key. Disable pitch tracking or set root note to the sample’s original pitch.
Can I use MIDI controllers to play the converted drum kit?
Yes. Once samples are in FPC or assigned to MIDI notes, any pad controller or keyboard can trigger them.
Should I slice loops automatically or manually for drum extraction?
Start with automatic slicing to save time, then refine manually. Manual edits let you keep musical timing and avoid awkward cuts.
Conclusion
You now have clear, practical ways to change Splice piano roll to drums fl studio. Use FPC for pad kits, Sampler channels for quick one-shots, and Slicex for loop chopping. These workflows keep your hits at the right pitch and help you sequence tight, musical drums fast.
Try one method on a real Splice sample today. Make a short drum loop, layer one hit, and route it to a mixer bus. Leave a comment about which method felt fastest for you, or subscribe for more FL Studio tips.

Senior Music Reviewer
Alex Carter is a seasoned music reviewer with over a decade of experience in the world of sound and instruments. Passionate about helping musicians and enthusiasts make informed choices, he brings sharp insights and in-depth knowledge to every review. From classical instruments to modern gear, Alex combines technical expertise with a love for music to deliver content that resonates with readers.
As a Senior Music Reviewer and expert author on Tuneluma.com, Alex is dedicated to sharing honest evaluations, practical advice, and thoughtful commentary to guide readers in their musical journey.