How To Set Violin Strings: Easy Step-By-Step Guide
Set violin strings by removing one string at a time, fitting each correctly, and tuning slowly to protect the instrument.
Learning how to set violin strings is a useful skill for every player. The process looks simple, but small details matter. String direction, bridge position, peg tension, and winding shape all affect sound and safety. This guide explains how to set violin strings with clear steps, practical tips, and lessons learned from hands-on setup work.
What You Need Before You Set Violin Strings
Before you learn how to set violin strings, prepare a clean, stable work area. A table with a soft towel can protect the violin’s finish while keeping it from sliding. Good light also helps you see the peg holes, bridge feet, and fine tuners.
You will usually need:
• A full set of violin strings that matches your instrument size
• A clean microfiber cloth
• An electronic tuner or tuning app
• Peg compound, if a peg slips or feels too stiff
• A pencil for light graphite on the bridge grooves
• A small string winder, if desired
• A soft support for the violin neck
Check the string package before you begin. Most full-size violins use 4/4 strings, while smaller violins need sizes such as 1/2, 1/4, or 1/8. Using the wrong size can cause poor tension, weak tone, or physical stress on the instrument.
A violin string set includes four strings: G, D, A, and E. From the lowest pitch to the highest, the tuning is G3, D4, A4, and E5. The G string is the thickest, and the E string is the thinnest.
How to Set Violin Strings Safely
The safest method is to replace one string at a time. Removing all four strings together can allow the bridge and soundpost to move or fall. A bridge that shifts may damage the violin or make accurate setup much harder.
Use this basic safety process:
-
Place the violin on a padded surface with the front facing up.
-
Loosen only the string you plan to replace.
-
Remove that string from the fine tuner and peg.
-
Check that the bridge remains upright.
-
Install the new string before moving to the next one.
-
Tune the new string slowly.
-
Repeat the process for the other strings.
The bridge is not glued to the violin. It stays in place through string pressure and careful positioning. This is why changing one string at a time is a smart choice, especially for beginners.
If your bridge leans toward the fingerboard, stop and correct it gently. The feet should sit flat on the violin top, and the bridge should stand nearly straight. If the bridge looks warped, cracked, or badly displaced, ask a violin shop or trained luthier for help.
Step-by-Step: How to Set Violin Strings
The following method works for most standard violins with traditional pegs and fine tuners.
1. Identify the correct string
Match the new string to the string you are replacing. The package will usually mark each string with a letter or color.
The order from thickest to thinnest is:
• G string
• D string
• A string
• E string
do not judge only by thickness. Some strings have similar sizes, and certain brands use different color systems. Confirm the string name on the package before installation.
2. Remove the old string
Turn the tuning peg slowly to loosen the string. Once the tension is low, lift the string from the peg hole and remove its lower end from the fine tuner or tailpiece.
Keep your face and eyes away from the string. A broken string under tension can snap back. Old strings may also have sharp or rough sections near the peg.
Wipe the area with a dry cloth. This removes rosin dust and dirt that can collect near the bridge, tailpiece, and fingerboard.
3. Insert the string at the tailpiece
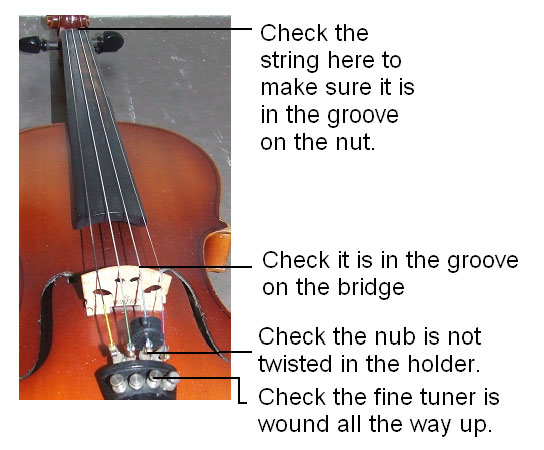
If your violin has fine tuners, guide the string’s ball end into the correct tuner. The ball should sit securely in the tuner slot or hook.
Some violin strings have a loop end instead of a ball end. A loop string must attach to a compatible fine tuner. Never force a ball end into a loop-only fitting.
If the string attaches directly to the tailpiece, place the ball into the tailpiece hole. Make sure the string is not twisted as it runs toward the bridge.
4. Place the string over the bridge
Guide the string through the correct bridge groove. The string should sit in a shallow notch and line up with the matching groove in the nut.
The bridge separates the vibrating string length from the tailpiece. If the string sits outside its groove, the violin may sound uneven, and the string can slide during tuning.
Some players rub a small amount of graphite from a pencil into the bridge and nut grooves. This can reduce friction during tuning. Do not widen or deepen the grooves yourself. A poorly cut groove may require professional repair.
5. Insert the string into the peg
Turn the peg so its hole faces a useful angle. Insert the string through the hole, leaving about 1/8 to 1/4 inch of string extending beyond it.
The exact amount is not critical. You need enough extra string to create a secure winding, but too much loose string will crowd the pegbox.
Start turning the peg slowly. Keep light tension on the string with your other hand. This helps the string wind neatly instead of forming loose loops.
6. Wind the string neatly
The string should wrap toward the pegbox wall without touching nearby strings. Neat winding gives the peg better control and helps the violin stay in tune.
Use these general winding directions:
• G and D pegs usually wind toward the left side of the pegbox
• A and E pegs usually wind toward the right side of the pegbox
The exact direction depends on the peg position and violin design. The main goal is to keep the string aligned with its path from the nut to the peg.
Avoid crossing the string over itself. Crossed windings can create tuning problems and may damage the string.
7. Bring the string to pitch slowly
After the string is installed, turn the peg in small movements. Stop often to check the bridge and string path.
Tune near the target pitch, but do not raise a new string too quickly. New strings stretch during their first hours and days of use. It is normal to tune them several times.
Use the fine tuner for small changes once the peg has brought the string close to pitch. On many violins, the E string has a fine tuner, while the other strings may use built-in fine tuners or none at all.
This is the core process for how to set violin strings. Patience is more important than speed.

How to Set Violin Strings Without Moving the Bridge
Bridge movement is one of the most common problems during string changes. As you tune, string tension pulls the bridge toward the fingerboard. Over time, this can make the bridge lean.
Look at the bridge from the side. Its back side, which faces the tailpiece, should generally stand close to a right angle with the violin top. The front side may have a slight angle toward the fingerboard.
To reduce movement:
• Replace only one string at a time