How Do You String A 12 String Guitar: Easy Guide
To string a 12-string guitar, replace each string pair in order, match the correct gauges, and tune slowly.
Learning how do you string a 12 string guitar can feel harder than changing strings on a six-string model. The neck carries more tension, the pairs must sit in the right order, and small tuning errors can create strong buzzing or poor intonation. This guide explains the full process with clear steps, safe handling tips, tuning advice, and practical lessons from restringing 12-string guitars.

What You Need Before You Start
Before learning how do you string a 12 string guitar, gather all the tools and parts you need. A calm setup makes the job much easier.
You will need:
• A new 12-string acoustic guitar string set
• A string winder
• A wire cutter
• A guitar tuner
• A soft cloth
• A bridge pin puller or string winder with a pin tool
• Lemon oil or another suitable fretboard cleaner, if the fretboard needs care
• A small towel or neck support
Use a string set made for your guitar. Most 12-string acoustic guitars use light or extra-light strings. Heavy strings can place too much force on the neck, bridge, and top.
Check the package before opening it. Some sets use color-coded ball ends, while others label every string. Keep the old strings nearby until you confirm the new string order.
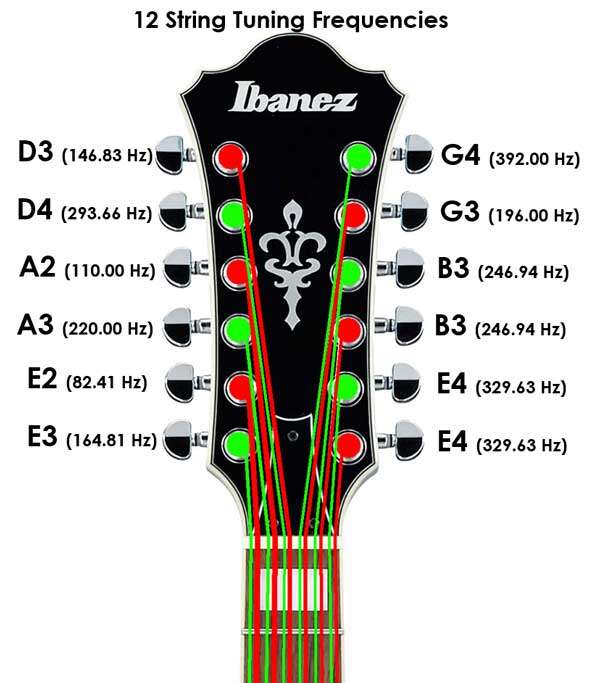
A 12-string guitar has six courses. Each course contains two strings. The four lower courses usually have one thick wound string and one thinner octave string. The two highest courses, B and high E, normally use strings tuned in unison.

Understand the 12-String Guitar String Order
Knowing the string order is the most important part of learning how do you string a 12 string guitar. The strings are not placed randomly. Each pair has a specific pitch and thickness.
In standard tuning, the strings are arranged like this from the lowest-sounding course to the highest:
| Course | Pair tuning | Common string setup |
|---|---|---|
| 6th course | E and E | Thick low E with a thinner octave E |
| 5th course | A and A | Thick A with a thinner octave A |
| 4th course | D and D | Thick D with a thinner octave D |
| 3rd course | G and G | Thick G with a thinner octave G |
| 2nd course | B and B | Two strings in unison |
| 1st course | E and E | Two strings in unison |
The octave strings sit above the main bass strings in pitch. When you hold the guitar in playing position, the thinner octave string usually sits toward the floor side of its pair.
The exact physical order can vary slightly by guitar design, bridge shape, or manufacturer. Before removing the old strings, take a clear photo of the bridge and tuners. That simple step prevents many mistakes.
Do not rely only on string color. Colors differ between brands. Gauge, printed labels, and the old string layout are safer guides.

How Do You String a 12 String Guitar Safely?
The safest method is to change one pair at a time. This keeps the neck under more stable tension and helps you remember where each string belongs.
Some guitar technicians remove all strings at once for cleaning or inspection. That can work, but it is less forgiving for beginners. A 12-string guitar has more total tension than a six-string guitar, so gradual changes are a sensible choice.
Place the guitar on a flat, padded surface. Support the neck if needed, and keep the guitar away from the edge of a table.
Before you begin:
• Loosen every string slightly if you plan to remove a pair
• Protect the finish with a soft cloth
• Avoid sharp bends in the neck
• Keep loose bridge pins in a safe place
• Never pull a tight string across your hand or face
If the guitar has a damaged bridge, lifting bridge plate, loose tuner, or visible neck problem, stop first. A new set of strings will not fix a structural issue. A qualified guitar repair technician should inspect it.

Step-by-Step: How Do You String a 12 String Guitar?
The following method works for most steel-string 12-string acoustic guitars with bridge pins and six headstock tuners.
1. Loosen and remove one string pair
Start with the lowest course or the highest course. Both approaches can work. I often begin with the low E pair because it gives me a clear reference for the remaining layout.
Turn each tuner until the string becomes loose. Cut the string near the sound hole only after the tension is gone. Pull the string from the tuner post and remove its bridge pin.
If a bridge pin feels stuck, use the notch on a string winder. Do not force it sideways. Excess force can chip the bridge or damage the pin.
2. Clean the exposed area
Wipe dust from the bridge, saddle, and nearby top. If the fretboard is dry, apply a small amount of suitable fretboard conditioner to a cloth.
Do not use household oil, furniture polish, or water on an unfinished fretboard. Too much cleaner can soak into the wood and cause problems.
This is also a good time to check for:
• Cracks around the bridge
• Loose bridge pins
• Deep grooves in the saddle
• Sharp fret ends
• Loose tuner bushings
• Unusual movement in the bridge
3. Identify the correct new strings
Find the two strings for the course you removed. The thick string is the main note. The thinner string is the octave string for the lower four courses.
For example, the low E course uses:
• A thick low E string
• A thin high E octave string
The B and high E courses usually use two strings of similar size. They are tuned to the same pitch.
If the package does not make the order clear, compare the gauges. The thickest string belongs to the low E course, and the thinnest strings belong to the high E course.
4. Insert the strings at the bridge
Place the ball end of each string into the correct bridge hole. Insert the bridge pin with the slot facing the string.
Press the pin down while gently pulling the string upward. This helps the ball end lock below the bridge plate instead of catching under the pin head.
A common mistake is to push the pin down without checking the ball end. The string may look secure but later pop loose when you tune. Hold light tension as you seat each pin.
5. Attach the strings to the tuners
Guide each string to its matching tuner. Leave about two or three inches of extra string beyond the post for the thicker strings. Leave slightly more for thin strings if you need extra wraps.
Bend the string at a right angle just past the tuner post. This keeps it from slipping while you wind.
For most acoustic tuners, wind the string so the wraps move toward the center of the headstock. Keep the wraps neat and stacked. Do not let them cross over one another.
6. Wind each string slowly
Use the string winder, but do not spin it too fast. Guide the string with your other hand while keeping gentle tension.
Aim for:
• Two or three clean wraps on thick wound strings
• Three or four wraps on thinner strings
• No overlapping wraps
• A firm angle from the nut to the tuner
Too many wraps can make tuning less stable. Too few wraps may let the string slip.
7. Tune the pair close to pitch
Bring both strings near their target notes. Do not tune one string fully before installing the second string in the pair.
Tune the thick string first, then the octave or unison string. Use an electronic tuner, preferably one with a clear chromatic display.
At this stage, the guitar will go out of tune often. That is normal. New strings stretch, and the bridge pins and tuner wraps settle.
8. Repeat for the other five courses
Move through the guitar one pair at a time. Keep the old strings in place until you reach the matching course.
Always check the string path:
• Bridge hole
• Saddle
• Nut slot
• Correct tuner
A string that crosses another string or sits in the wrong nut slot can cause tuning problems and poor playability.

How to Tune a 12-String Guitar After Restringing
Tuning is a major part of learning how do you string a 12 string guitar. A 12-string guitar can sound harsh if its pairs are only slightly out of tune.
Standard tuning is:
• 6th course: E and E
• 5th course: A and A
• 4th course: D and D
• 3rd course: G and G
• 2nd course: B and B
• 1st course: E and E
The lower four courses use octave tuning. The thinner string should sound one octave higher than the thick string. The B and high E pairs use unison tuning, so both strings should match closely.
Tune in several passes:
- Tune every thick string near pitch.
- Tune every thin octave or unison string near pitch.
- Repeat the full tuning cycle.
- Stretch each string gently.
- Tune again.
- Check the guitar after playing for a few minutes.
To stretch a new string, place one finger around the middle of the string. Pull it upward gently by about half an inch. Move along the string in small sections, then retune.