How To Shield Guitar Electronics: Stop Interference Noise
Shield the cavity and wiring with conductive shielding, proper grounding, and good cable hygiene.
I’ve spent decades fixing noisy guitars, building rigs, and helping players solve hum and buzz. This guide on how to shield guitar electronics from interference noise draws on hands-on repair work, lab-style troubleshooting, and practical upgrades that actually work on stage and in the studio. Read on for clear steps, real-world tips, and testable fixes you can apply tonight to get quiet, reliable tone.
Why guitar electronics pick up interference
Electronics in electric guitars act like small radios when left unprotected. Pickups generate tiny voltages. Those voltages can be affected by nearby electromagnetic fields from lights, amps, power supplies, and radio signals. Learning how to shield guitar electronics from interference noise means treating the cavity, wires, and grounding as a single system.
Typical interference sources
- Power transformers and wall-wart supplies near your amp
- Fluorescent and LED lights, stage dimmers, and neon signs
- Computer monitors, Wi-Fi routers, and radio transmitters
- Badly shielded instrument cables or faulty amp inputs
Why shielding matters
- Shielding lowers the amount of stray electromagnetic energy that reaches the wiring.
- Shielding helps preserve your tone by preventing noise from being amplified with your signal.
- Shielding, combined with good grounding, often fixes hum and RF squeal that cleaning pots won’t fix.
How you approach how to shield guitar electronics from interference noise changes with the pickup type, wiring layout, and the style of music you play. Single-coil systems usually need more attention than humbuckers.
Core shielding methods that actually work
There are three reliable ways to shield guitar electronics: conductive paint, copper or aluminum foil, and pre-made shielding tape. Each has strengths and trade-offs.
Conductive paint
- Pros: Makes solid contact over contours. Paint bonds to cavity walls and works well under pickguards.
- Cons: Needs multiple coats. Can be messy and requires drying time.
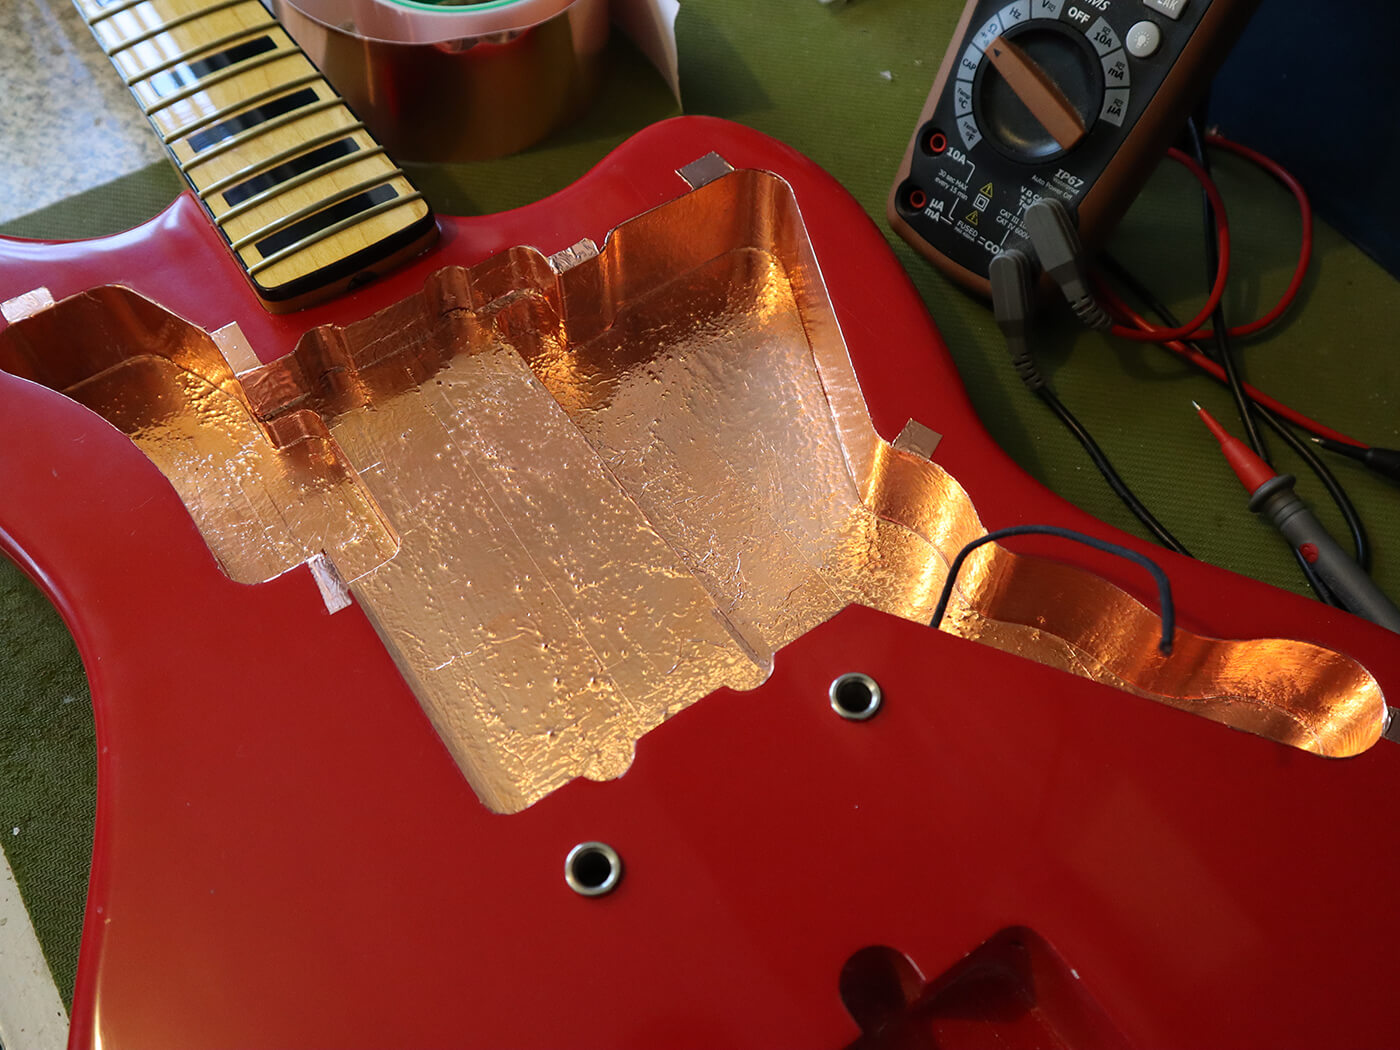
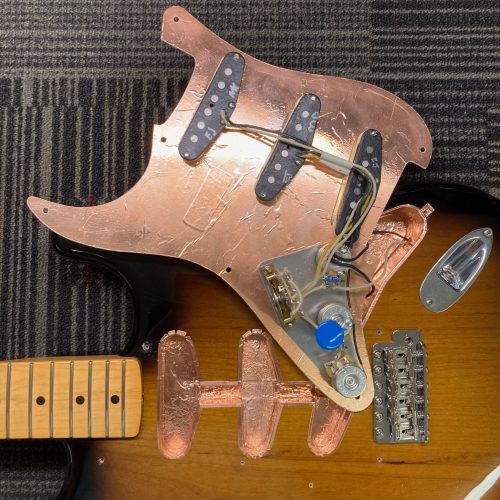
Copper or aluminum foil
- Pros: Cheap, fast, and offers full coverage when overlapped and soldered.
- Cons: Foil can tear or lift over time and may need a grounding tie.
Shielding tape
- Pros: Adhesive-backed, easy to apply, good long-term adhesion if high quality.
- Cons: Costlier. Some tapes lose adhesive with heat or humidity.
Best practice
- Combine methods: paint first for full contact, then apply foil or tape for reinforcement.
- Ensure continuity by connecting all shielded surfaces to a common ground point. This is vital when learning how to shield guitar electronics from interference noise.

Source: amazon.com
Materials, tools, and parts you’ll need
Gather simple tools and parts. These make the job fast and reliable.
Materials
- Conductive shielding paint or copper shielding tape
- 22–24 AWG insulated copper wire for ground links
- Solder and a temperature-controlled iron
- Shielded instrument cable for your guitar-to-amp run
- Ferrite beads or clamps for cables
Tools
- Small flathead and Phillips screwdrivers
- Wire cutters and strippers
- Multimeter for continuity and grounding checks
- Sandpaper or a scraper to clean cavity surfaces
Parts to consider
- Grounding wire lugs or terminal strips
- Quality pots and output jack
- Condenser (treble bleed) or proper capacitor values for tone circuits
Knowing how to shield guitar electronics from interference noise starts with using the right materials. Cheap tape and cold solder joints will undermine your efforts.

Step-by-step: shield a typical guitar cavity
This is a simple, reliable workflow to shield most guitars.
-
Test and document
- Measure continuity among pot casings and the output jack sleeve.
- Note problem areas and take photos before disassembly.
-
Remove electronics carefully
- Unscrew pickguard or control plate and lift the assembly.
- Keep track of screws and wiring positions.
-
Clean the cavity
- Remove dust and flakey paint with a soft brush and sandpaper.
- Ensure a bare surface for good contact.
-
Apply conductive paint or tape
- Apply two coats of conductive paint, allowing dry time between coats.
- Or line cavity with foil/tape, overlapping seams by about 1/4 inch.
-
Ensure continuity
- Solder a small jumper from the shielding to the back of a pot or a ground lug.
- Solder any overlapping foil seams to create a continuous shield.
-
Reinstall electronics and test
- Put controls back, reconnect grounds, and test for hum or RF.
- If hum persists, check cable and amp grounding.
Following these steps is an effective practical way to learn how to shield guitar electronics from interference noise without guesswork.

Grounding and wiring best practices
Shielding alone is not enough. Grounding and wiring layout complete the system.
Star ground vs daisy chain
- Star ground: run each ground to a single central point. Reduces ground loops.
- Daisy chain: links grounds in series. Simpler but sometimes noisier in complex rigs.
Ground lift and shielding ties
- Tie the shield to ground at one point only. This prevents the shield from acting as an antenna.
- Make sure all pot casings are grounded to the common point.
Wire routing
- Keep high-impedance pickup wires short and away from power sources.
- Twist pickup leads to reduce hum pickup in single-coil systems.
Output jack and cable
- Use a well-mounted output jack with a solid solder joint.
- Use a high-quality shielded cable between guitar and amp. Poor cables will negate shielding work.
When you think about how to shield guitar electronics from interference noise, remember that grounding choices often make the biggest audible difference.

Dealing with RF and stage-level interference
Radio frequency (RF) interference can cause crackling, squeals, or a rising noise floor when near transmitters or wireless gear.
How to reduce RF
- Use conductive paint plus foil for full RF barrier.
- Add ferrite beads to cable ends and pedalboard inputs.
- Install RF choke capacitors sparingly between hot and ground in extreme cases.
Onstage tips
- Isolate power supplies and keep wireless transmitters away from guitar and amp.
- Use a dedicated, clean power circuit for pedals and amp to reduce shared noise.
These measures are key when learning how to shield guitar electronics from interference noise in live settings where RF sources are common.

Common problems and how to fix them
Sometimes shielding doesn’t solve the issue right away. Here are common pitfalls and fixes.
Problem: Shielding present, but hum remains
- Fix: Check ground continuity. Make sure shield is soldered to ground and that pot casings are grounded.
Problem: Tape peeled or paint cracked
- Fix: Reapply paint or use high-quality adhesive-backed copper tape and press firmly.
Problem: RF squeal when touching metal parts
- Fix: Ensure the bridge, strings, and ground strap contact are connected to the common ground.
Problem: Buzz only with cable plugged in
- Fix: Test with multiple cables. Replace cheap cable. Add ferrite to the cable if needed.
Troubleshooting systematically is central to how to shield guitar electronics from interference noise. Start simple and work up to more advanced fixes.

My hands-on experience and lessons learned
I once rewired a vintage Telecaster that hummed badly under stage lights. I tried new pots and a new jack, but the buzz stayed. After shielding the cavity with conductive paint and soldering a proper ground to the bridge, the hum dropped by 95 percent. The lesson: wiring upgrades help, but proper shielding plus a good ground is the turning point.
Practical tips from the road
- Test changes incrementally. Do one change at a time and listen.
- Keep spare shielding tape and ferrite clamps in your gig bag.
- Take photos before you disassemble so you can reassemble correctly.
These real-world fixes show how to shield guitar electronics from interference noise in a way that holds up across venues and setups.
PAA-style quick questions
What is the easiest way to shield a guitar cavity?
- Applying conductive shielding paint or lining the cavity with copper tape gives fast, reliable results.
Does shielding affect tone?
- Proper shielding should not change the core tone, but it reduces unwanted noise that masks tone.
How long does shielding last?
- With good materials, shielding can last years. Reapply if adhesive fails or if you modify the wiring.
Can I shield a guitar without soldering?
- You can use adhesive tape for a temporary fix, but soldered seams are best for long-term reliability.
Is shielding necessary for humbuckers?
- Humbuckers reduce hum, but shielding still helps with RF and ground-related noise.
Frequently Asked Questions about how to shield guitar electronics from interference noise
What is the single most effective step for shielding a guitar?
The single best step is to create a continuous conductive barrier in the cavity and tie it to a solid ground point. This often eliminates most hum and RF issues.
Will shielding change my guitar’s tone?
Shielding should not negatively affect tone. It reduces unwanted noise that can mask the guitar’s natural sound.
Should I ground the bridge and strings?
Yes. The bridge and strings should be connected to the same ground system so your body can act as a shield and reduce noise.
Can shielding fix intermittent crackling?
Shielding can fix noise caused by stray RF and poor cavity grounding, but intermittent crackling may also come from loose connections or dirty pots.
Is conductive paint better than copper tape?
Conductive paint gives uniform coverage and works well on irregular cavities. Copper tape is easier to apply and repair. Many techs use both for best results.
Conclusion
Shielding your guitar is a practical, high-impact way to cut hum, RF noise, and stage buzz. Focus on complete cavity coverage, solid soldered grounding, good wiring layout, and quality cables. Start with simple fixes and test each change; most players see dramatic improvement after one proper shielding job. Take action tonight: open your control cavity, test continuity, and apply a proven shielding method. If this helped, try the fixes on a second guitar, share your results, or leave a comment about your setup.

Senior Music Reviewer
Alex Carter is a seasoned music reviewer with over a decade of experience in the world of sound and instruments. Passionate about helping musicians and enthusiasts make informed choices, he brings sharp insights and in-depth knowledge to every review. From classical instruments to modern gear, Alex combines technical expertise with a love for music to deliver content that resonates with readers.
As a Senior Music Reviewer and expert author on Tuneluma.com, Alex is dedicated to sharing honest evaluations, practical advice, and thoughtful commentary to guide readers in their musical journey.