
How To Identify Violin Strings: Simple Guide
You can identify violin strings by their color, ball-end code, packaging, winding, and sound.
Learning how to identify violin strings helps you choose the right replacement, match your current setup, and avoid damaging your instrument. String makers use different colors, materials, gauges, and labels, so guessing from appearance alone can lead to mistakes. This guide explains how to identify violin strings with clear checks you can use at home, in a music store, or during a repair visit.

Why identifying violin strings matters
Violin strings may look similar, but they can feel and sound very different. A steel string, synthetic-core string, and gut string each respond in its own way. The wrong set may feel too stiff, sound too bright, or place an unsuitable level of tension on the violin.
Correct identification also makes restringing easier. You will know which string belongs in the G, D, A, or E position. You can also replace one broken string without accidentally buying an incompatible model.
Knowing how to identify violin strings is useful for several reasons:
• It helps you replace a broken string with the correct type.
• It lets you compare string sets before buying.
• It helps you reproduce a sound you already enjoy.
• It prevents confusion between the four string positions.
• It makes it easier to discuss your setup with a teacher, luthier, or music shop worker.
A common mistake is to treat all violin strings as interchangeable. They are not. Even strings with the same note can have different tension, core materials, winding metals, and response.

Learn the four violin string names
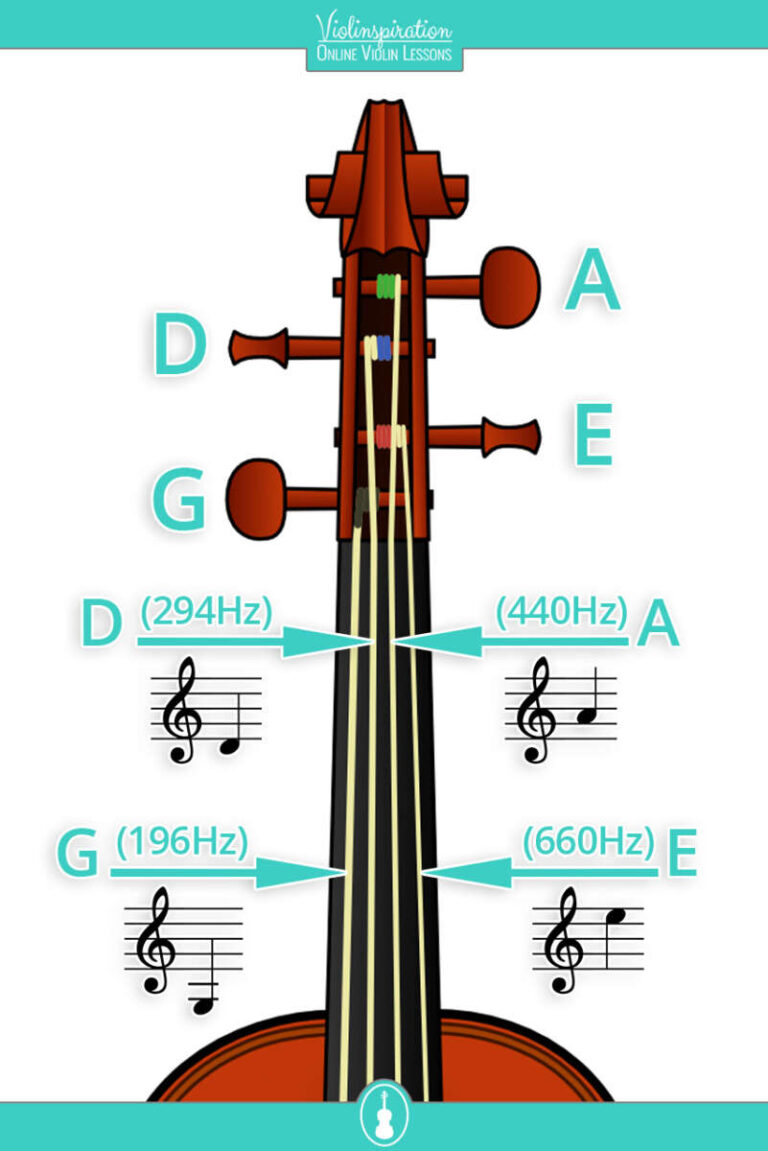
The easiest first step in how to identify violin strings is learning the standard string order. When you hold the violin in playing position, the strings run from lowest pitch to highest pitch like this:
- G string: The thickest and lowest string.
- D string: The second-lowest string.
- A string: The second-highest string.
- E string: The thinnest and highest string.
The G, D, and A strings usually have a metal winding around a core. The E string is often a plain, solid steel wire, although some E strings have a special coating or winding.
String thickness generally follows pitch. The G string needs more mass to produce its low note. The E string is much thinner because it must vibrate at a higher frequency.
If you are unsure, do not rely only on thickness. Some specialty strings have unusual designs. Always check the package, tailpiece end, or manufacturer chart when possible.

Check the string packaging first
The package is usually the most reliable way to identify violin strings. Look for the brand, product name, size, string note, material, and tension. Most major brands print enough information to identify the set or individual string.
A package may show:
• The string name, such as G, D, A, or E.
• The violin size, such as 4/4 or 3/4.
• The core type, such as steel, synthetic, or gut.
• The tension level, such as low, medium, or high.
• The winding material, such as aluminum, silver, chrome steel, or tungsten.
• A color code for the silk at each end.
The words “medium,” “mittel,” or “medium tension” often describe the tension level. They do not identify the string note by themselves. A medium-tension G string and a medium-tension A string are still very different strings.
Keep the original envelope after opening a new set. I have found that this simple habit prevents many mix-ups. Players often place loose strings in drawers and later cannot remember which one is which.

Use the color codes carefully
Color is one of the fastest methods for how to identify violin strings, but it is not universal. Each brand uses its own color system. A red thread may identify one brand’s A string, while another brand may use red for a different string or for the set design.
Look at the silk winding near both ends of the string. You may see colored thread near:
• The peg end.
• The tailpiece end.
• Both ends.
• One end only.
The color near the peg can help you identify the string after it is installed. The color near the tailpiece can help you check the string before installation. Some brands publish color charts in their packaging or online product information.
Do not identify a string by color alone. Lighting can change how dark blue, purple, black, and gray appear. Old strings can also fade, collect rosin dust, or become stained by hand oils.
A better method is to combine color with three clues: the string’s position, its thickness, and its packaging. When all three agree, your identification is much more dependable.
 end”
style=”max-width: 100%; height: auto; border: 2px solid black; border-radius: 10px; display: block; margin: 0 auto;”
loading=”lazy”
/>
Inspect the ball end and loop end
the end of a violin string can provide another useful clue. Most violin strings have a small metal ball at the tailpiece end. Some E strings use a loop instead, depending on the tailpiece and fine tuner.
A ball-end string has a round metal piece that fits into a tailpiece slot or fine tuner. A loop-end string has a small metal loop. These ends are not always interchangeable.
Check the following details:
• Ball end: Look for a round metal bead.
• Loop end: Look for a small circle of wire or metal.
• Silk color: Note the thread near the end.
• String length: Confirm that it suits your violin size.
• Fine tuner fit: Make sure the end sits correctly in the tuner.
Never force a ball end into a loop-style fine tuner. The string may not seat properly, and the tuner could become difficult to use. If you are unsure, compare the old string with the new one before removing anything.
When learning how to identify violin strings, many players focus on the visible wire and forget the end fitting. That small detail can tell you whether the string is suitable for your tailpiece.

Identify the core material
Violin strings usually have one of three core types: gut, synthetic, or steel. The core is the inner part of the string. Winding may cover it, so you may not see the core directly.
Steel-core strings
Steel-core strings often feel direct and stable. They tend to speak quickly and can produce a clear, bright sound. They are common on student instruments, folk violins, and electric violins.
They may be:
• Solid-core steel strings.
• Rope-core steel strings made from several fine wires.
Steel strings often resist changes in humidity better than gut strings. However, some players find them less warm or complex than synthetic or gut options.
Synthetic-core strings
Synthetic strings use a manufactured fiber core. They often offer a balance between warmth, comfort, projection, and tuning stability. Many orchestral and advanced players use them.
Synthetic strings may feel softer than steel strings. They can take more time to settle after installation, often requiring regular retuning during the first day or two.
Gut-core strings
Gut strings use animal gut, traditionally sheep gut, as the core. They can create a rich and complex tone, but they are more sensitive to humidity and temperature. They also need careful setup and regular maintenance.
Gut strings are not automatically better. They suit certain players, instruments, and musical styles. A luthier can help determine whether they are appropriate for your violin.