How To Make A Steel Drum: Easy DIY Guide
To make a steel drum, shape a steel sheet, tune its notes, and finish the shell with care.
Making a steel drum, also called a steel pan, is part metalwork, part music, and part careful ear training. The craft began in Trinidad and Tobago, where makers turned discarded oil drums into bright, melodic instruments. This guide explains how to make a steel drum, from choosing the metal to shaping the playing surface, cutting notes, tuning the pan, and applying a safe finish.
What Is a Steel Drum?
A steel drum is a tuned percussion instrument made from a steel container or steel sheet. Its playing surface has raised or lowered note areas called tone fields. When struck with rubber-tipped mallets, each field vibrates at a specific musical pitch.
Although people often say “steel drum,” the more accurate name is “steel pan.” The word “drum” describes its original container shape, but the instrument behaves more like a tuned metal resonator than a normal drum.
The main parts include:
• The bowl or shell, which supports the instrument
• The skirt, or vertical side wall below the playing surface
• The note areas, which produce different pitches
• The bridge areas between notes, which help separate vibrations
• The rim, which strengthens the shell and affects its tone
A steel drum is not simply a metal barrel with dents. Every note must have the correct size, shape, depth, stiffness, and pitch. Small changes can affect the sound across the whole instrument.

Tools and Materials You Need
Learning how to make a steel drum starts with the right materials and tools. A beginner can make a simple practice pan, but a professional instrument requires specialized forming and tuning equipment.
Basic materials
• A clean, unused or properly prepared steel barrel, often around 55 gallons
• Mild steel with consistent thickness
• Replacement steel sheet if a barrel is not available
• Rust-resistant primer
• Protective enamel or powder coating
• Rubber for mallet tips
• Strong stand material, such as steel tubing or hardwood
Never use a barrel that held toxic chemicals, pesticides, fuel residue, or unknown substances. Even after cleaning, dangerous vapors and contaminants may remain.
Common tools
• Metal cutting tools
• Ball-peen hammers
• Sledgehammers
• Shaping stakes or forming blocks
• Angle grinder
• Files and sanding tools
• Ruler, compass, and marking tools
• Propane or oxyfuel heating equipment for advanced work
• Electronic tuner or strobe tuner
• Welding equipment for the stand
A digital tuner helps, but it does not replace a trained ear. A note may show the right fundamental pitch while still producing harsh overtones or a weak sustain.
Safety equipment
• Safety glasses or a full face shield
• Hearing protection
• Leather gloves
• Steel-toe shoes
• Flame-resistant clothing when heating metal
• Respirator suitable for dust and coatings
• Fire extinguisher
• Good ventilation
Metal shaping creates sharp edges, loud impact noise, sparks, and flying particles. Good ventilation is especially important when grinding, painting, or heating steel.

Choose the Steel Drum Design
Before you begin, decide what type of steel pan you want to build. Different designs use different note ranges and different numbers of note fields.
A simple beginner pan may contain eight to 12 notes. A standard tenor pan may contain more than 20 notes and can play a broad melody range. Larger instruments, such as double seconds, guitar pans, cello pans, and bass pans, use more shells and require much more advanced tuning.
Common steel pan types
• Tenor pan: Usually carries the main melody and has a bright, high range
• Double tenor: Uses two pans for a wider melodic range
• Double second: Offers a lower and fuller melodic register
• Guitar pan: Often uses four pans and supports harmony
• Cello pan: Produces deep supporting notes
• Bass pan: Uses several large pans for low musical lines
For a first project, a small tenor-style design is more realistic than a full orchestra set. It lets you learn how the metal responds without managing a large number of notes.
Plan the note layout
Draw the note layout before you cut or shape the shell. Include the note names, approximate sizes, and their positions around the playing surface.
A chromatic layout may include notes such as C, C-sharp, D, D-sharp, and E. The exact pattern depends on the maker and the musical range. Keep enough space between note fields so that each note can vibrate without disturbing its neighbors.
Prepare and Cut the Barrel
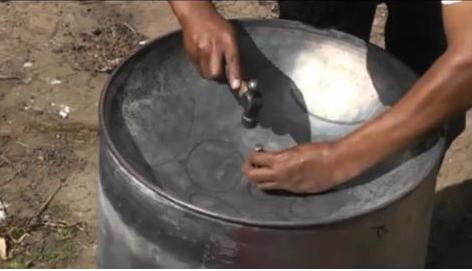
The first physical stage in learning how to make a steel drum is preparing the steel shell. If you use a barrel, inspect it closely for deep rust, dents, thin areas, or damaged seams.
A clean, food-grade barrel is the safest choice. Wash it, remove labels, and allow it to dry fully. If there is any doubt about what the barrel contained, do not use it.
Steps for barrel preparation
-
Remove the top and bottom lids with a suitable cutting tool.
-
Cut the barrel to the planned height.
-
Smooth every sharp edge with a grinder and file.
-
Check the shell for cracks, weak spots, or major dents.
-
Clean away oil, dirt, and loose rust.
-
Mark the top surface where the bowl will be formed.
The shell height affects the instrument’s resonance and playing position. A deeper shell often gives more internal volume, while a shorter shell may be easier to handle. There is no single height that works for every design.
Do not rush the cutting stage. A crooked rim can create uneven tension, and uneven tension makes later tuning harder.

Form the Bowl Shape
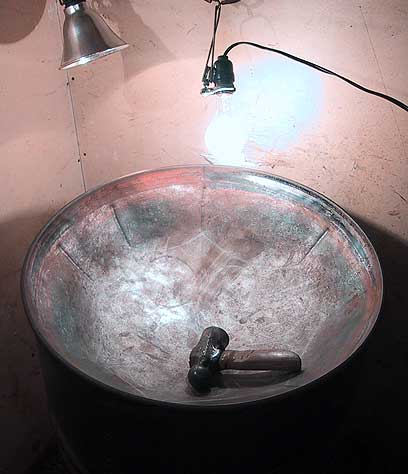
A flat steel surface must be shaped into a shallow bowl. This step gives the steel pan its curved playing surface and creates the tension needed for musical vibration.
Many traditional makers use a large hammer and a forming block. The steel is struck in controlled patterns, often beginning near the center and moving outward. The goal is to stretch and curve the metal without creating deep cracks or random dents.
A simple forming method
-
Place the steel shell on a stable forming surface.
-
Mark the center of the top.
-
Begin with light hammer strikes around the center.
-
Work in small circles and move gradually toward the rim.
-
Check the depth often with a straightedge or template.
-
Keep the bowl symmetrical from every direction.
-
Stop if the metal develops a sharp fold or crack.
The shaping process is not about hitting the metal as hard as possible. Heavy blows can stretch one area too much and make the surface unstable. Controlled force produces a more even bowl.
Heat may be used by experienced makers to soften stressed steel. However, heating changes the metal’s structure and can make tuning unpredictable if it is not controlled. Beginners should learn cold forming first or work with an experienced pan maker.

Mark and Cut the Note Fields
Once the bowl has the correct shape, mark the note layout on the playing surface. Each note field must have enough room to vibrate freely.
Use a compass, ruler, flexible template, or printed layout. Mark each note with its musical name. Keep your lines clear but shallow so they do not become unwanted grooves in the metal.
The note fields are usually separated by narrow grooves or raised borders. These boundaries help reduce vibration traveling from one note to another.
Important layout tips
• Place larger, lower notes in areas with enough room to vibrate.
• Keep small, high notes away from large areas that may overpower them.
• Leave clear borders between neighboring notes.
• Avoid placing a note across a seam or damaged area.
• Use a consistent layout so tuning remains predictable.
Some makers shape the note zones before cutting the grooves. Others mark and define the zones first, then raise or sink each field. Both methods can work, but the order should remain consistent throughout the instrument.

Shape and Separate Each Note
This is the stage where the steel pan begins to look like a musical instrument. Each marked field is carefully shaped so it can act as a separate vibrating surface.
The maker may raise the outer boundary and lower the center of a note, or use the opposite form depending on the design. The exact geometry varies. What matters is that the note has a stable center, a controlled edge, and enough separation from nearby fields.
How to shape a note field
-
Define the outside edge of the note.
-
Use light hammer strokes to establish the boundary.
-
Form the center with small, controlled blows.
-
Check that the field is smooth and free from sharp creases.
-
Compare its size with the planned musical range.
-
Leave room for later tuning adjustments.
A common mistake when learning how to make a steel drum is making the note fields too deep at the start. Deep dents can limit later adjustments and may cause the steel to crack. Begin shallow, then increase the shape slowly.
Think of each note as a small bell. Its shape controls how it vibrates, just as the shape of a bell controls its tone.
Tune the Steel Drum
Tuning is the most difficult part of how to make a steel drum. It requires patience, good listening, and repeated small adjustments.
Strike the center of one note with a soft rubber mallet. Use an electronic tuner to identify the fundamental pitch. Then listen for unwanted overtones, buzzing, double tones, or a note that fades too quickly.
Basic tuning process
-
Tune one note near the center of the instrument.
-
Compare it with a reference pitch.
-
Raise the pitch by carefully stiffening or stretching the note area.
-
Lower the pitch by carefully softening or deepening the field.
-
Check the octave and other overtones.
-
Retest nearby notes after every major adjustment.
-
Repeat the process until the pitch and tone are stable.
Steel usually rises in pitch when the note area becomes smaller, tighter, or stiffer. It usually falls when the area becomes larger, softer, or more deeply shaped. These changes are not perfectly predictable, so make small adjustments.
Tuning can also change when you tune nearby notes. The shell acts as one connected system. A note that sounds correct alone may shift after the surrounding fields are formed.
Professional pan tuners often return to the same notes many times. This is normal. Tuning is closer to balancing a choir than setting a single alarm clock.

Finish the Rim, Shell, and Stand
After tuning, smooth the rim and inspect the shell for sharp edges. A strong rim helps maintain the shell’s shape and can improve safety during handling.
Clean the metal before applying a finish. Remove dust, oil, and loose rust. Use a primer made for steel, followed by a durable topcoat. Keep paint away from the playing surfaces unless the coating is designed for that use and does not interfere with vibration.
Build a stable stand
A steel drum should sit at a comfortable height and angle. The stand must support the shell without pressing hard against the bowl or blocking its sound.
A good stand should:
• Hold the pan securely
• Reduce unwanted rattling
• Keep the playing surface near waist height
• Allow the player to move freely
• Protect the instrument from tipping
Test the stand by playing several notes. If the sound becomes dull, check whether the stand is touching too much of the shell.
Make Rubber-Tipped Mallets
Steel pans are normally played with mallets that have soft rubber tips. Hard sticks can damage the note fields and create a harsh sound.
You can make simple mallets from lightweight wooden dowels and dense rubber tubing. The rubber should be firm enough to produce a clear tone but soft enough to protect the steel.
Mallet tips should be
• Smooth
• Securely attached
• Similar in size
• Free from cracks
• Comfortable to hold
Different note ranges may benefit from different mallet sizes. Smaller tips can make high notes speak clearly, while larger tips may produce a fuller sound on low notes.
Do not use bare wood, metal, or hard plastic on the playing surface. These materials can dent the notes and damage the finish.
Common Mistakes to Avoid
Many first-time builders focus on the shape of the bowl and underestimate the effect of small details. The best results come from slow work and frequent checks.
Mistake 1: Using an unsafe barrel
Unknown barrel contents can create serious health risks. Use a new steel container or a verified food-grade barrel.
Mistake 2: Making uneven hammer marks
Random strikes create weak areas and unstable notes. Use a pattern and check the surface often.
Mistake 3: Cutting notes too close together
Crowded fields interfere with one another. Leave enough separation for each note to vibrate.
Mistake 4: Tuning too aggressively
Large pitch changes can damage the metal. Make small adjustments and allow the steel to settle.
Mistake 5: Ignoring overtones
A tuner may show the correct note while the instrument still sounds rough. Listen for tone quality, sustain, and unwanted ringing.
Mistake 6: Skipping hearing protection
Repeated hammering can harm hearing. Wear proper protection even during short sessions.
One practical lesson from workshop demonstrations is simple: the first pan does not need to be perfect to be valuable. It teaches how steel stretches, how vibration travels, and how small changes affect pitch. Treat mistakes as information, but do not repeat avoidable safety errors.
How Much Does It Cost to Make a Steel Drum?
The cost of how to make a steel drum depends on the shell, tools, finish, and tuning equipment. A basic homemade project may use an affordable steel container and hand tools, but professional equipment can cost much more.
Typical cost areas include:
• Clean steel barrel or sheet metal
• Cutting and grinding tools
• Hammers and forming blocks
• Tuning tools
• Protective equipment
• Primer and paint
• Rubber mallets
• Stand materials
The hidden cost is time. A small practice pan may take many hours, while a refined professional instrument can require weeks of shaping and tuning. Labor, skill, and repeated adjustments explain why handmade steel pans can cost far more than the raw metal.
If your main goal is to play music quickly, buying a tuned beginner pan may be more practical. If your goal is to understand metalwork and instrument building, making a steel drum can be a rewarding long-term project.
Can You Make a Steel Drum Without Welding?
Yes, you can make a basic steel drum without welding if the barrel remains structurally sound and the instrument uses a simple support stand. You can build the stand from wood or use a prebuilt frame.
Welding becomes useful when you need to repair the rim, reinforce the shell, or build a custom steel stand. Welding the playing surface is not a normal substitute for shaping and tuning. A welded patch can create uneven tension and damage the instrument’s tone.
For beginners, focus on forming and tuning first. A safe wooden stand is often enough for a small pan.
Frequently Asked Questions About How to Make a Steel Drum
How long does it take to make a steel drum?
A basic practice instrument may take several days of part-time work. A well-tuned professional steel pan can take many weeks because shaping, tuning, and retuning require patience.
What kind of metal is used to make a steel drum?
Most steel pans use mild steel from a barrel or steel sheet. The metal must be strong, workable, and consistent enough to hold stable note fields.
Can a beginner make a steel drum at home?
A beginner can make a simple pan with careful preparation and safe tools. However, advanced shaping and tuning are easier with instruction from an experienced steel pan maker.
Do steel drums need electricity?
No. A traditional steel drum is an acoustic instrument and does not need electricity to produce sound. A microphone or pickup can be added for performances, but it is not required.
Why does my steel drum sound dull?
A dull sound may come from an over-thick coating, poor note separation, weak shaping, excessive contact with the stand, or incorrect tuning. Check the stand first, then inspect the note fields and finish.
Can I use any old oil barrel?
No. Only use a barrel with a known, safe history, and never use one that held toxic chemicals or unknown materials. Residue and fumes can remain dangerous even after cleaning.
What is the hardest part of making a steel drum?
Tuning is usually the hardest part because each note must have the right pitch, tone, sustain, and balance with the rest of the shell. It takes both measuring tools and trained listening.
Conclusion
Learning how to make a steel drum combines metal shaping, musical design, careful tuning, and strong safety habits. Start with a safe steel shell, form the bowl slowly, plan the note layout, separate each field, and tune with small adjustments.
Your first instrument may not sound like a professional Trinidadian steel pan, and that is normal. Each careful strike teaches you more about vibration and craftsmanship. Begin with a small design, practice under expert guidance when possible, and share your progress with other steel pan enthusiasts or music-making communities.

Senior Music Reviewer
Alex Carter is a seasoned music reviewer with over a decade of experience in the world of sound and instruments. Passionate about helping musicians and enthusiasts make informed choices, he brings sharp insights and in-depth knowledge to every review. From classical instruments to modern gear, Alex combines technical expertise with a love for music to deliver content that resonates with readers.
As a Senior Music Reviewer and expert author on Tuneluma.com, Alex is dedicated to sharing honest evaluations, practical advice, and thoughtful commentary to guide readers in their musical journey.