How Do You Change Acoustic Guitar Strings: Easy 2026 Guide
Changing acoustic guitar strings involves loosening the old tension, removing pins, threading new strings, and tuning them precisely. I’ve spent years in recording studios and playing live gigs. Nothing kills a creative run faster than a dull, rusted string snapping mid‑chord. Learning how to change acoustic guitar strings is a rite of passage for every guitarist. It directly affects your tone and your guitar’s health. Follow a simple, methodical approach and your guitar will sing like the day you brought it home. This guide shares my hands‑on tips and hard‑learned lessons so you get it right the first time.

Gather Your Tools and Prepare Your Workspace
Before you start, lay everything out. Having tools within reach saves time and lowers stress. I keep a small kit ready. It lives in my gig bag and gets used every few weeks.
- Choose a clean area with plenty of light so you can clearly see the bridge pins and headstock.
- Have a microfiber cloth handy to wipe down the fretboard once the old strings are removed.
- Ensure you have the correct gauge of strings for your specific guitar to avoid neck tension issues.
Tools checklist (quick)
- New set of strings (correct gauge and type)
- String winder (speeds up winding and often has a pin puller)
- Wire cutters or flush cutters for trimming excess
- Chromatic tuner or clip‑on tuner
- Soft towel or padded mat to protect the guitar
- Microfiber cloth and light fretboard oil (optional)
- Graphite pencil for nut lubrication (optional)
Work on a flat, padded surface. I use a towel on a table. This protects the finish if the guitar slips. The image above shows a clean setup. Good light helps spot worn frets, grime, or a damaged bridge pin.
Removing the Old Strings Safely
Patience is key. Rushing can chip the bridge or rub marks into the finish. Loosen each string slowly with a string winder until it is slack. Cut the string in the middle if you prefer smaller pieces, but be careful—the cut ends can spring back.
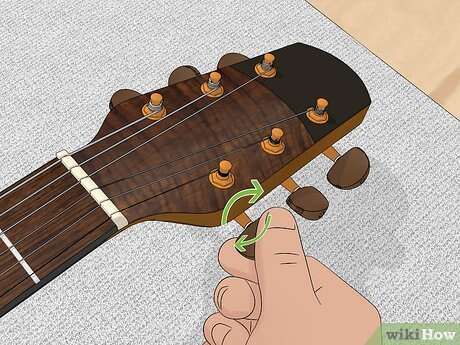
- Wind down each tuner until the string hangs loose.
- Use your cutters to snip the middle of the string to reduce tension, but be careful as they can snap back.
- Pull the ball end of the string out through the bridge once the pin is removed.
Use the notched end of a string winder or a bridge pin puller to remove bridge pins. Avoid pliers; they can chip wood or crush plastic pins. If a pin feels stuck, wiggle it gently while pulling straight up to avoid bending the pin or pin hole. Put removed strings in a small trash bag or container—old strings can be sharp.
One‑at‑a‑time or all at once?
Both methods work. I usually change strings one at a time. It keeps neck tension more stable. That makes re‑tuning easier. If you want a deep clean or fretwork, you can remove all strings. Just be ready to adjust the truss rod if the neck relief changes significantly.

Installing the New Strings Correctly
Start with clean hands. Dirt and oil shorten string life. Insert the ball end into the bridge hole and seat it against the bridge plate. Press the bridge pin in with the groove facing the neck. That groove guides the string into place. Make sure the ball end sits flat on the plate inside the body.
- Feed the other end of the string through the corresponding hole in the tuning peg.
- Leave enough slack, about two inches, so you can wind the string around the post three or four times.
- Maintain tension on the string with one hand while winding with the other to ensure a clean, tidy wrap.
When winding, aim for neat coils that do not overlap. Coil the string down the post for the low E, and shorter coils for the thin strings. Keep the coils stacked so the string moves downward as you tighten. This improves tuning stability and limits slippage.
Locking methods and extra security
For added stability, try a simple lock wrap. Pass the string through the tuning post hole, pull a loop, then wind the string so one coil passes under the main wrap. This helps the string lock and stay in tune. Avoid too many winds—three to five wraps on most posts is enough.

Tuning and Stretching Your New Strings
New strings stretch and settle. Tune slowly and in several passes. Use a chromatic tuner for accuracy. Bring each string up to pitch, then go back and tune the whole set again. Repeat until the strings hold pitch.
- Play a few chords to see if the tuning holds.
- Retune as necessary, as the initial stretching phase will cause them to drop in pitch.
- Clip the excess wire at the headstock once you are satisfied with the tuning.
To speed settling, gently pull each string away from the fretboard a few times about an inch. Retune and repeat until the pitch stops drifting. Trim excess string neatly and tuck the ends so they don’t catch on clothing. If your nut slots bind, rub a little graphite from a pencil in the slot to help the string move freely.

Troubleshooting Common Problems
Even with care, things can go wrong. Here are quick fixes I use on stage and in the studio.
String keeps slipping or pegs unwind
Check winding direction and number of wraps. Use a tighter lock wrap on the post. Make sure the string is seated properly in the bridge pin groove and the ball end is against the bridge plate.
Bridge pin pops out
Push the ball end deeper so it catches the bridge plate. Inspect the pin for cracks. If it still pops, the pin hole or pin may be worn and need repair or replacement.
New strings break during installation
Trim any sharp burrs on the bridge pin hole and the nut. Use cutters with a clean cut close to the tuner post. Old tuning posts with burrs can cut strings—clean them or file gently if needed.
Guitar won’t hold tune
Check the nut, tuning machines, and bridge pins for binding or slippage. Stretch the strings fully. If problems persist, inspect the tuner gear tightness and consider new tuners or a professional setup.

Frequently Asked Questions of how do you change acoustic guitar strings
How often should I change my strings?
You should typically change your strings every one to three months depending on how often you play. If you notice a dull sound, oxidation, or difficulty keeping tune, it is time for a fresh set. Players who sweat a lot, play daily, or record often swap strings more frequently for the cleanest tone.
Can I change my strings one at a time?
Yes, changing them one at a time is a great practice because it maintains the tension on the guitar neck. This prevents the bridge from moving and makes the final tuning process much easier. I do this for gig guitars when I need a quick change between songs.
What should I do if a bridge pin keeps popping out?
If a pin pops out, the ball end of the string is likely not seated properly against the plate inside the guitar. Push the ball end in further and ensure it is caught on the bridge plate before pushing the pin back down. If the pin or hole is worn, have a luthier check it. A loose pin can also be tightened or replaced with a new pin that matches the original.
Do I need to lubricate the nut slots?
Lubricating the nut slots with a bit of graphite from a pencil helps the strings glide smoothly during tuning. This prevents binding and helps your guitar stay in tune much longer. For a longer‑lasting solution, some players use a small amount of nut lubricant or a specialized product made for strings and nuts.
Are coated strings better for beginners?
Coated strings last significantly longer than standard strings because they resist sweat and oil buildup. They are an excellent choice if you do not want to change your strings as frequently. Coated strings can cost more, and some players feel they change the tone slightly. Try a set to decide if you like the feel and sound.
Choosing the Right Strings and Gauge
String choice changes tone and playability. Lighter gauges are easier to bend and play. Heavier gauges give more volume and fuller tone. If you switch gauge, recheck neck relief and intonation. Common sets include .012‑.054 (medium) and .013‑.056 (heavy) for steel‑string acoustics. Consider coated vs. uncoated based on life span and feel.
Popular string types and when to use them
- Bronze (bright tone) – good for recording and bright acoustic tone.
- Phosphor bronze (warm and balanced) – common for live and studio work.
- Coated (long life) – ideal for players who sweat or play outdoors.
Final Setup and Care Tips
After you finish, wipe down strings and fretboard. Store the guitar in a case or on a stand away from extreme heat or moisture. Regular cleaning lengthens string life and preserves your fretboard. If you play often, keep a second set of strings in your gig bag so you can swap quickly.
Conclusion
Mastering how to change acoustic guitar strings is one of the most rewarding steps in your musical journey. It gives you direct control over your tone and deepens your connection to your instrument. Do not be discouraged if your first attempt feels a bit clumsy; even professional luthiers once struggled with their first string change. Start your next practice session with a fresh set of strings and hear the difference for yourself. If you found this guide helpful, feel free to share it with fellow players or leave a comment below about your favorite string brand.

Senior Music Reviewer
Alex Carter is a seasoned music reviewer with over a decade of experience in the world of sound and instruments. Passionate about helping musicians and enthusiasts make informed choices, he brings sharp insights and in-depth knowledge to every review. From classical instruments to modern gear, Alex combines technical expertise with a love for music to deliver content that resonates with readers.
As a Senior Music Reviewer and expert author on Tuneluma.com, Alex is dedicated to sharing honest evaluations, practical advice, and thoughtful commentary to guide readers in their musical journey.