
Follow the diagram: string number, tuning, and bridge direction guide for clear, correct stringing.
I have spent years restringing guitars and teaching others to read diagrams. This guide shows you how to string a guitar diagram step by step. You will learn to read string numbering, match string types, route strings at the bridge and through tuners, and tune with confidence. I explain common diagram symbols and pitfalls, share real-world tips from my experience, and give troubleshooting advice so you can string any guitar using a diagram with ease. Read on to master how to string a guitar diagram and get your guitar playing and sounding right fast.
Understanding a guitar stringing diagram
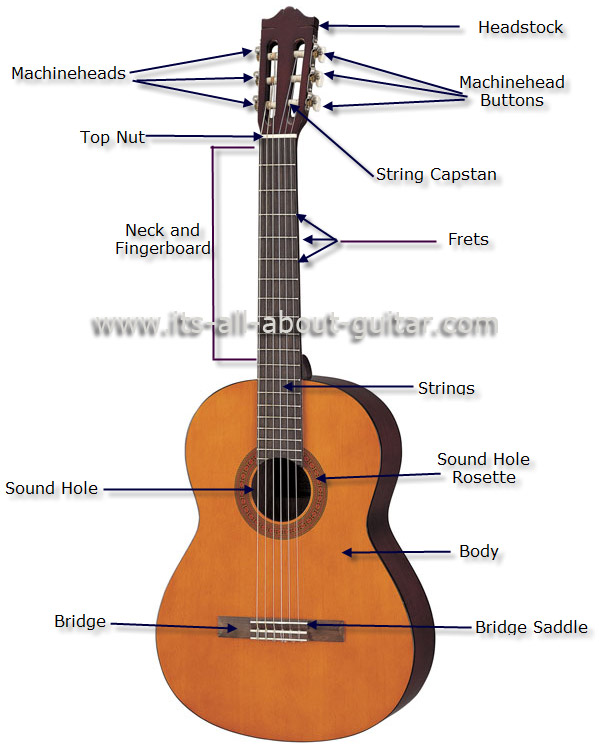
A guitar stringing diagram is a simple map that shows where each string starts, where it ends, and how it crosses the nut, bridge, and tuners. Diagrams usually show string numbers, tuning pitches, and routing for through-body, top-load, or tremolo systems. Knowing how to read the diagram is the first step to correct stringing and stable tuning.
Common diagram elements include string numbers, tuner positions, bridge posts, and arrows for direction. Diagrams may be front-facing (looking at the headstock) or top-down (looking from above), so check orientation before you start. When you understand the symbols, following any diagram becomes straightforward.

Tools and supplies you need
Before you start, collect these items. A clean workspace helps you avoid mistakes.
- String sets for your guitar type: electric, acoustic, or classical.
- Wire cutters or string snips for trimming excess string.
- Tuner or tuning app to get accurate pitch.
- String winder to speed up winding, optional but useful.
- Needle-nose pliers for pulling strings through tight holes.
- Cloth to wipe the fretboard and reduce slipping while you work.
Quality strings and a good tuner will make the process easier and your results last longer. I recommend fresh strings if the old ones are rusty or dead.
Reading string numbering and tuning on a diagram
Most diagrams label strings from low to high or from the player’s perspective. Understand the standard systems.
- Numbering: Many diagrams number strings 6 to 1, with 6 as the low E and 1 as the high E. Others use 1 to 6 depending on orientation.
- Pitch labels: Diagrams often show E A D G B E or alternate tunings. Match the pitch to each string number.
- Orientation: Confirm whether the diagram shows the front of the headstock or the back. This prevents swapping left and right tuners.
If you get the numbering wrong, the wrong gauge or pitch may end up in the wrong slot. Double-check before threading any strings.

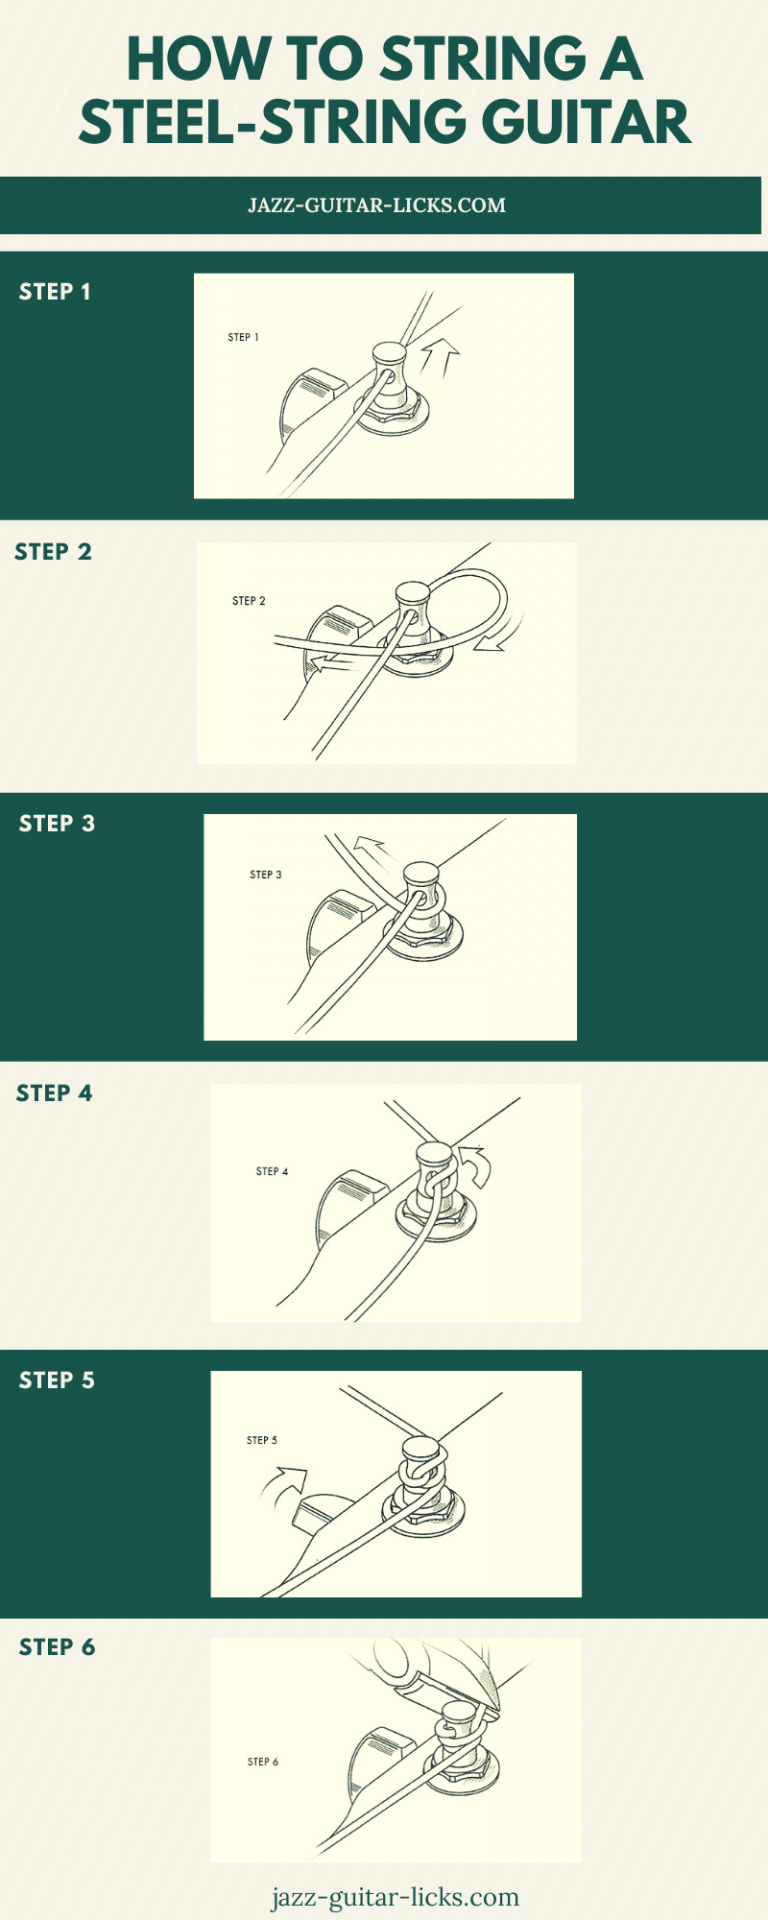
Step-by-step: How to string a guitar diagram
Follow these clear steps to string your guitar using a diagram. Keep each step short and steady.
- Remove old strings and clean the fretboard
- Loosen and cut old strings, then wipe the fretboard and hardware
- Lay out your new strings in order by number and pitch according to the diagram
- Identify each string on the diagram so you don’t mix gauges
- Anchor the string at the bridge or tailpiece following the diagram’s route
- For acoustic guitars, tie or pin the ball end per diagram; for electrics, insert through the bridge or backplate
- Thread the string through the correct tuner post indicated on the diagram
- Ensure the string winds in the direction shown on the diagram for proper tension
- Pull the string tight and leave slack for 2-3 winds around the post
- Wind neatly and count wraps: fewer wraps on thinner strings, more on thicker ones
- Tune to pitch and stretch the string gently to settle it
- Retune until stable; repeat stretching and tuning until it holds
When following the diagram, always keep the string path straight from nut to tuner to reduce friction. A straight path reduces tuning problems and string breakage.

Tuning, stretching, and checking after stringing
After all strings are on, tune to the diagram’s indicated pitches. Then check these items.
- Stretch each string gently by pulling away from the fretboard and retune. This removes slack.
- Check nut slots and guide the string so it sits cleanly in the slot on the nut.
- For tremolo systems, block or stabilize the bridge while tuning, if the diagram indicates special routing.
- Play chords and single notes up the neck to find dead spots or buzzing.
Repeat stretching and tuning until the strings hold pitch. Patience here prevents repeated re-stringing.

Common mistakes and troubleshooting
Mistakes happen even to pros. Here are common issues and quick fixes.
- Wrong string on wrong tuner
- Fix: Refer to the diagram and swap strings before many winds are applied.
- Excessive wraps around tuner post
- Fix: Reduce wraps and lock with a neat bend or one extra wind for stability.
- String breaks at the nut
- Fix: Check for sharp edges in the nut and smooth them with fine sandpaper or a nut file.
- Bridge or tremolo moves after tuning
- Fix: Ensure correct routing and block the tremolo while stretching strings, then balance springs if needed.
If a diagram is unclear, compare it to a photo of the headstock and bridge. Visual cross-checks reduce errors.

Personal experience and pro tips
I once restringed a player’s touring guitar using a complex diagram for a floating tremolo. The first attempt left the bridge tilting forward. I stopped, rechecked the routing, stabilized the bridge, and retraced the diagram step by step. The second attempt held through an hour-long set. Lessons learned here:
- Always follow the diagram’s orientation first.
- Tidy winding saves time later.
- Use a tuner that shows cents for precise matching.
Small habits, like counting winds and checking the string path, avoid big headaches on stage and in the studio. I prefer to stretch each string twice and retune before final tuning. That routine has kept my guitars stable on long gigs.

Frequently Asked Questions of how to string a guitar diagram
What does string numbering on a diagram mean?
String numbering shows which string corresponds to which pitch and tuner. Follow the numbers precisely to avoid mixing strings or tunings.
How do I know which direction to wind the tuner?
Diagrams show arrows or a top-down view. Wind so the string coils toward the center of the headstock to keep tension stable.
Can I use any string gauge shown on a diagram?
Diagrams show recommended gauges, but you can choose a different set. Changing gauge may require neck truss or action adjustments.
Why does my guitar go out of tune after stringing?
New strings stretch and settle. Stretch each string gently, retune several times, and check for friction points at the nut and bridge.
How do I string a tremolo system correctly according to a diagram?
Follow the diagram for routing through springs or holes, stabilize the bridge, then tune slowly while maintaining bridge balance. Adjust spring tension if the bridge shifts.
Conclusion
Understanding how to string a guitar diagram turns a confusing picture into a clear plan. Read the diagram closely, match string numbers and tuning, follow the correct routing, and take time to stretch and tune. With practice, stringing from diagrams becomes fast and reliable. Try these steps on your next restringing session, and leave a comment about your experience or subscribe for more practical guitar care tips.

Senior Music Reviewer
Alex Carter is a seasoned music reviewer with over a decade of experience in the world of sound and instruments. Passionate about helping musicians and enthusiasts make informed choices, he brings sharp insights and in-depth knowledge to every review. From classical instruments to modern gear, Alex combines technical expertise with a love for music to deliver content that resonates with readers.
As a Senior Music Reviewer and expert author on Tuneluma.com, Alex is dedicated to sharing honest evaluations, practical advice, and thoughtful commentary to guide readers in their musical journey.
Leave a Reply