Open the Piano Roll, use Helpers → Scale Highlighting, then Stamp or transpose notes to that key.
I’ve spent years producing in FL Studio and setting the key in the Piano Roll is one of the first skills you learn. This guide shows proven, practical steps for how to set key in fl studio piano roll so your melodies, chords, and basslines sit right. I’ll share clear instructions, helpful tricks, and real-world tips from my session work, so you can set the key fast and stay in tune while you work.
Why set the key in FL Studio Piano Roll?
Setting the key in FL Studio Piano Roll gives you a visual map of safe notes. It keeps melodies and chords consistent. It also speeds up workflow and reduces trial-and-error when composing.
When you know how to set key in fl studio piano roll, you make fewer mistakes and finish tracks faster. The Piano Roll helpers are simple but powerful. Use them to highlight a scale, stamp scale notes, and move MIDI to fit the key.
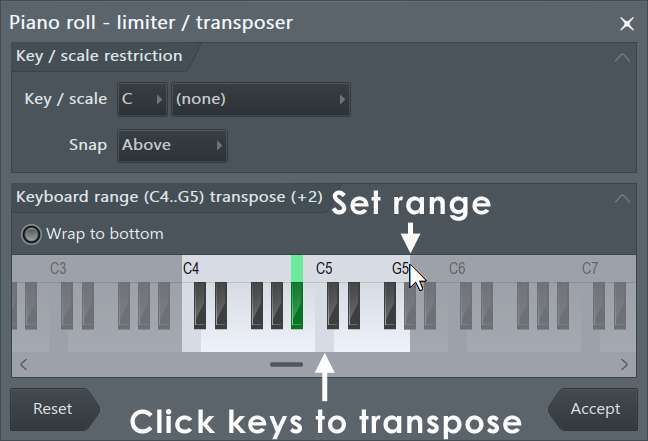
 highlighting, root note, and stamp tool”
style=”max-width: 100%; height: auto; border: 2px solid black; border-radius: 10px; display: block; margin: 0 auto;”
loading=”lazy”
/>
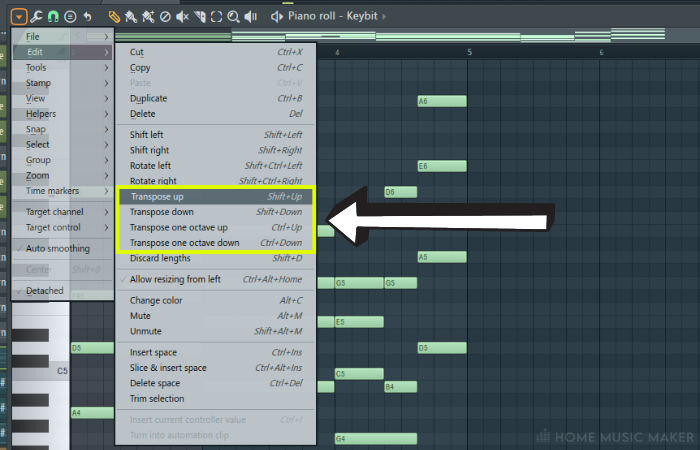
Key concepts: scale highlighting, root note, and stamp tool
Understanding a few terms makes everything easier.
- Scale highlighting shows which notes belong to a chosen key and scale. It’s visual only, but it guides composition.
- Root note tells you the tonal center. Pick the right root, like C, A, or F#, to define the key.
- Stamp tool places chords or scale notes quickly. Use it to sketch chords and melody ideas fast.
Knowing these tools is the main part of how to set key in fl studio piano roll. Once you use them, you’ll avoid out-of-key notes and get cleaner progressions.
Step-by-step: how to set key in FL Studio Piano Roll
Follow these steps to set the key and align your MIDI.
- Open the Piano Roll for the instrument or channel you want to edit.
- Locate the Piano Roll menu at the top left. Click Helpers.
- Choose Scale Highlighting. A small dialog opens.
- Pick the root note (for example, C) and choose a scale (such as Major or Minor).
- Click OK. The piano keys on the left will now show highlighted notes. These are the in-key notes.
- To fill the piano with key notes, open Stamp (the small keyboard icon). Select the same root and scale, then click in the grid to place scale notes or chords.
- To move existing MIDI to the key, select notes, then drag them up or down so they land on the highlighted notes. Use the snap grid for precision.
- If you need to transpose everything by a set interval, select all notes and use the edit drag to move them up or down by semitones until they match the scale.
These actions cover the most direct ways to set key in fl studio piano roll. They work for chords, bass, and melody.
Using Scale Highlighting and the Stamp tool effectively
Scale Highlighting and Stamp are your best friends for key work. Here’s how to use them well.
- Always set Scale Highlighting first. It gives you a clear target for notes.
- Use Stamp to lay down scale notes or basic triads. This is faster than painting notes one-by-one.
- After stamping, edit the rhythm and velocity. The musical feel comes from timing and dynamics, not just note pitch.
- When you stamp chords, play the progression and then shift individual notes to add color or tension within the key.
I use this routine on every beat. It helps me lock in the right notes fast and keeps my ideas in the chosen key.
Practical workflows: transposing, audio, and MIDI detection
Here are practical options when you need to set key in different situations.
- To transpose MIDI phrases: select notes and drag them to the highlighted notes. This is quick and precise.
- To change the key of an entire pattern: select all notes and move them together to a new root. Then update Scale Highlighting to match.
- For audio samples: use tools like pitch shift or a pitch-detection plugin to find the root. Once you know the root, set Scale Highlighting in Piano Roll for any MIDI parts you add.
- For complex MIDI from other sources: copy notes into the Piano Roll and use the highlighted grid to clean or nudge notes into key.
From my experience, small manual nudges give the most musical results. Auto-correct tools can sound robotic. Use the highlighted key as a guide, not a crutch.

Tips, common mistakes, and personal notes
I’ve noticed patterns in what slows producers down. Here’s what helps.
- Tip: Always label your pattern with the key. It saves time when arranging.
- Tip: Work from the chord progression first. That locks your harmonic key early.
- Mistake: Relying only on Scale Highlighting and not listening. Your ear is the final judge.
- Mistake: Overusing stamping without changing voicings. Varied voicings sound more natural.
- Personal note: I usually set Scale Highlighting, stamp a chord progression, and then mute parts to test the bass and melody against the same key.
These small habits improved my workflow and kept mixes clean and musical.
Advanced workflows: automation, key changes, and collaboration
When you need to do more than set a static key, try these approaches.
- For modulating keys inside a song: update Scale Highlighting at the section break and transpose notes for the new key. Keep a copy of the original pattern for quick edits.
- For collaborative projects: add the chosen key to the project notes and the pattern names so other producers know the key.
- For DAW automation: automate pitch controls on audio channels for smooth modulations while keeping MIDI aligned to the Piano Roll key.
These steps make key changes manageable and keep collaborators on the same page about how to set key in fl studio piano roll across the project.
Frequently Asked Questions of how to set key in fl studio piano roll
How do I highlight a scale in the Piano Roll?
Open the Piano Roll, click the menu, go to Helpers, and choose Scale Highlighting. Pick a root note and scale, then confirm. The piano keys will show the in-scale notes.
Can I force MIDI notes into the chosen key automatically?
FL Studio does not auto-correct every note by default. Use Scale Highlighting as a visual guide and move notes manually. You can also use stamp tools to place in-key notes quickly.
How do I transpose a melody to a different key?
Select all notes in the Piano Roll and move them up or down to match the new root. Use the highlighted keys as targets to keep the melody in the new key.
What if I only have an audio loop and need the key?
Use a pitch-detect tool or plugin to find the loop’s root note. Then set the scale in Piano Roll to that root when adding MIDI parts.
Can I change key mid-song in FL Studio?
Yes. At the section where the key changes, update Scale Highlighting and transpose affected MIDI. Keep patterns labeled so you know which key each section uses.
Conclusion
Setting the key in FL Studio Piano Roll is simple and powerful. Use Scale Highlighting, Stamp, and careful transposition to keep melodies and chords in tune. Start by choosing a root and scale, stamp or move notes to fit, then listen and tweak. Try these steps in your next session and watch your ideas fall into place. If this helped, try it on a small loop now, then save the pattern and share your results or ask a question below.

Senior Music Reviewer
Alex Carter is a seasoned music reviewer with over a decade of experience in the world of sound and instruments. Passionate about helping musicians and enthusiasts make informed choices, he brings sharp insights and in-depth knowledge to every review. From classical instruments to modern gear, Alex combines technical expertise with a love for music to deliver content that resonates with readers.
As a Senior Music Reviewer and expert author on Tuneluma.com, Alex is dedicated to sharing honest evaluations, practical advice, and thoughtful commentary to guide readers in their musical journey.
Leave a Reply