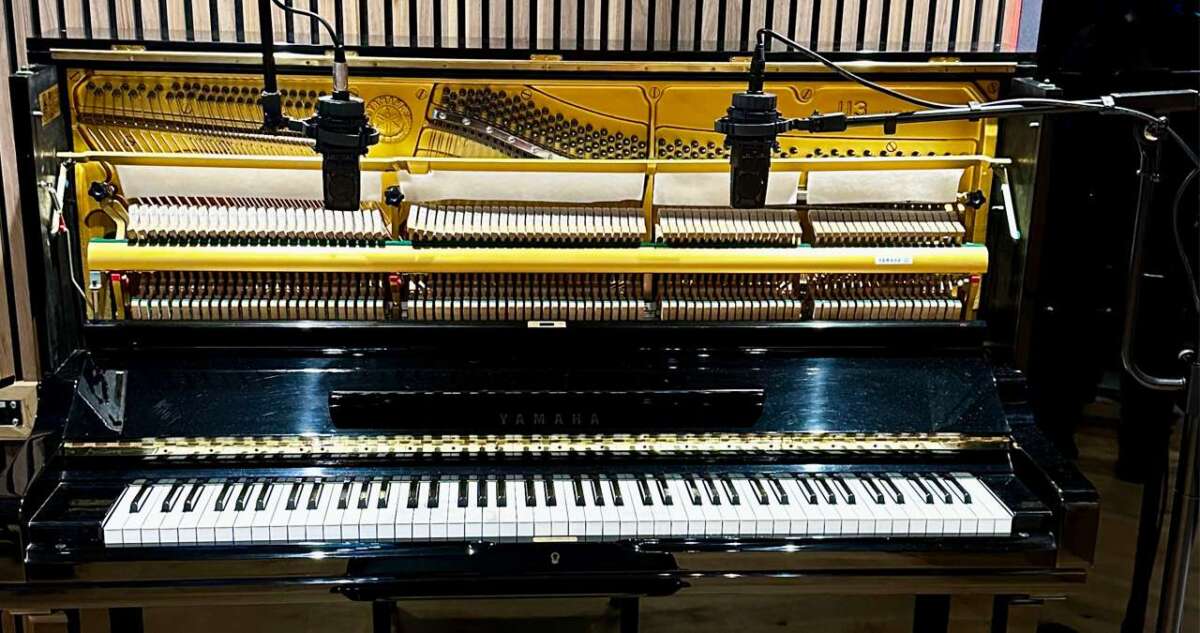
Place a close condenser by the hammers and a pair over the strings for a full, clear sound.
I’ve mic’d pianos in rooms from small living rooms to large studios. I will walk you through practical, pro-tested steps on how to mic a piano. You’ll get clear mic choices, placements, setup tips, and troubleshooting. Read on to record a piano that sits well in any mix.

Why mic a piano and what you can achieve
Mic’ing a piano captures tone, touch, and room feel. The right mic and placement let you shape warmth, clarity, and attack. Knowing how to mic a piano gives you control. You can make a piano sound intimate or roomy. You can record solo piano or blend into a band mix.

Know your piano and the room before you mic
A few checks early save time and keep takes honest. Grand, baby grand, and upright pianos each behave differently. Room size and surfaces change the sound a lot. Listen while a player plays scales. Note where the tone is thin or too bright. Use that to guide where to place mics.

Choose the right microphones for the job
Different mics give different tonal results. Here are common, reliable options to learn how to mic a piano well.
- Small-diaphragm condenser microphones — crisp attack and detail; great for close work and stereo pairs.
- Large-diaphragm condenser microphones — warmer body; good for room or single-mic captures.
- Ribbon microphones — smooth highs and round lows; use to tame bright hammers.
- Dynamic microphones — hardy and cheap; use for close, loud playing or when you need isolation.
- Stereo mic pairs — XY, ORTF, and spaced pairs capture stereo field and room depth.
Match mic type to your goal. For a natural, full piano, pair a close small condenser and a room mic. For solo classical tone, use a well-placed stereo pair. For pop and rock, favor clarity and isolation.

Basic mic placements: simple setups that work every time
Start simple. These setups teach how to mic a piano and get a great sound fast.
- Close stereo pair over the strings, near the hammers — captures detail, attack, and stereo image. Place 6–12 inches above the strings.
- Spaced pair above the soundboard toward the lid — wider stereo, more room sound. Keep 1–3 feet above depending on room.
- Single large-diaphragm over the hammers toward the middle — good for solo vocals-style clarity.
- Inside-the-lid spot mic — useful for grand pianos when lid is raised; aim toward the mid-strike point.
- Underneath or back of an upright — captures resonance for vintage or moody tones.
As you try these, change small distances and listen. Moving a mic a few inches can shift tone from bright to warm. Learn how to mic a piano by listening, not by rules alone.

Stereo techniques and placement specifics
Stereo gives life and space. Choose a method and follow simple placement rules.
- XY pair — capsules close together, 90–135 degrees. Works well near hammers. Keeps mono compatibility.
- ORTF — spaced at 17 cm, 110 degrees. Feels natural and wide. Place 6–12 inches above strings.
- Spaced pair (A/B) — mics separated by 2–3 feet. Use for big room feel. Watch phase when collapsed to mono.
- Mid-Side (M/S) — one cardioid + one figure-8. Great for adjustable width. Decode in your DAW.
When using stereo, always mono-check. Phase issues are common. If the sound thins in mono, move mics or adjust distance. This is a key part of learning how to mic a piano correctly.

Advanced mic techniques and creative options
Once you cover basics, try creative placements. These help when you need a unique tone.
- Hammer mic plus room blend — close small condensers at hammers plus a distant large diaphragm. Mix for punch or air.
- Inside-and-out — one mic inside lid toward strings and one outside the lid pointing to room. Blend for color.
- Spot the low end — place a mic near bass strings to add depth without muddying mids.
- Use a ribbon to tame bright hammers — place ribbon slightly back for warmth.
- Close mic one side only — useful if one side of piano sings more or needs cut.
Label each mic in your session. Track takes with notes on placement. This helps repeat great sounds and refine how to mic a piano over time.
Signal chain and recording tips
Good mic choice and placement are vital. The chain after the mic matters too.
- Preamps — choose clean preamps for clarity. Warm preamps add character.
- Gain staging — set input so peaks sit around -12 dB to -6 dB on your meter. Avoid clipping.
- EQ and compression — use gentle EQ to cut harshness. Compress lightly for consistency, if needed.
- Phase and polarity — flip polarity and nudge time to fix comb filtering between mics.
- Monitor on good headphones and speakers — compare both to catch issues.
Save takes and mark what you did. That habit speeds up future sessions and improves how to mic a piano in similar rooms.
Common problems and how to fix them
Problems happen. Here are quick fixes to common mic issues when learning how to mic a piano.
- Harsh high end — move mic farther from hammers, use ribbon, or cut 3–6 kHz.
- Muddy low end — move mic away from the bass strings or apply a high-pass below 40–80 Hz.
- Phase cancelation — check mono, flip polarity, or adjust mic spacing.
- Too much room — lower room mic level, close the lid, or move the mic closer to strings.
- Player bleed in band — use dynamic mics or isolation and close mic placement.
Test fixes while the player performs. Small moves matter. Keep notes on what works.
Personal experience, mistakes, and lessons learned
I’ve mic’d many pianos in varied rooms. Here are lessons from that work.
- Don’t trust diagrams alone. I once followed a diagram and got thin sound. A small move fixed it.
- Always listen before recording. I learned to walk the room and hear reflections first.
- Label and document. I kept a great sound only because I wrote down mic distances and angles.
- Be patient with phase. Early sessions lost time fixing phase. Now I check phase early and save hours.
- Use what the song needs. A bright pop piano needs different placement than a mellow jazz solo.
These real errors and wins shape how I teach how to mic a piano. They will help you avoid common traps.
Troubleshooting checklist before you hit record
Do a short list to avoid wasted takes. This makes recording smooth.
- Check cables and phantom power.
- Set preamp gain and confirm no clipping.
- Mono-check and flip polarity if needed.
- Listen at mix level and at low volume.
- Note mic types, distances, and angles.
A quick checklist turns a nervous session into a calm one. It also helps you get consistent results when learning how to mic a piano.
Frequently Asked Questions of how to mic a piano
What mic types work best for piano?
Condenser mics are the go-to for detail and clarity. Ribbon mics add smoothness, and dynamics are good for isolation or loud playing.
How far should mics be from the strings?
Start 6–12 inches for close mics and 1–3 feet for room or spaced pairs. Small moves change tone a lot.
Should I record in stereo or mono?
Stereo gives a natural image and depth. Mono can work for tight mixes or limited tracks, but stereo is preferred for most piano work.
How do I fix phase problems between mics?
Flip polarity and listen in mono. Move mics slightly or delay one track by a few milliseconds if needed.
Can I mic an upright the same as a grand?
Uprights behave differently. Place mics near the soundboard, front, or back based on where the tone is best. Use similar mic types but adjust placement.
Conclusion
You now have a clear roadmap on how to mic a piano. Start simple, listen closely, and tweak placements with care. Use the mic types and setups here as a base and adjust for taste and room. Try a few takes, take notes, and repeat what works. If you enjoyed this guide, try different mic combos and leave a comment or subscribe to follow more practical recording tips.
Leave a Reply