
Is your electric guitar feeling harder to play than it should? High string action can make fretting notes a struggle and slow down your playing.
But here’s the good news: you don’t have to live with that uncomfortable setup. Lowering the action on your electric guitar can make it easier to play, improve your tone, and bring out the best in your instrument. In this guide, you’ll learn simple, step-by-step ways to adjust your guitar’s action—no complicated jargon, no expensive tools needed.
Ready to make your guitar feel just right under your fingers? Keep reading and discover how to play with comfort and confidence.
Check Neck Relief
Checking the neck relief is a key step to lower the action on your electric guitar. Neck relief means the slight curve of the guitar’s neck. This curve affects how high the strings sit above the fretboard. Adjusting the neck relief helps reduce string buzz and makes the guitar easier to play. Follow these simple steps to check and adjust your guitar’s neck relief.
Loosen Strings
Start by loosening the strings slightly. This reduces tension on the neck. Loosen them just enough to make adjustments safely. Use a tuner to note the current pitch. This prevents tuning issues after adjustments. Always be gentle to avoid damaging the guitar.
Adjust Truss Rod
Locate the truss rod nut on the headstock or near the neck joint. Use the correct size wrench or Allen key. Turn clockwise to reduce neck relief and lower the action. Turn counterclockwise to add relief if the neck is too straight. Make small turns, about a quarter turn at a time. Let the neck settle before checking again.
Measure Neck Bow
Press down a string at the first fret and at the fret where the neck meets the body. Check the gap between the string and the middle frets. Use a feeler gauge or a business card to measure this gap. A small gap, about 0.25mm to 0.5mm, is ideal for most guitars. Adjust the truss rod again if the gap is too large or too small.
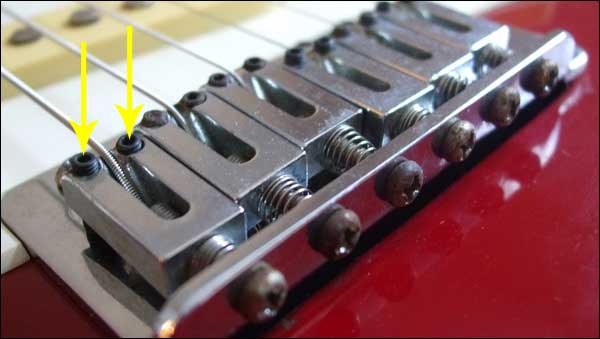
Lower Bridge Saddles
Lowering the action on an electric guitar can improve playability and comfort. One effective way is to adjust the bridge saddles. The bridge saddles hold each string and control string height. By lowering them, you reduce the distance between strings and fretboard. This makes fretting easier and reduces finger fatigue. Follow these simple steps to lower your bridge saddles safely.
Identify Saddle Height
First, find the bridge saddles on your guitar. They are small metal pieces where each string rests. Check their current height by looking from the side. Notice how high the strings sit above the fretboard. This gives you an idea of how much to lower them. Write down or remember the current settings before adjusting. This helps you restore the original setup if needed.
Use Allen Key For Adjustment
Most electric guitars use small Allen screws to raise or lower saddles. Use the correct size Allen key for your guitar. Insert the key into the screw on each saddle. Turn the screw slowly to lower the saddle. Usually, turning clockwise lowers the saddle. Make small turns, about a quarter or half turn at a time. Avoid lowering too much to prevent string buzz or fret noise.
Tune And Test
After adjusting the saddles, tune your guitar strings to pitch. Check the playability by pressing each string on different frets. Listen for any buzzing sounds. Play chords and single notes to test comfort and sound quality. Adjust the saddles again if the strings feel too low or still too high. Repeat tuning and testing until you find the perfect action height.
Adjust Nut Height
Adjusting the nut height is a key step to lower the action on your electric guitar. The nut holds the strings near the headstock and affects string height at the first few frets. Proper nut height allows easier playability and better tone.
Making small changes to the nut height can improve comfort without causing buzzing or fret problems. Take your time and work carefully to avoid damage. The following steps explain how to adjust the nut height safely.
Check String Clearance
Start by checking the clearance between the strings and the first fret. Press each string at the third fret and see the gap at the first fret.
There should be a small space, about the thickness of a business card. If the strings are too high, the action feels stiff. If too low, buzzing may occur.
Measure carefully to decide how much nut slot filing is needed.
File Nut Slots Carefully
Use a set of nut files designed for guitar strings. Pick the right size file for each string gauge to avoid over-cutting.
File gently and evenly inside the nut slots. Remove a small amount at a time and check often.
Keep the slots angled slightly downward toward the first fret to guide the strings smoothly.
Retune And Check Playability
After filing, retune your guitar to pitch. Play open strings and notes near the nut to test action and buzzing.
Check every string carefully. If needed, file a little more, then retune and test again.
Stop filing once you reach comfortable string height without buzzing.
Credit: www.reddit.com
Set String Radius
Setting the string radius plays a key role in lowering the action on your electric guitar. The string radius is the curve that matches the strings’ height across the fretboard. Correctly setting this helps the strings sit closer to the frets without buzzing. It also keeps the guitar comfortable to play and maintains good tone.
Adjusting the string radius requires attention to two main steps. First, you need to match the fretboard radius. Then, you adjust the saddle heights to fit this curve. These steps ensure the strings follow the fretboard’s natural curve. This prevents uneven string height and unwanted buzzing.
Match Fretboard Radius
The fretboard radius is the curve of the guitar neck surface. Find this radius by checking your guitar’s specs or using a radius gauge tool. The string radius should match this curve exactly. If the strings are set too flat or too curved, it will cause high action or fret buzz.
Set the radius by filing or adjusting the bridge saddles. Some bridges have adjustable saddles you can raise or lower individually. Align each saddle’s height to match the fretboard radius. This step creates a smooth, even curve for all strings.
Adjust Saddle Heights Accordingly
After matching the radius, adjust each saddle’s height. Lower the saddles carefully to reduce the action. Do this slowly and check string clearance over the frets each time. Too low and the strings will buzz; too high and the action stays high.
Use a ruler or feeler gauge to measure the string height above the frets. Aim for a comfortable height that suits your playing style. Make small changes and test by playing notes and chords. Proper saddle height adjustment lowers action while keeping clear sound.
Test Action And Playability
Testing the action and playability of your electric guitar is a key step after making adjustments. This process helps ensure your guitar feels comfortable and sounds clear. Proper testing reveals if the strings are too high or too low and if any buzzing or dead spots occur.
Take your time to carefully check every fret and string. Play with different pressures and styles. This will give you a better idea of how well the guitar responds to your touch. Small changes in action can make a big difference in playability.
Check For Fret Buzz
Fret buzz happens when strings hit the frets unintentionally. After lowering the action, play each string open and on every fret. Listen closely for any buzzing noises. Buzzing means the strings are too low or the neck needs adjustment.
Buzz can also occur from uneven frets or loose hardware. Spotting fret buzz early helps avoid damage to your guitar. Make sure your guitar is well tuned before testing for buzz. This gives the most accurate result.
Play Different Frets
Play notes on the first fret, middle frets, and near the body. Notice if the strings feel easy to press or if they seem stiff. Check if the tone stays clear and strong across the fretboard. This shows if the action suits your playing style.
Try chords and single notes to test various finger positions. Playing scales or simple songs helps identify problem areas. Different frets may require slight action changes for comfort and sound quality.
Make Minor Readjustments
Small tweaks can improve your guitar’s feel and tone. If fret buzz occurs, raise the action slightly or adjust the truss rod. If strings feel too high, lower the bridge or saddle a little bit more. Make changes in tiny steps.
After each adjustment, retune your guitar and test again. This careful approach prevents over-adjusting. Keep notes on what you change to track improvements. Perfect action balances comfort, tone, and playability.
Credit: guitargearfinder.com
Consider String Gauge And Tension
String gauge and tension directly affect your electric guitar’s playability. Choosing the right strings can help lower the action and improve comfort. Understanding their impact guides you in making smart adjustments without harming your instrument.
Choose Appropriate String Gauge
Lighter gauge strings are easier to press down. They require less tension, which lowers the string height above the fretboard. This reduces the action and makes playing smoother, especially for beginners or those with small hands.
Heavier gauge strings need more tension. They sit higher and raise the action naturally. Use them if you want a fuller tone but expect a higher action unless adjusted carefully.
Understand Impact On Action
String tension pulls on the neck and bridge, affecting the guitar’s setup. Higher tension can cause the neck to bow forward, increasing the action. Lower tension allows the neck to stay straighter, reducing string height.
Changing string gauge means adjusting tension too. Always tune your guitar after changing strings to check the action. Small tweaks to the truss rod or bridge might be necessary to keep everything balanced.
Final Tuning And Intonation
After lowering the action on your electric guitar, final tuning and intonation are crucial. These steps ensure your guitar sounds great and plays smoothly. Proper tuning keeps the strings at the correct pitch. Intonation adjustment makes sure notes play in tune across the fretboard. Skipping these steps can cause poor sound and hard playability.
Tune Guitar To Pitch
Start by tuning your guitar to standard pitch using a reliable tuner. Tune each string slowly and carefully. Check the tuning again after any adjustments to the action. Strings can stretch or slip during setup. Accurate tuning is the base for checking intonation. Without correct pitch, intonation cannot be set properly.
Check Intonation After Adjustments
Play the 12th fret harmonic on each string. Compare it to the fretted 12th fret note. Both should sound the same pitch. If the fretted note is sharp, move the saddle back. If it is flat, move the saddle forward. Make small adjustments and retune after each move. Proper intonation keeps your guitar in tune across all frets. Double-check intonation after lowering the action to avoid buzzing or dead notes.

Credit: www.youtube.com
Tips For Avoiding Common Mistakes
Lowering the action on an electric guitar can improve playability and comfort. Avoiding common mistakes helps keep your guitar safe. Simple care and attention prevent damage and costly repairs.
Follow these tips to adjust your guitar action properly. Small, careful steps lead to better results and a smoother playing experience.
Avoid Over-tightening Truss Rod
The truss rod controls the neck’s curve. Turning it too much can warp the neck or cause cracks. Make slow, gentle turns of no more than a quarter turn. Check the neck relief after each adjustment to avoid damage.
Make Small Adjustments
Lowering action requires patience. Small changes prevent sudden drops that cause buzzing or fret issues. Adjust the bridge or saddles in tiny steps. Test play often to find the best height for your style.
Use Proper Tools
Use the right tools for each adjustment. A good set of Allen wrenches fits nuts and screws perfectly. Avoid forcing wrong tools, which can strip screws or damage parts. Clean tools ensure smooth and safe tuning.
Frequently Asked Questions
How To Reduce Action On An Electric Guitar?
To reduce action loosen the strings first. Tighten the truss rod clockwise to lower neck relief. Adjust the bridge saddles down to reduce string height. Tune the guitar and check for buzzing. Repeat adjustments carefully until the desired action feels comfortable.
Which Direction To Turn To Lower Action?
Turn the truss rod clockwise to lower the action. Always loosen the strings before adjusting.
How Low Should The Action Be On An Electric Guitar?
Set electric guitar action between 1. 5mm to 2. 5mm at the 12th fret for balanced playability. Lower action reduces string buzz but may cause fret buzz. Adjust gradually, ensuring comfort and clear sound. Tailor action height to your playing style and guitar setup.
How To Lower The Action On A Guitar Without A Truss Rod?
Lower guitar action without a truss rod by filing the bridge saddle or nut carefully. Tune and check playability after adjustments.
Conclusion
Lowering the action on an electric guitar improves playability and comfort. Start with small adjustments to avoid damage. Check the neck relief and bridge height carefully. Tune the strings after every change to measure action accurately. Patience is key; it may take several tries.
A well-set action helps you play faster and cleaner. Keep your guitar maintained for the best sound. Enjoy smoother playing and better tone with the right setup.

Senior Music Reviewer
Alex Carter is a seasoned music reviewer with over a decade of experience in the world of sound and instruments. Passionate about helping musicians and enthusiasts make informed choices, he brings sharp insights and in-depth knowledge to every review. From classical instruments to modern gear, Alex combines technical expertise with a love for music to deliver content that resonates with readers.
As a Senior Music Reviewer and expert author on Tuneluma.com, Alex is dedicated to sharing honest evaluations, practical advice, and thoughtful commentary to guide readers in their musical journey.
Leave a Reply