Lower the action by adjusting bridge saddles, truss rod, nut height, and a careful setup.
I have set up hundreds of basses and taught players how to lower the action on a bass guitar so it feels fast, clean, and buzz-free. This guide walks you through clear, trusted steps. You will learn what changes matter most, when to make them, and how to test results. Read on to get a stable, playable bass that suits your style.

Understanding action and what causes high action
Action is the string height above the fretboard. Low action makes playing easy. High action can come from string gauge, worn frets, neck relief, or saddle height. Knowing the cause is the first step in how to lower the action on a bass guitar.
Common causes you will check
- Neck relief that's too high from a loose or warped neck.
- Saddle or bridge height set high.
- Nut slots cut too high.
- Heavy gauge strings that sit farther from the frets.
- Worn frets creating uneven fret height.
I often see players lower only the bridge and miss the nut or truss adjustments. That can fix playability but leave buzzing or intonation issues. In this guide you will learn the full process.

Tools and prep you need before adjusting action
Use the right tools. Small mistakes cost time and money. Gather these items before you start.
Essential tools
- Capo to hold the strings at the first fret.
- Feeler gauges or a ruler with millimeters.
- Phillips and flat screwdrivers for your bridge and saddles.
- Allen/hex keys for your truss rod and bridge saddles.
- String winder and wire cutters.
- Sandpaper or nut files if you plan to lower the nut.
- Cloth and tuner for clean checks.
Prep steps
- Tune the bass to pitch and let it settle.
- Clean the fingerboard and remove grime.
- Note current string height at 12th fret and at the nut.
- Take photos or notes so you can revert changes if needed.
Having the right tools and prep makes how to lower the action on a bass guitar safe and repeatable.

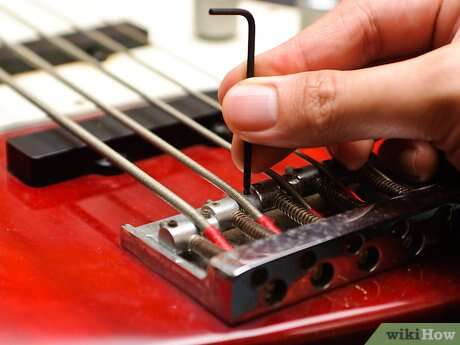
Step-by-step: Lower action at the bridge (saddle adjustments)
Start with the bridge. This is the easiest place to lower action without major risk.
Step-by-step
- Tune the bass to pitch and capo at the 1st fret.
- Measure current action at the 12th fret with a ruler or feeler gauge.
- Loosen string tension slightly for safe adjustment.
- Turn the saddle screws to lower the saddle height. Make small turns only.
- Retune and re-measure. Repeat until you reach the target height.
Tips from experience
- Make quarter-turn adjustments. Big changes lead to buzzing.
- Lower one string at a time and test playability.
- Write down the number of turns so you can track progress.
This process is the core of how to lower the action on a bass guitar quickly and effectively.

Adjust the truss rod and neck relief
Neck relief affects action along the whole neck. Adjusting the truss rod can change relief and thus string height.
How to check relief
- Place capo at the first fret and press the low string at the last fret.
- Measure the gap between the string and the 8th–10th fret. A small gap is normal.
- Typical relief for basses is 0.1–0.35 mm, depending on play style.
How to adjust the truss rod
- If the gap is too large, tighten the truss rod slightly to reduce relief.
- If the gap is too small, loosen the truss rod slightly to add relief.
- Make small turns, about 1/8 to 1/4 turn, and let the neck settle for 10–20 minutes.
Safety and notes
- Always make small adjustments. The truss rod is under tension.
- If you feel resistance or hear cracking, stop and seek a tech.
- Adjusting the truss rod is a key step in how to lower the action on a bass guitar safely.

Nut height and saddle shaving: finishing touches
Even with the bridge and neck set, a high nut will keep action high near the first frets. Lowering nut slots needs care.
When to lower nut slots
- If open string action at the first fret is high and fretting notes causes a big drop.
- When you want smooth low-position play for slapping or fast runs.
How to lower nut slots
- Remove or loosen the strings.
- Use nut files sized for bass strings. File a tiny amount and test.
- Check string buzz at open and first fret notes after each pass.
Saddle shaving
- If individual string saddles tilt or sit high, you can sand the saddle bottom or replace saddles.
- Keep material removal minimal and test frequently.
These fine changes complete how to lower the action on a bass guitar and make the low frets feel right.

Check intonation and playability after lowering action
Lowering action changes string length and intonation. Re-check these elements every time.
How to check intonation
- Tune open string to pitch.
- Play the 12th fret harmonic and then fretted 12th fret note.
- If the fretted note is sharp, move the saddle back. If flat, move it forward.
Playability checks
- Play all frets, especially the first five and around the 12th fret.
- Listen for fret buzz, dead spots, or rattles.
- Test your normal playing style: fingerstyle, slap, or pick.
Final note
- You may need a few rounds of tweaks. The goal is low action with no buzz and correct intonation. This is how to lower the action on a bass guitar and keep it musical.

Common mistakes to avoid when lowering action
Avoid these pitfalls I have seen many players make. They cause more problems than they solve.
Common mistakes
- Lowering the bridge too far at once, causing fret buzz.
- Ignoring truss rod adjustments, which can make the neck backbow.
- Filing the nut too fast and making slots too deep.
- Skipping intonation checks after lowering action.
- Using overly light strings without adjusting setup, which can change tension and relief.
I once lowered a bass action quickly and missed a loose saddle screw. The string slipped and fretted wrong. Take your time and test often.

Maintenance and setup routine to keep action low and stable
A good setup routine prevents action creep and keeps your bass playable.
Routine tips
- Change strings every 2–6 months, depending on play.
- Check neck relief and action after each string change.
- Clean and condition the fretboard to prevent wear.
- Tighten hardware and check saddle screws regularly.
- Keep a setup log with measurements and dates.
A short check every month keeps how to lower the action on a bass guitar from becoming a major job later.
Frequently Asked Questions about how to lower the action on a bass guitar
How low should I set the action on my bass?
Aim for 2.5–4.5 mm at the 12th fret for most basses. The ideal height depends on style, string gauge, and fret condition.
Will lowering action cause fret buzz?
If done too far or without adjusting neck relief, yes. Lower in small steps and check relief and intonation each time.
Can I lower action by just changing strings?
Changing to lighter strings can lower feel but also changes tension and neck relief. You may still need saddle or truss rod tweaks.
Is it safe to adjust the truss rod myself?
Yes, with care. Make small turns and wait for the neck to settle. Stop if you feel strong resistance or hear cracks.
When should I see a pro for lowering action?
If frets are heavily worn, the neck is warped, or you feel unsure about nut work. A tech can do fret leveling or nut replacement safely.
Conclusion
You can make your bass easier to play by learning how to lower the action on a bass guitar step by step. Start with the bridge, check neck relief, fine-tune the nut, and always test intonation and playability. Take small steps, test often, and keep records of each change. Try these tips on your next setup, and leave a note about your results or questions below to keep learning and improving.
Leave a Reply