Label piano keys using letters, colors, or removable stickers for fast, clear learning.
I’ve taught beginners and worked with students for years, so I know how to label piano keys in ways that speed learning and avoid long-term dependency. This guide explains practical methods, materials, and mistakes to avoid when you decide how to label piano keys for children, adults, or classroom use. Read on to get step-by-step instructions, pro tips, and my real-world lessons so you can label piano keys confidently and effectively.

Why label piano keys?
Labeling helps new players find notes quickly. It reduces frustration and builds confidence. When you label piano keys, students learn patterns faster. Labels can be temporary or permanent depending on goals.
My students moved from labeled keys to note reading faster than expected. I saw progress when labels reinforced theory and practice. Proper labeling is a teaching tool, not a crutch.
Common labeling systems and when to use them
There are a few popular ways to label keys. Choose a method that matches the learner’s age, goals, and lesson style.
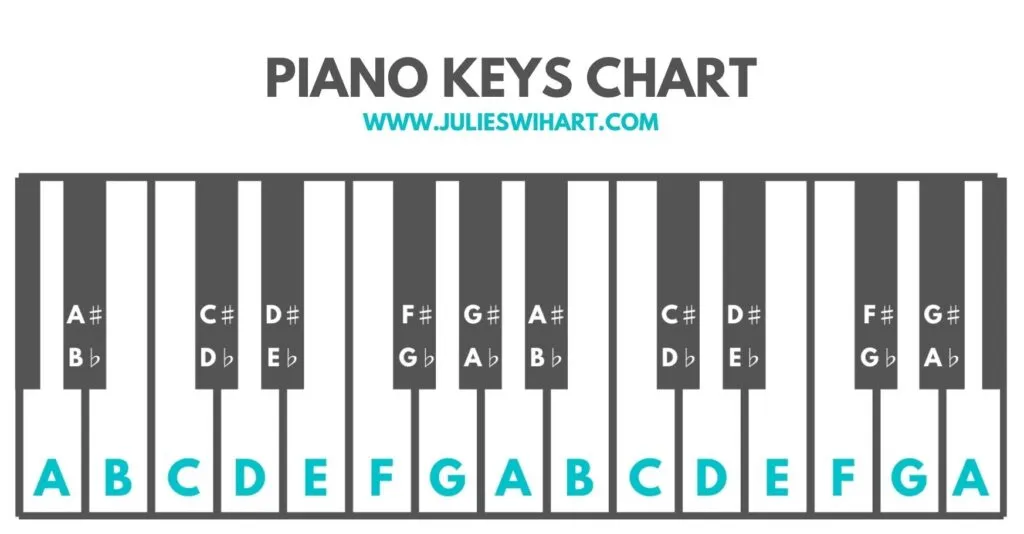
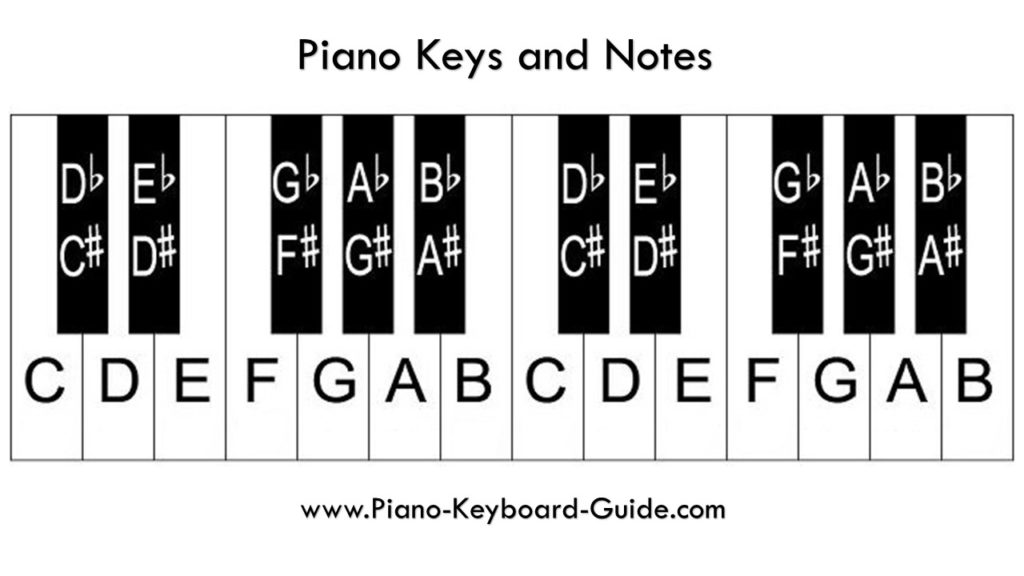
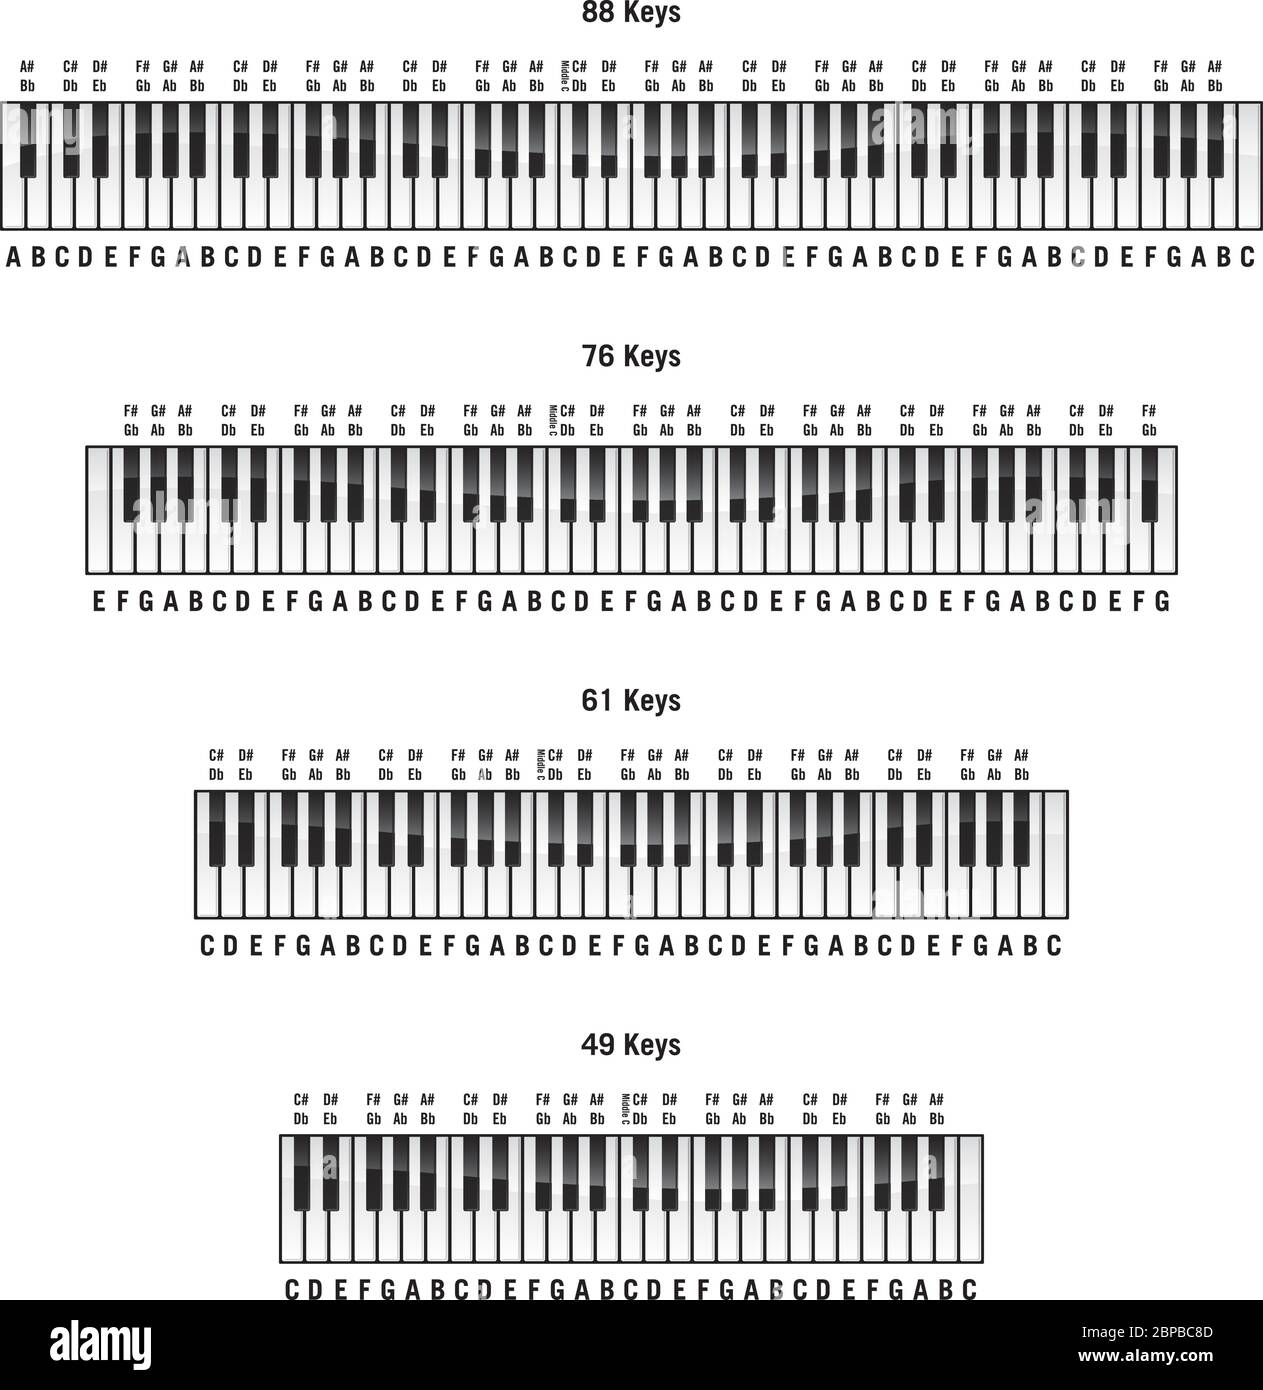
- Letter labels: A, B, C, D, E, F, G. Best for early reading and simple songs.
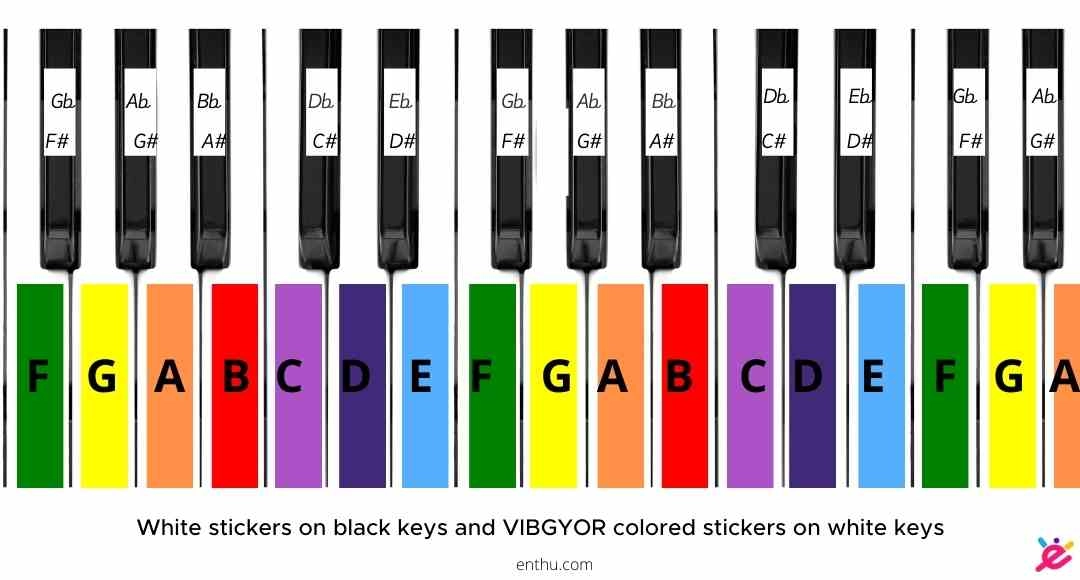
- Color coding: Use consistent colors for groups of notes or octaves. Great for children.
- Numbering: Useful for chord patterns and scale fingerings.
- Do-Re-Mi (solfege): Helpful in ear training and sight singing.
Decide whether labels are temporary. For short-term beginners, stickers are ideal. For classroom pianos, more durable labels work well.
Materials you need to label piano keys
Pick materials that are safe and easy to remove. Avoid adhesives that damage finish.
- Removable piano stickers: Designed for keys and come off cleanly.
- Washable markers: Good for practice pianos but test a corner first.
- Transparent label tape: Less visible and simple to replace.
- Colored dots or tabs: Quick and clear for kids.
- Small plastic labels: Durable for frequent use in group lessons.
I prefer store-bought removable stickers. They stay put during practice and peel off without residue. Test any product on an unused key or back of the keyboard.

Step-by-step: how to label piano keys
Follow these simple steps to label piano keys neatly and effectively.
-
Prepare the keyboard
- Clean keys with a soft cloth and mild cleaner.
- Dry thoroughly before applying any labels.
-
Decide your system
- Choose letters, colors, or numbers.
- Pick one system and use it consistently across the keyboard.
-
Mark middle C first
- Find middle C to anchor the rest of your labels.
- Work outward from middle C to avoid mistakes.
-
Apply labels
- Place stickers on the white keys near the front edge.
- For colored dots, group them logically (for example, all Cs same color).
-
Double-check placement
- Play each labeled key and confirm the note name.
- Fix any misplaced labels immediately.
-
Teach with labels, then remove
- Use labels for initial lessons.
- Gradually reduce reliance and remove labels when the student reads notes reliably.
I once labeled a classroom keyboard and left the labels too long. Students became dependent. I now recommend removing labels within weeks once recognition improves.
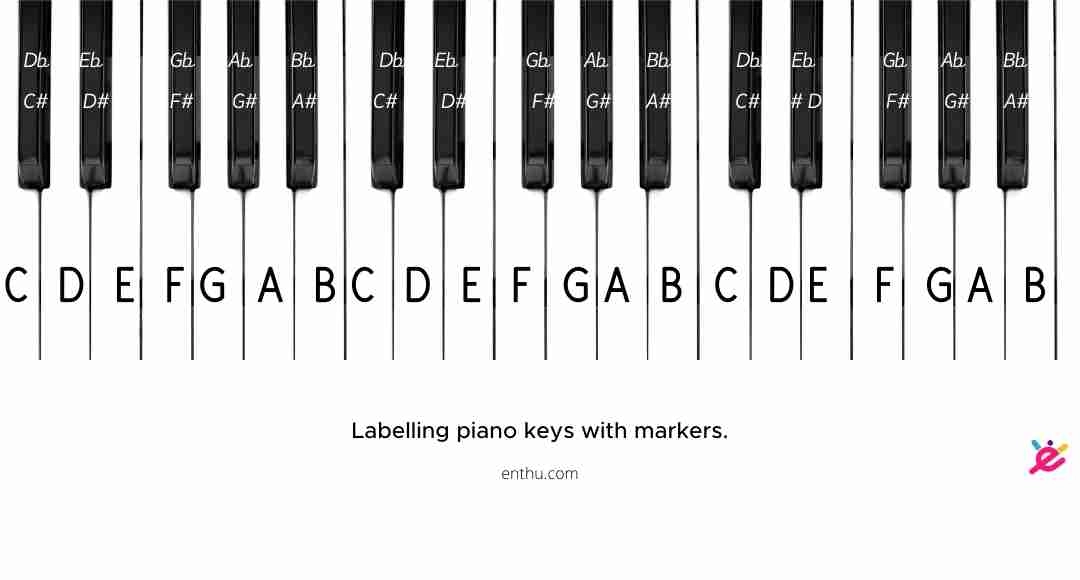
Labeling the black keys: best practices
Black keys can be labeled, but do so sparingly. They are often introduced after white keys.
- Use small markers or dots above the black keys.
- Label groups of two and three to show pattern rather than every black key.
- For color systems, assign a secondary palette so black keys remain distinct.
Labeling black keys can help with chords and sharps. But overlabeling can cause clutter and confusion.

Teaching strategies when you label piano keys
Labels support several teaching methods. Use them creatively.
- Start with pattern recognition
- Show how scales and chords follow shapes on labeled keys.
- Combine reading and listening
- Ask students to play a labeled key and name it by ear.
- Fade labels gradually
- Remove a few labels each week to build reading skills.
When I taught adults, I used labels for two lessons. Then I switched to flash drills. They learned faster than expected once labels were removed.
Removing labels and preventing dependency
Have a clear plan to remove labels. The goal is to read music without aid.
- Set a timeline from day one, such as 4–6 weeks.
- Remove labels by sections: start with middle octaves.
- Replace labels with small mnemonics or fingerings in the music book.
- Encourage sight-reading practice without the keyboard in view.
If a student clings to labels, use timed drills and positive reinforcement. Explain that removing labels is progress.

Troubleshooting and common mistakes
Avoid these pitfalls when you label piano keys.
- Using permanent adhesives that damage keys.
- Mixing systems mid-way, causing confusion.
- Leaving labels on too long and creating dependence.
- Incorrect placement of labels (e.g., wrong octave).
- Overcomplicating black key labels.
I once used color codes that conflicted with a published method. Students got mixed signals. Stick to one clear system to avoid this.

Advanced tips for teachers and parents
Make the most of labeling in a teaching context.
- Create label sets for different ages. Use bright colors for kids and subtle markers for teens.
- Combine labels with apps that reinforce note recognition.
- Keep spares for quick replacement.
- Train parents on the removal timeline and practice tasks.
In group classes, number each keyboard and use matching label sets. This reduces setup time and keeps lessons consistent.
How to label piano keys for different instruments and keyboards
Different keyboards need different approaches. Acoustic pianos, digital pianos, and small keyboards vary.
- Acoustic pianos: Use non-damaging stickers or removable tape.
- Weighted digital pianos: Stickers work well. Test adhesive on plastic.
- Mini keyboards for kids: Colorful dots can make learning fun.
- Keyboard apps: Use on-screen labels and toggles instead of physical stickers.
Always test a small area before applying labels widely, especially on vintage or high-end instruments.
Frequently Asked Questions of how to label piano keys
What is the easiest way to label piano keys for beginners?
Use removable letter stickers placed on white keys near the front edge. They are clear, simple, and easy to remove when the student improves.
How long should labels stay on piano keys?
Keep labels on for a few weeks to a couple of months depending on progress. Remove them gradually as reading improves to avoid dependency.
Can labeling piano keys damage the keys?
Proper removable stickers usually do not damage keys. Avoid permanent adhesives and always test a sticker in a hidden spot first.
Should I label black keys too?
You can, but label black keys sparingly. Marking the two- and three-key groupings helps students learn patterns without clutter.
Are colored labels better than letter labels?
Colors help young children and pattern learners, while letter labels map directly to reading music. Choose based on the learner’s needs.
Conclusion
Labeling piano keys is a practical, low-risk way to speed early learning and build confidence. Choose a clear system, use safe materials, and set a plan to remove labels over time. Start with simple letter stickers or colors, teach patterns, and then fade labels to strengthen note reading skills. Try one method this week, watch how it helps, and remove labels as recognition grows — your next step is to practice consistently and enjoy the progress. Leave a comment about your labeling method or subscribe for more piano teaching tips.


Leave a Reply