
Turn off the piano roll waveform overlay in your DAW by disabling the sample or audio preview option in the piano roll view.
I’ve spent years producing music across FL Studio, Ableton Live, Logic Pro, Cubase, Reaper, and Studio One, and I know how distracting a waveform in the piano roll can be. This guide on how to get rid of waveform in piano roll walks you through why that waveform appears, exact steps for major DAWs, general fixes that work anywhere, troubleshooting tips, and best practices to keep your MIDI editing clean and fast. Read on and you’ll learn practical steps, prevent common mistakes, and get back to composing without visual clutter.
Why the waveform appears in the piano roll and why you might want to remove it
Most DAWs show a waveform in the piano roll when a MIDI channel is linked to a sampler or when an audio preview is enabled. The waveform helps align MIDI note length or velocity to the audio sample. That can be helpful at times, but it often blocks note view, hides velocities, and slows editing.
Removing the waveform improves visual clarity and speeds up editing. It also reduces confusion when you copy and paste or use ghost notes. Knowing how to get rid of waveform in piano roll makes your workflow cleaner and more focused.

General methods to get rid of waveform in piano roll (works across most DAWs)
These steps cover common options you’ll find in most DAWs. Try them first before diving into DAW-specific menus.
- Open the piano roll for the track that shows the waveform.
- Look for a setting labeled show waveform, show sample, audio preview, or sample display and turn it off.
- If the waveform is tied to a sampler channel, open the sampler’s channel settings and disable waveform preview.
- Check the piano roll view menu (often a small gear, eye icon, or drop-down) and uncheck audio waveform or sample display.
- If nothing helps, toggle the track’s instrument to a blank MIDI instrument to see if the waveform disappears.
These steps cover how to get rid of waveform in piano roll in most situations. If it persists, move to the DAW-specific instructions below.

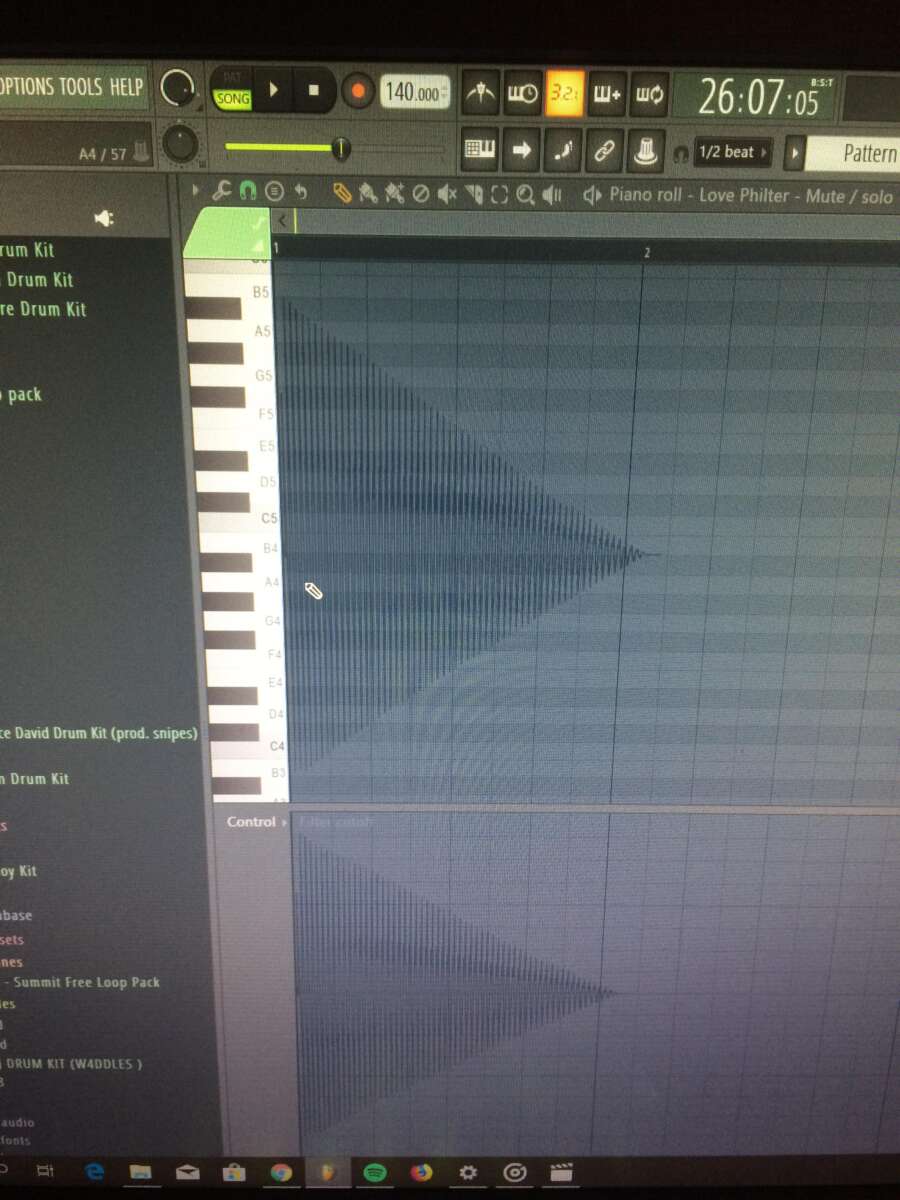
How to get rid of waveform in piano roll in FL Studio
FL Studio often shows a waveform when an Audio Clip is linked or when a Sample Channel is open.
- Open the piano roll for your pattern.
- Click the piano roll menu icon (top-left).
- Go to View and uncheck Show Waveform.
- Alternatively, open the channel settings for the sample and disable waveform preview or use a pure VST plugin instead of a sample channel.
I’ve found unchecking Show Waveform in the piano roll clears clutter fast and helps when editing short transient samples.

How to get rid of waveform in piano roll in Ableton Live
Ableton doesn’t normally show a waveform in the MIDI piano roll unless you’re using an External Instrument or a specific device that shows sample previews.
- Open the Clip View for the MIDI clip.
- If you’re using Simpler or Sampler, open the device and hide the waveform display.
- In the clip box, toggle the Sample Display off or switch to an instrument that doesn’t show the waveform.
- If using audio and MIDI side-by-side, separate the audio clip from the MIDI clip to avoid overlap.
I once left Simpler visible and wondered why notes were hard to edit—hiding the sample view fixed it instantly.
How to get rid of waveform in piano roll in Logic Pro
Logic can show the audio waveform when using the EXS24 (Sampler) or Quick Sampler.
- Open the Piano Roll.
- In the Instrument Channel, open the Sampler and toggle off waveform preview or close the sampler window.
- Check the Piano Roll View menu and disable Show Audio Waveforms if present.
- You can also convert the instrument to a plain software instrument without a sample preview.
Logic’s Quick Sampler window is the usual culprit. Closing it clears the piano roll view quickly.

How to get rid of waveform in piano roll in Cubase
Cubase links sampler instruments and can show waveforms in the Key Editor.
- Open the Key Editor (piano roll).
- Click the Editor Settings or the Editor toolbar icon.
- Uncheck Show Waveform or Show Sample Preview.
- If needed, open the sampler instrument and hide the waveform in its GUI.
Cubase’s editor settings are powerful. I prefer customizing the Editor Toolbar to hide waveform toggles for faster access.

How to get rid of waveform in piano roll in Reaper
Reaper’s MIDI editor can show media items tied to notes when the media is routed.
- Open the MIDI editor.
- Right-click the editor background and open View options.
- Uncheck Show Waveform or Show Source Media.
- Alternatively, open the track’s FX and disable sample displays in the sampler plugin.
Reaper is flexible. If a plugin is drawing the waveform, disable its GUI overlay to keep MIDI clean.

How to get rid of waveform in piano roll in Studio One
Studio One displays sample waveform when using Sample One or Presence XT.
- Open the piano roll (editor).
- Click the View menu in the editor.
- Disable Show Sample or Show Waveform.
- Close the sampler window or switch to a plain instrument.
Studio One’s editor view is straightforward. I disable sample previews by habit to stay focused.
Troubleshooting if the waveform can’t be removed
If the waveform persists, try these troubleshooting steps.
- Restart the DAW to clear cached visuals.
- Update your DAW; some versions had persistent waveform bugs that were fixed.
- Disable third-party plugins temporarily to isolate the issue.
- Check track routing; an audio clip placed on the same track can force a waveform display.
- Reset the piano roll/editor view to defaults in your DAW preferences.
When I had a stubborn waveform, updating the DAW fixed it. If not, a fresh project can reveal if the issue is project-specific.
Best practices to avoid waveform clutter in the piano roll
Adopt these workflows to keep the piano roll clean long term.
- Use pure MIDI instruments for composing and switch to samplers only for final sound design.
- Turn off audio previews by default in your DAW preferences.
- Create a clean editing template with waveform display off.
- Use separate tracks for audio and MIDI to prevent accidental overlays.
- Learn your DAW’s view toggles so you can switch views quickly.
These habits save time and keep the piano roll focused on note editing.
Personal tips and common mistakes I’ve made
I used to leave samplers open while composing. That added visual noise and slowed me down. Now I:
- Start with a silent instrument.
- Only open samplers when I need sample editing.
- Keep a template with waveform toggles off.
A common mistake is changing the wrong channel (pattern vs. sample channel) and thinking the DAW is broken. Always check the sampler plugin itself.
Frequently Asked Questions of how to get rid of waveform in piano roll
How do I hide the waveform in the piano roll of my DAW?
Open the piano roll view. Look for View or Preferences and uncheck Show Waveform, Show Sample, or Audio Preview. If needed, close the sampler plugin.
Why does the waveform show up in the piano roll?
It appears when a sampler or audio clip is linked to the MIDI track or when audio preview is enabled. DAWs show it for alignment and visual reference.
Will hiding the waveform affect my audio or MIDI playback?
No. Hiding the waveform only changes the visual display. Audio and MIDI playback remain the same.
I disabled the waveform but it returned—what happened?
Some DAWs will re-enable waveform if you open the sampler or load an audio clip on the same track. Save your template with waveform disabled to prevent this.
Can I remove the waveform for a single track only?
Yes. Most DAWs let you change editor view per track or per instrument. Open that track’s piano roll and toggle the waveform setting for that track only.
Conclusion
Removing the waveform from the piano roll is usually a quick settings change, and it can dramatically speed up your MIDI editing. Try disabling Show Waveform or Sample Display in your piano roll and sampler plugin, update your DAW if needed, and build a clean template that keeps previews off. Take one small step now: open your piano roll, find the view menu, and turn the waveform off—your next session will feel cleaner and faster. If this article helped, leave a comment, share your DAW tips, or subscribe for more hands-on workflow advice.

Senior Music Reviewer
Alex Carter is a seasoned music reviewer with over a decade of experience in the world of sound and instruments. Passionate about helping musicians and enthusiasts make informed choices, he brings sharp insights and in-depth knowledge to every review. From classical instruments to modern gear, Alex combines technical expertise with a love for music to deliver content that resonates with readers.
As a Senior Music Reviewer and expert author on Tuneluma.com, Alex is dedicated to sharing honest evaluations, practical advice, and thoughtful commentary to guide readers in their musical journey.
Leave a Reply